 Back
VST Plugins Explained: Formats, Installing Plugins and Using Them in Your DAW
A plugin is a small program that adds one instrument or one effect to the music software you already use, your DAW (digital audio workstation). Install a free synthesizer, and it shows up next to the built-in instruments. This guide starts Tissimo's plugin series: what the format names on a download page mean (VST, VST3, AU, AAX, CLAP), how to install plugins so your DAW finds them, where a plugin goes in a mix, the controls almost every plugin shares, and five good habits. Every plugin window here is a real screenshot of the version current in November 2026.
What a plugin is
Your DAW is the host: it records, plays, mixes and saves. A plugin runs inside it and does one job. There are two main kinds:
- Instruments turn MIDI notes into sound: synthesizers, samplers, pianos. If MIDI is new to you, start with MIDI explained.
- Effects take audio in and send changed audio out: EQ, compression, reverb, delay, saturation.
Ableton's Live 12 manual puts it plainly: plugin instruments go on MIDI tracks, effects on audio tracks or after an instrument.
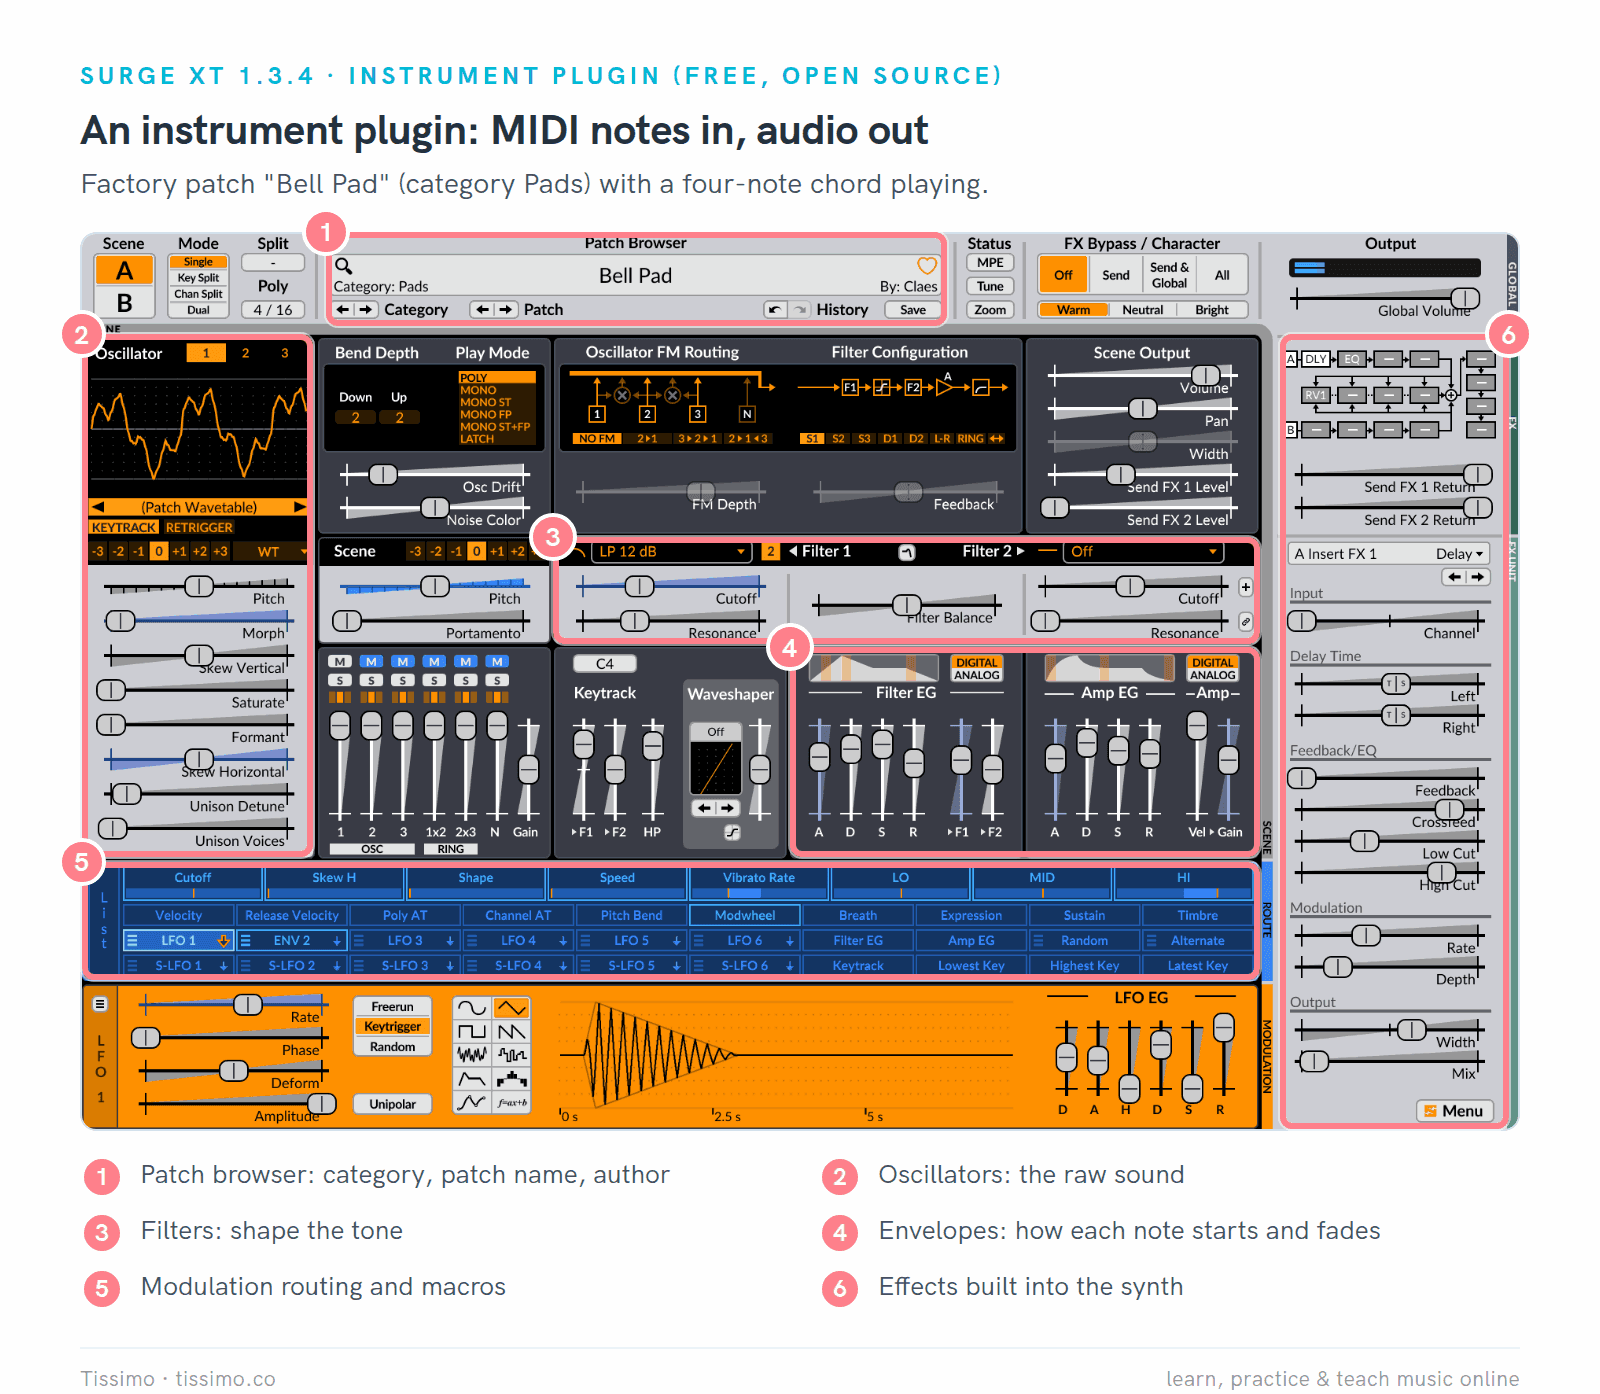
An instrument plugin: Surge XT 1.3.4 with the factory patch "Bell Pad" (category Pads, by Claes) playing a four-note chord. The voice counter reads 4 / 16.
Surge XT is a free, open-source synthesizer (GPL-3.0 license) for Windows, macOS and Linux. It reads like most synths: oscillators make the raw tone, filters shape it, and envelopes decide how each note starts and fades. Synthesizer Basics explains those parts one at a time.
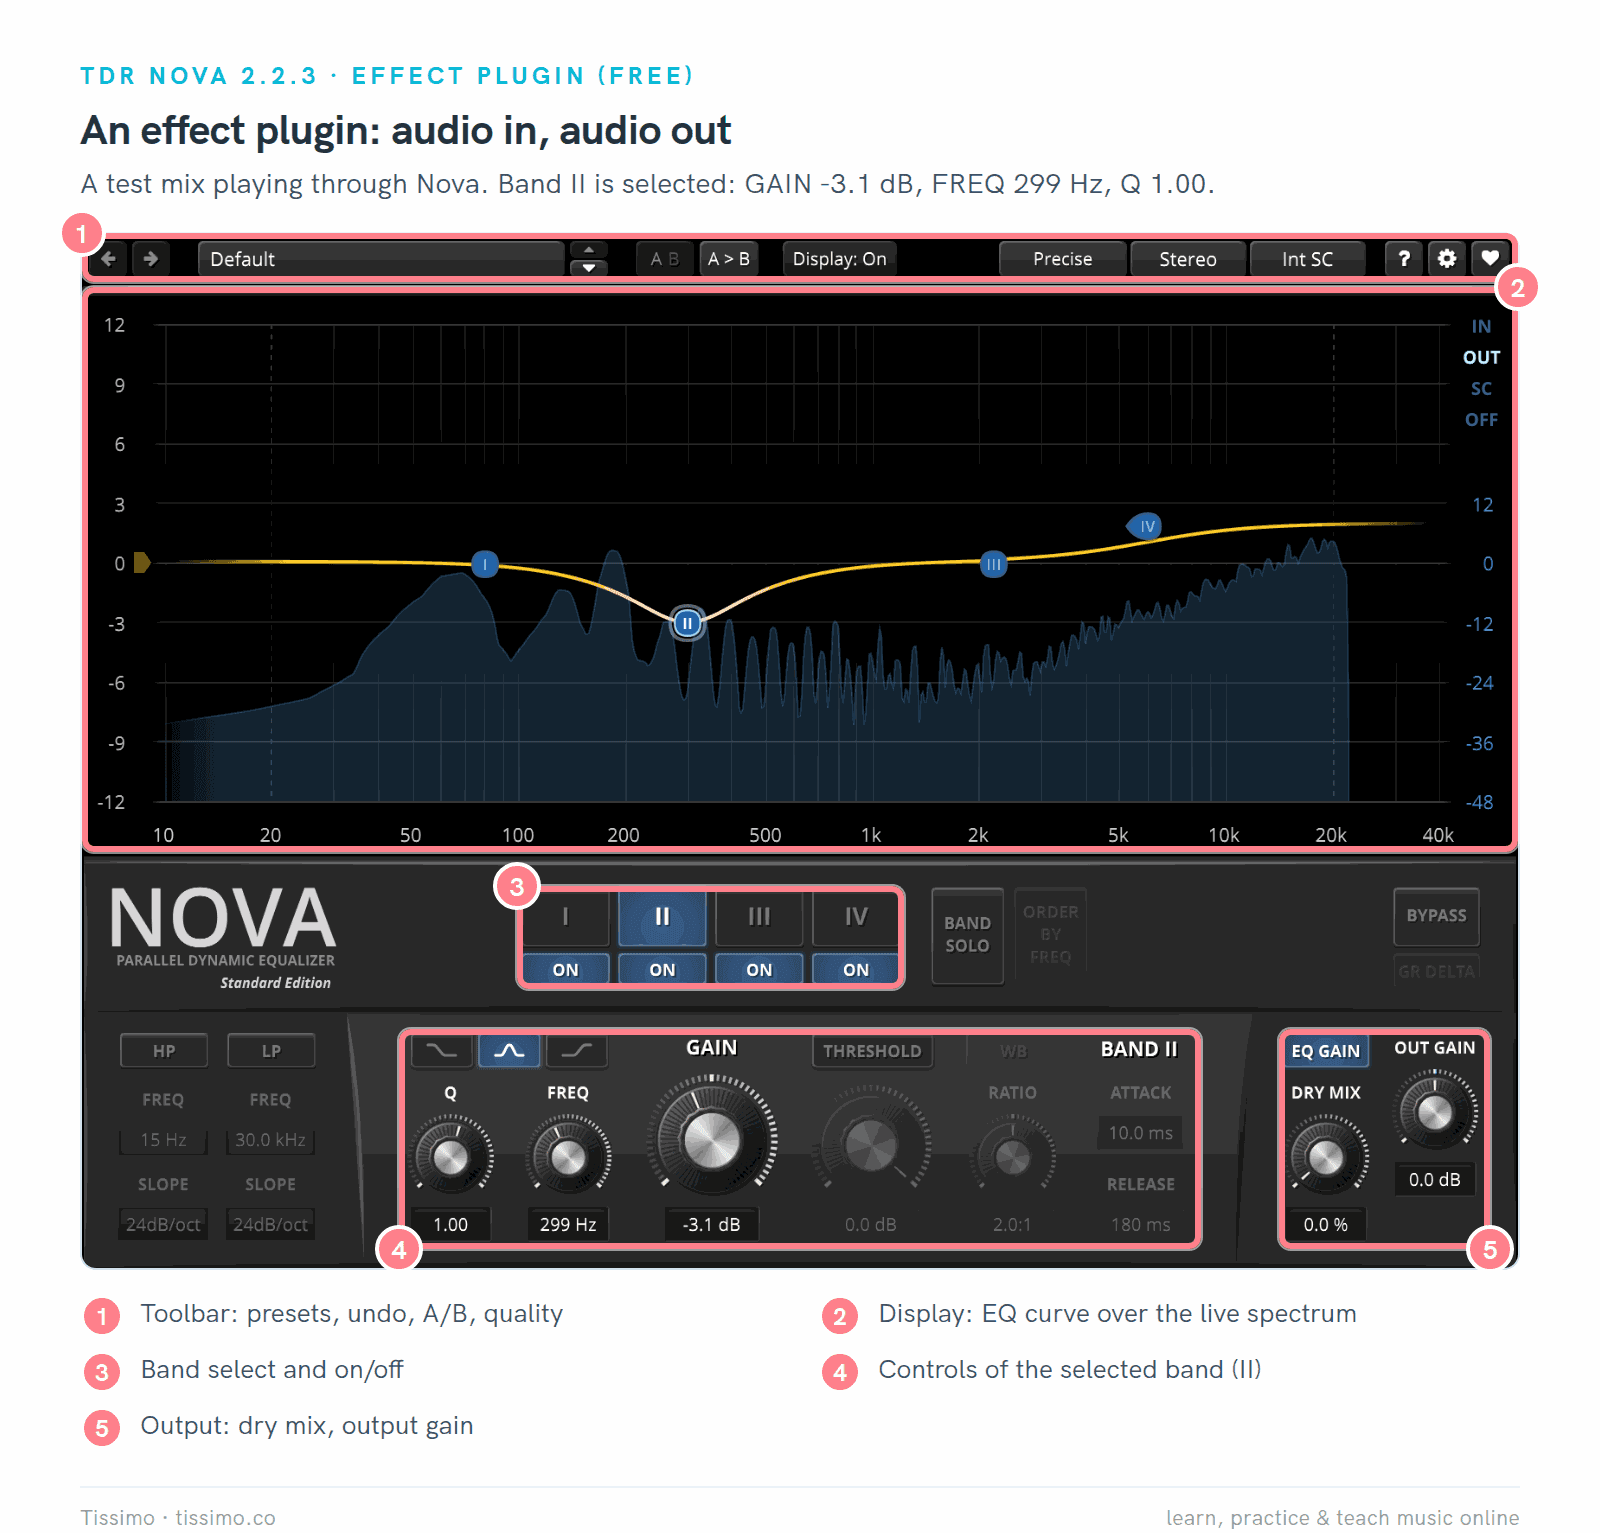
An effect plugin: TDR Nova 2.2.3, free from Tokyo Dawn Labs, with a test mix playing through it. Band II is cut by 3.1 dB at 299 Hz (GAIN reads -3.1 dB); the analyzer is set to OUT, so the shaded spectrum shows the sound after the EQ.
In Nova the yellow line is the EQ curve and the shaded shape is the music. Many effects can also process only part of a stereo signal: Nova's Stereo button offers Left, Right, Sum (the middle) and Diff (the sides), plus a Mono mode, according to its manual.
Plugin formats: VST, VST3, AU, AAX and CLAP
A plugin format is the agreement between a plugin and its host. Each DAW understands only some formats, so developers ship the same plugin in several; FabFilter offers all its plugins as VST, VST3, Audio Units, CLAP and AAX.
- VST and VST3. Steinberg's Virtual Studio Technology. Plain "VST" on a download page usually means the older VST2 (also written VST 2.4), and "VSTi" means a VST instrument. VST3 is the current version, and Steinberg has published it as open source (MIT license) since version 3.8 in October 2025. Only developers who signed a VST2 license before October 2018 may still distribute VST2, and Cubase 14 and later switch VST2 off by default.
- AU (Audio Units). Apple's format: on computers, macOS only. Logic Pro and GarageBand use Audio Units for third-party plugins; Live and FL Studio also load AU on a Mac.
- AAX. Avid's format for Pro Tools, which cannot load VST, VST3 or AU plugins.
- CLAP (CLever Audio Plug-in). An open-source format (MIT license) started by Bitwig and u-he; version 1.0 came out in June 2022. Bitwig Studio, REAPER and FL Studio (since 2024.1) host it.
- LV2. An open standard for audio plugins; REAPER loads it on Windows, macOS and Linux.
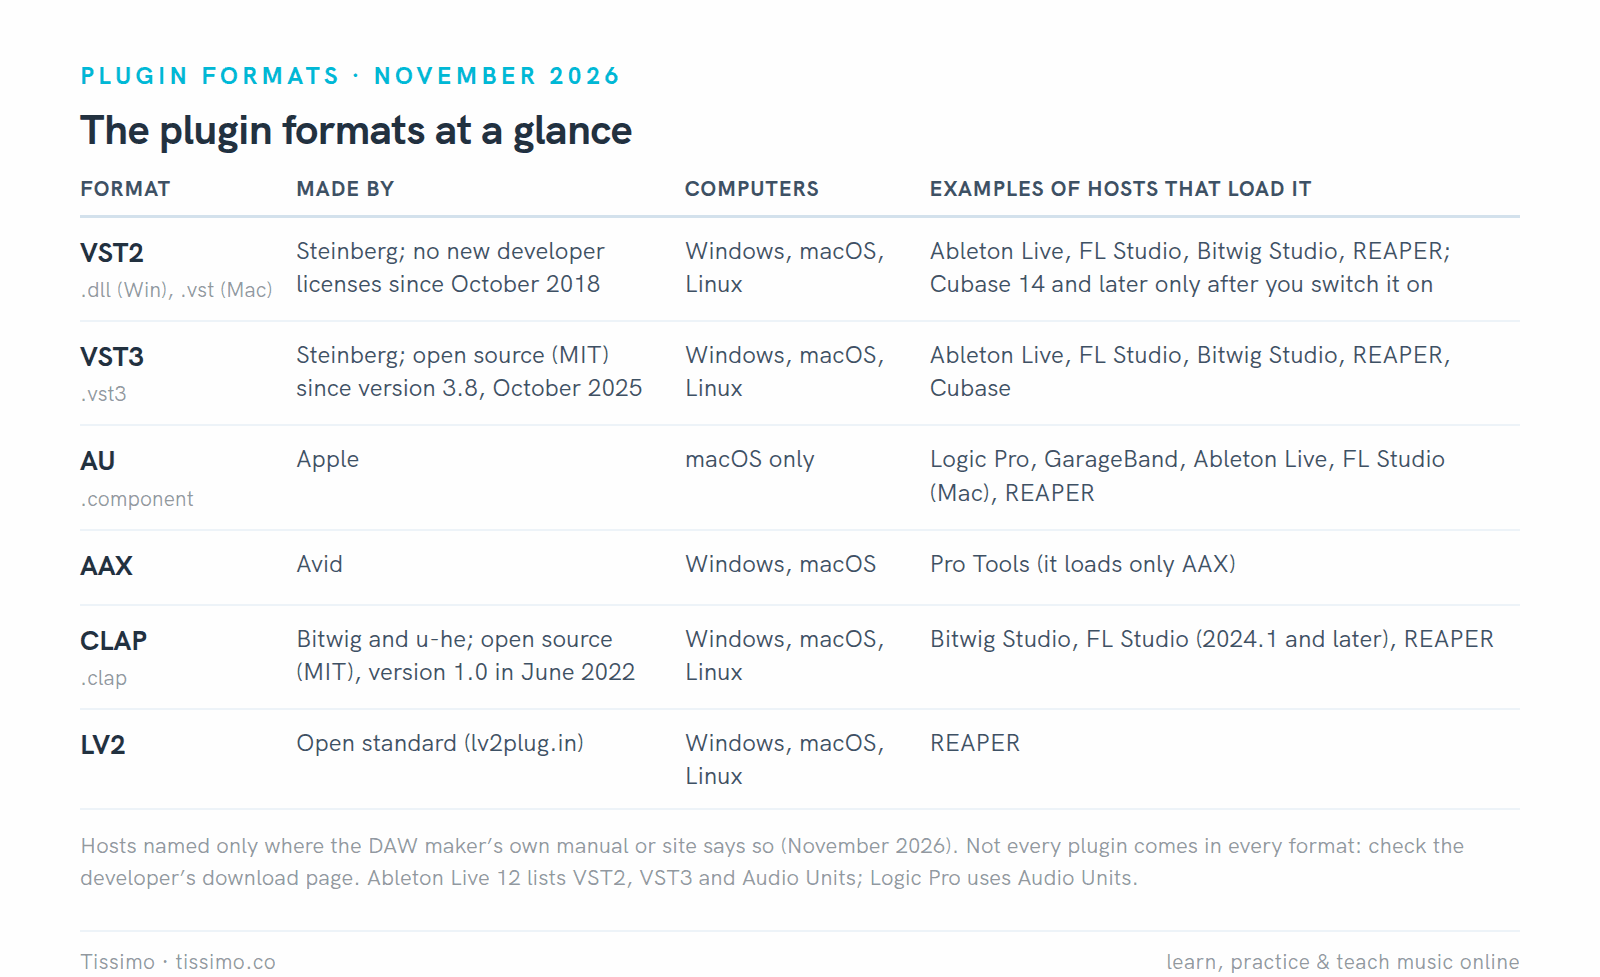
The formats at a glance, as of November 2026. A host is listed only where its maker's manual or site says it loads that format.
Which one should you install? Ableton calls the choice between AU, VST2 and VST3 in Live a matter of preference, with two rules: use one format for every copy of a plugin in a project, and use VST (VST2 or VST3) if you share projects between Mac and Windows. Image-Line agrees about sharing (use the VST versions for projects that go to Windows users) and goes a step further for FL Studio on a Mac: it recommends the VST version of a plugin over the AU version whenever both exist.
You may also see "32-bit" or "64-bit". Live has loaded only 64-bit plugins since Live 10. FL Studio itself has been 64-bit only since 20.9; on Windows it can still bridge old 32-bit plugins, but on a Mac it cannot. The number says how much memory a plugin can use and, in Image-Line's words, "has nothing to do with audio quality" (it is not the 16- or 24-bit depth of your audio). Download the 64-bit version.
Installing plugins and making your DAW find them
Run the developer's installer and keep its default folders, as Image-Line recommends. If you copy files by hand, use the standard places:
- Windows: C:\Program Files\Common Files\VST3 for VST3 and C:\Program Files\Common Files\CLAP for CLAP. VST2 has no single standard; Ableton calls C:\Program Files\Common Files\VST2 a safe choice.
- macOS: /Library/Audio/Plug-Ins/, with subfolders Components (AU), VST, VST3 and CLAP.
Ableton's Windows guide adds three rules: keep VST2 and VST3 in separate folders, put nothing but plugins in them, and never install into a DAW's program folder.
Ableton Live 12
- Open Settings with Ctrl+, (Windows) or Cmd+, (Mac) and choose Plug-Ins.
- Under Plug-In Sources, turn on the VST3 system folder (on Windows the switch is Use VST3 Plug-In System Folder). For VST2 on Windows, click Browse, pick your VST2 folder and set Use VST Plug-In Custom Folder to On. On a Mac, turn on Use Audio Units and the VST system folders you need.
- Live scans; the plugins appear under Plug-Ins in the browser, instruments with a keyboard icon.
- Installed something while Live was open? Click Rescan. Alt-click (Option-click on a Mac) Rescan for a clean scan.
If a heavy plugin makes the audio crackle, see Fix Latency, Crackles and Bad Exports in Ableton Live 12.
FL Studio
Open the Plugin Manager (in FL Studio 2026: Options > Manage plugins), switch on Verify plugins and click Find installed plugins. Verifying sorts plugins into Effects and Generators (Image-Line's word for instruments). After an update, scan with Rescan previously verified plugins. New plugins appear in the browser under Plugin database > Installed; mark one as a favorite to add it to the plugin menus.
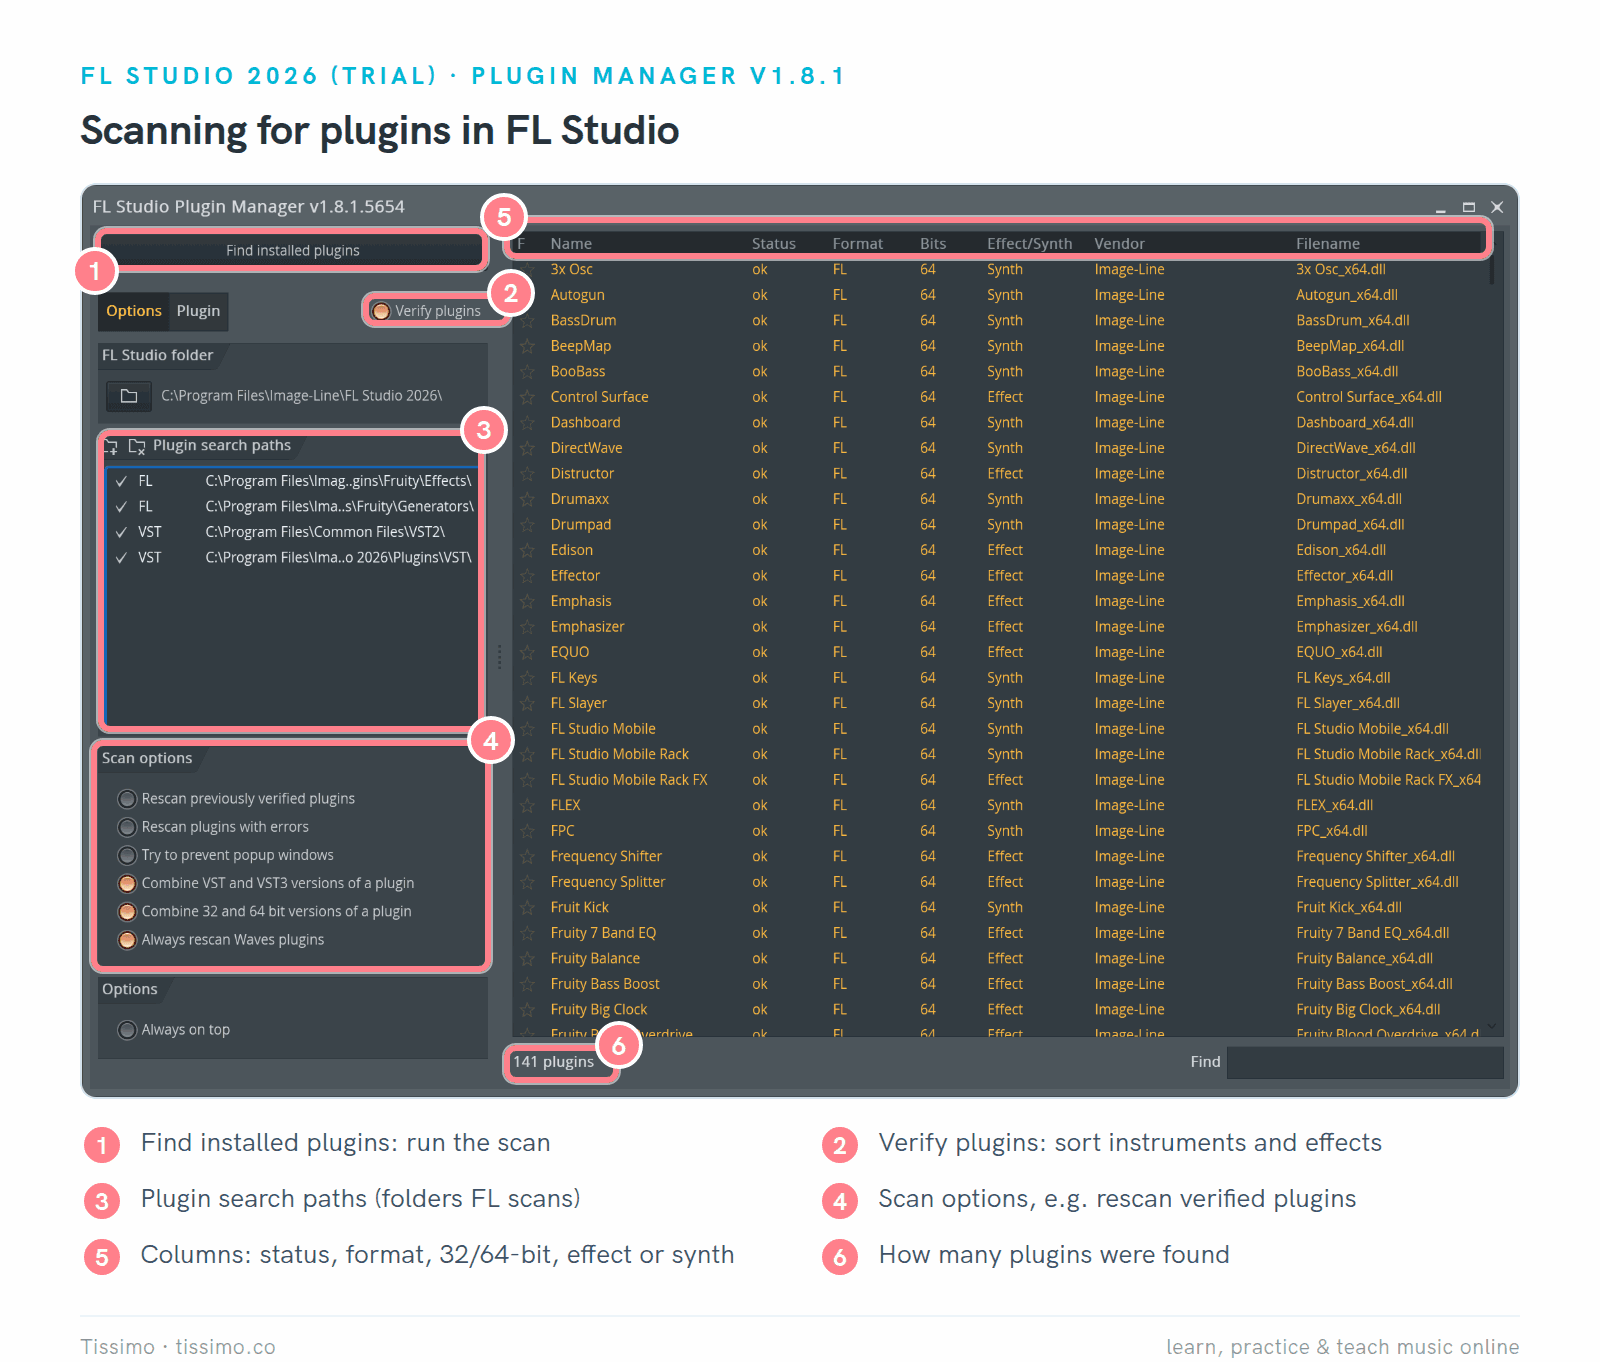
The FL Studio 2026 Plugin Manager (trial version) after a scan. Every row lists the plugin's status, format, 32- or 64-bit build and type. The rows shown are FL Studio's own plugins (format FL); VST, VST3 and CLAP plugins appear in the same list.
Logic Pro (and GarageBand)
Apple's Logic Pro guide describes third-party plugins only as Audio Units: classic AU plugins in Library/Audio/Plug-Ins/Components, Audio Unit Extensions (AUv3) in the Applications folder. Choose Logic Pro > Settings > Plug-in Manager: the Compatibility column shows a checkmark or "not compatible", and Reset & Rescan Selection rescans and activates the selected plugins. In GarageBand, select Enable Audio Units in GarageBand > Settings > Audio/MIDI.
When a plugin does not show up
- Check the format: Logic loads Audio Units, so a plugin installed only as VST will not appear there, and Pro Tools shows only AAX.
- Check the build and folder: 64-bit, in its format's standard folder. On an Apple silicon Mac, Live running natively sees only VST plugins built for Apple silicon.
- Rescan, or restart the DAW.
- Authorize the plugin if required, or reinstall it.
- If a plugin crashes the scan, Live may offer to make it unavailable; holding Alt or Option while Live starts skips scanning.
Where a plugin goes: insert, send or master
- Insert: the whole signal of the track runs through the plugin. Put EQ, compression and saturation here. Several inserts process one after another, in the order they are listed.
- Send and return: each track sends a copy, at a level you set, to a return track that holds the effect, so one reverb can serve several tracks. Sound On Sound's Paul White calls reverb the most common send effect. On a return track the plugin's mix belongs at 100 percent wet, because the dry sound still reaches the mix through the track itself.
- Master: a plugin on the master track (Live calls it the Main track) processes the whole mix, for example a limiter at the very end.
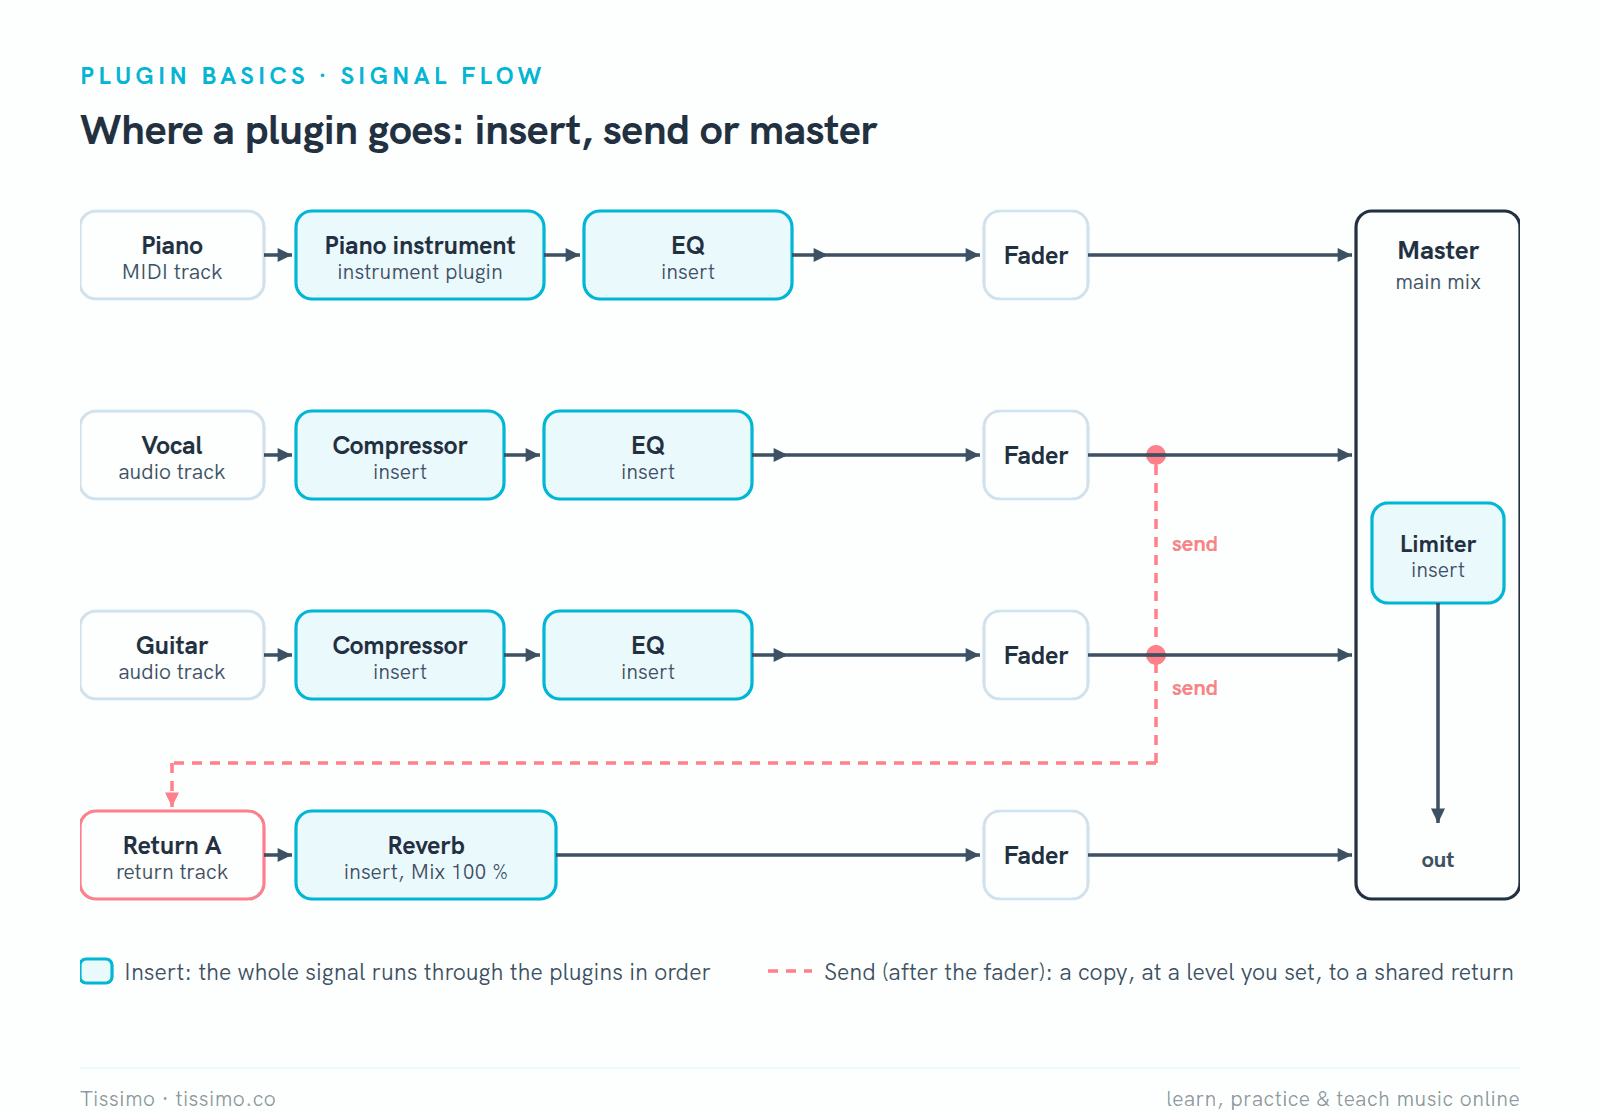
Inserts process one track in order; sends share one effect between tracks; the master processes everything.
In FL Studio, the selected track's insert slots are listed on the right of the mixer.
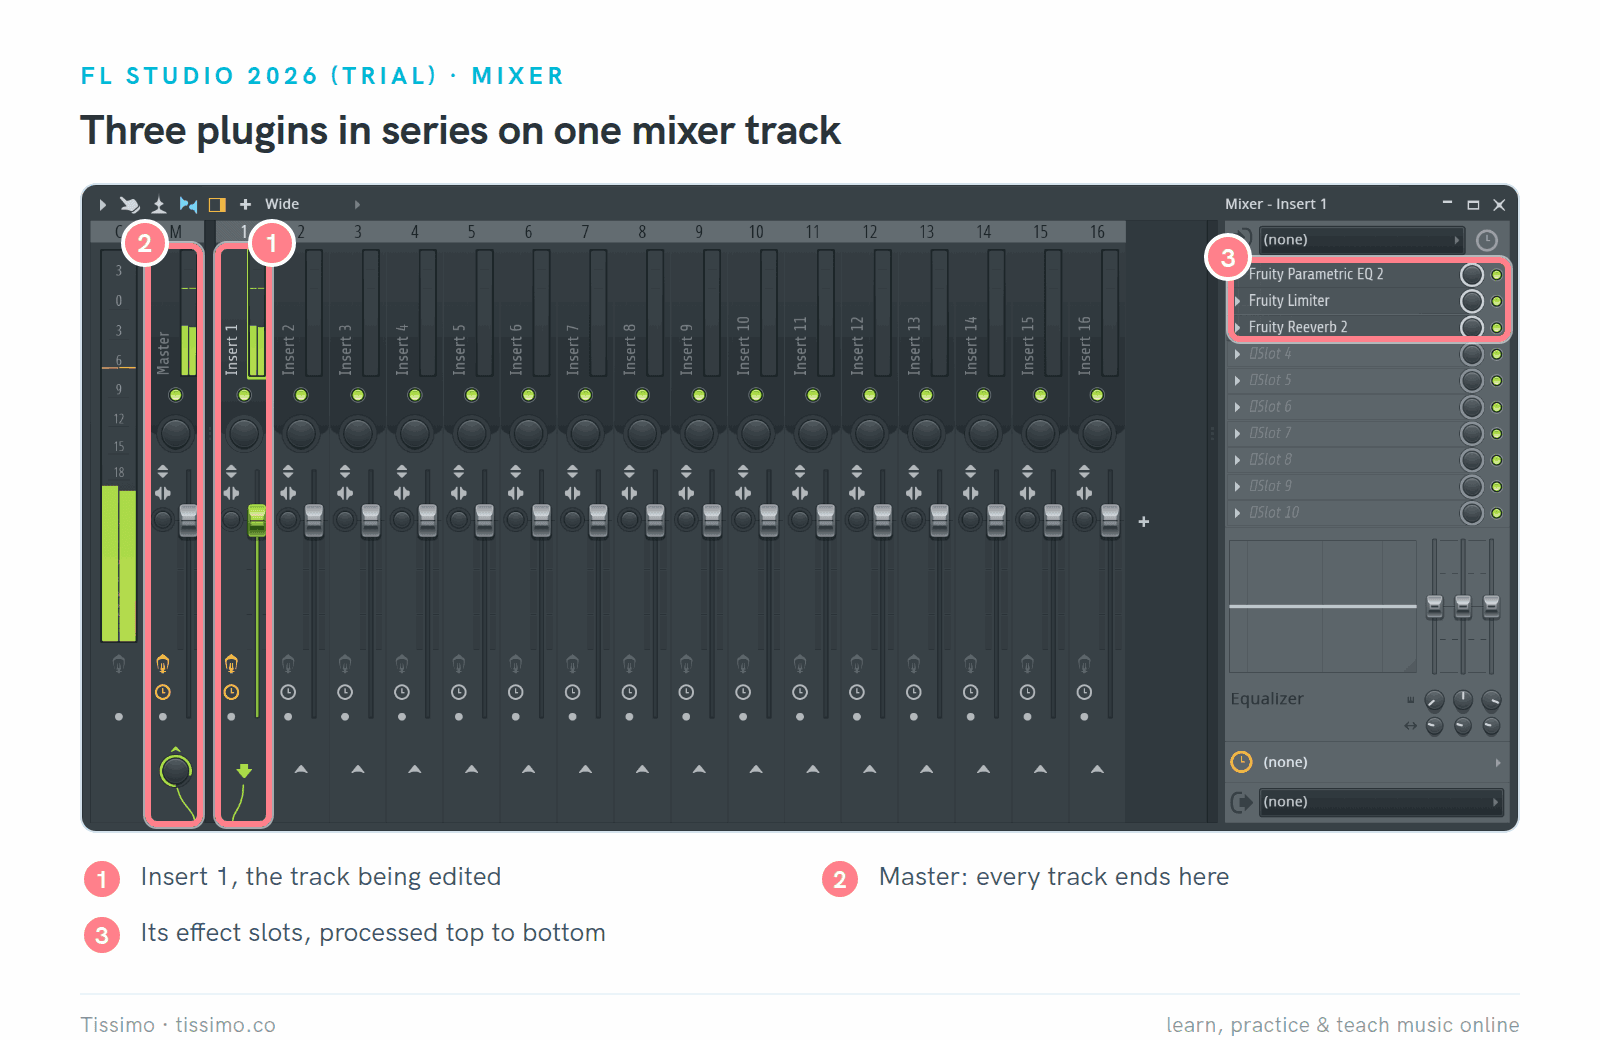
Three inserts in series on one FL Studio mixer track: EQ, then limiter, then reverb, processed top to bottom (the order shows the slots, not a recommended chain).
The controls almost every plugin shares
Most plugin windows share a set of controls. In TDR Nova most of them sit in the toolbar and the output section.
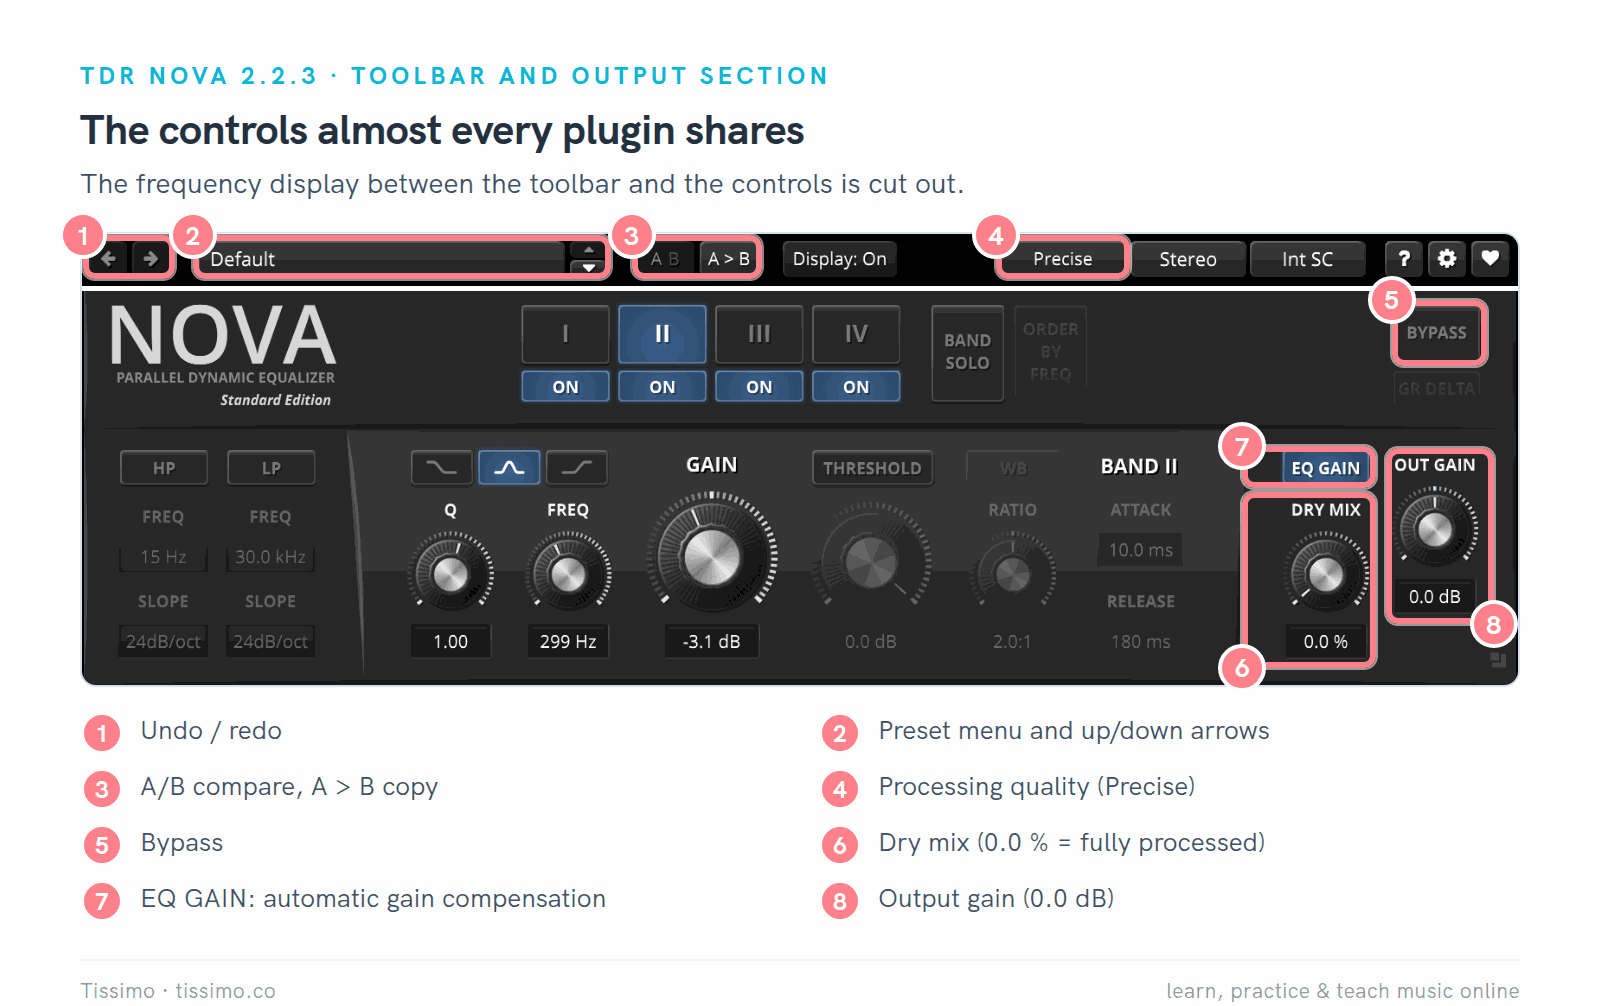
The shared controls in TDR Nova 2.2.3. The frequency display between the toolbar and the controls is cut out.
- Undo and redo (1): step back and forward through your changes inside the plugin.
- Presets (2): a menu of saved settings, usually with arrows to step through them.
- A/B compare (3): two settings to switch between. Nova's A > B copies A into B, so you can try a change and go back.
- Quality (4): Nova offers Eco, Precise and Precise+ processing.
- Bypass (5): hear the track without the plugin. Nova's manual calls this button EL BYPASS (equal-loudness bypass): click-free, and compensated for latency and loudness.
- Mix, or dry/wet (6): blends the processed signal with the original. On Nova it is called DRY MIX and works backwards: 0.0 % means fully processed.
- Output gain (7, 8): sets the level leaving the plugin so you can match it to the level going in. Nova's OUT GAIN has a circular meter showing the setting for equal perceived loudness; EQ GAIN compensates static EQ changes automatically.
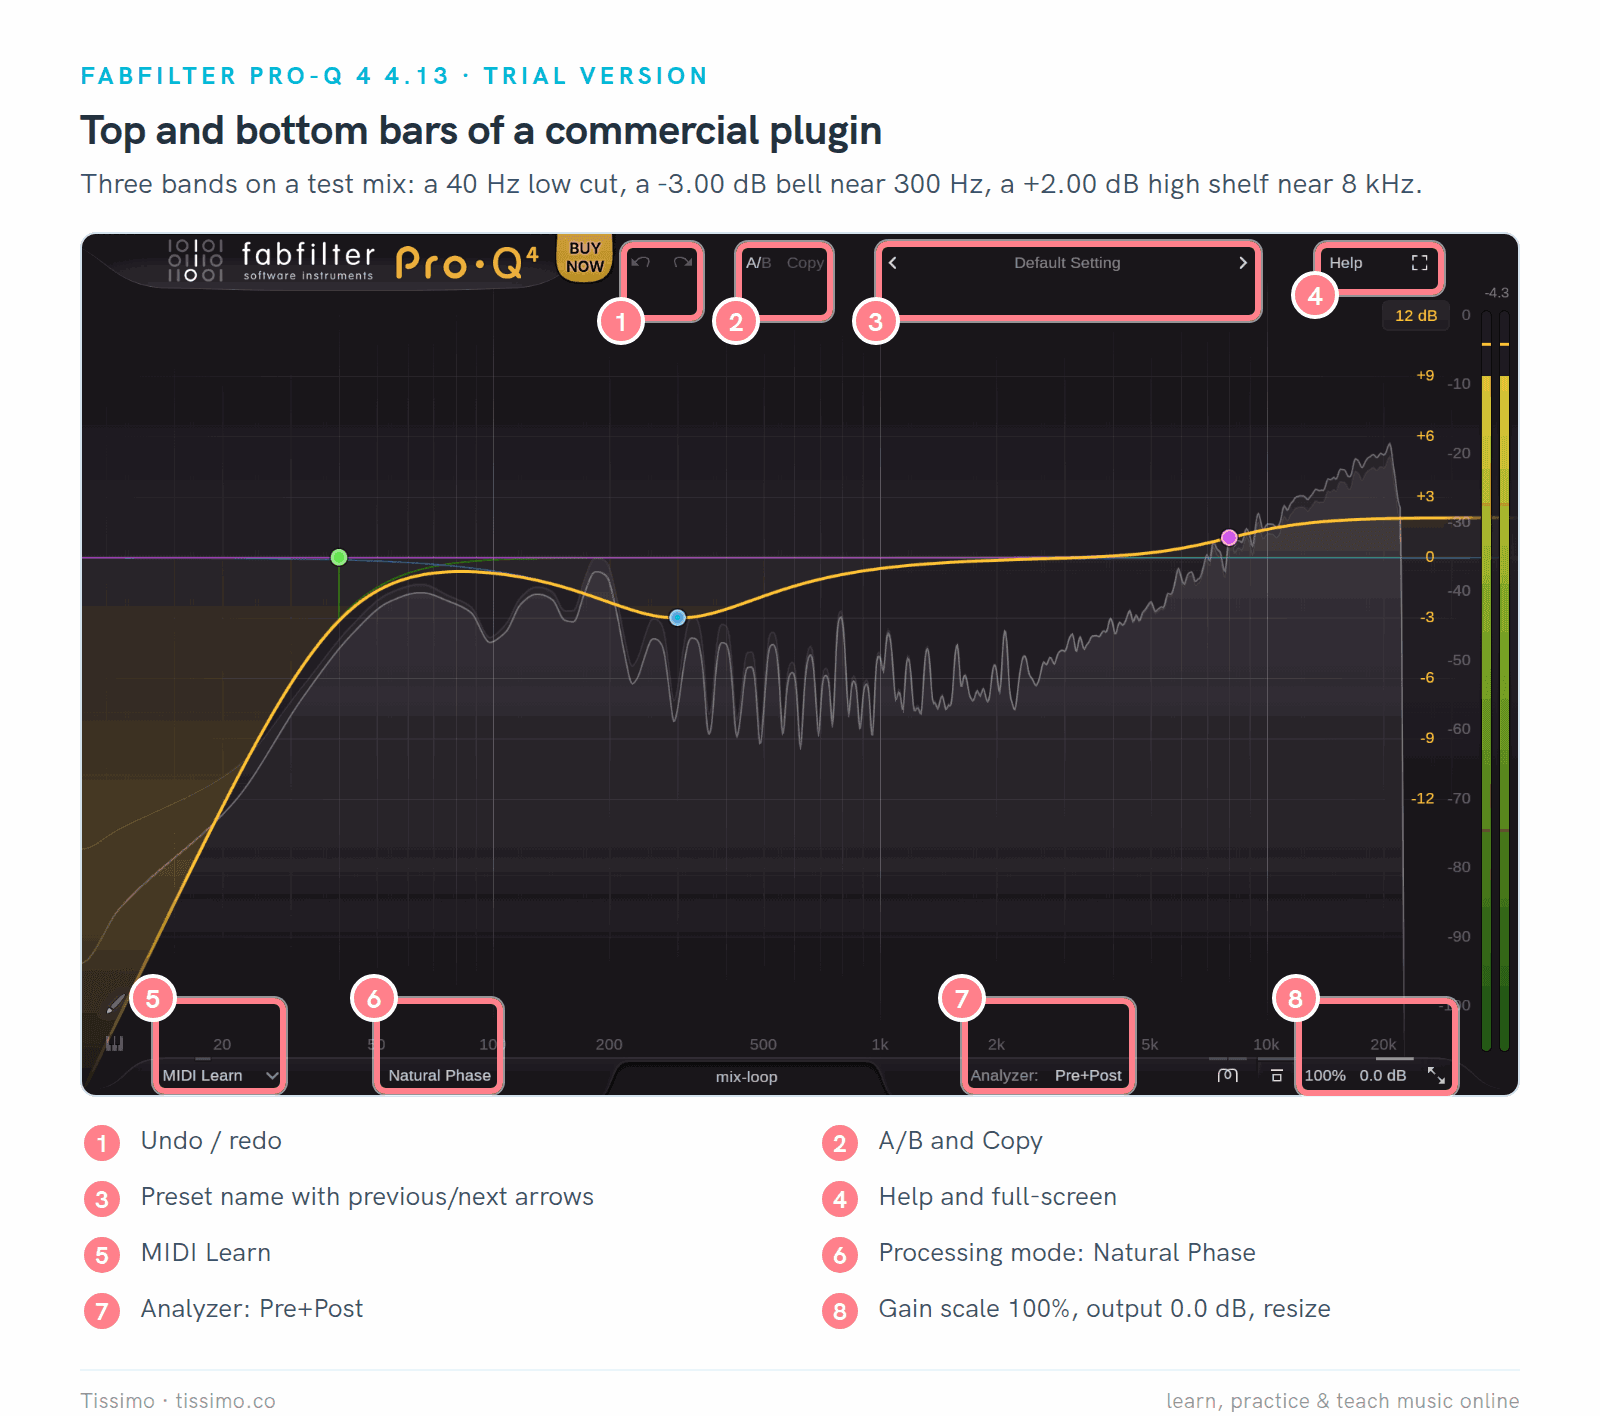
A commercial plugin, FabFilter Pro-Q 4 (version 4.13) in its trial version, puts the same controls in two thin bars. The bottom bar adds MIDI Learn, the processing mode and the analyzer.
Pro-Q 4's Copy button copies the active A/B state to the inactive one.
Step through the factory presets to hear what a plugin can do, then turn the knobs of one you like and listen.
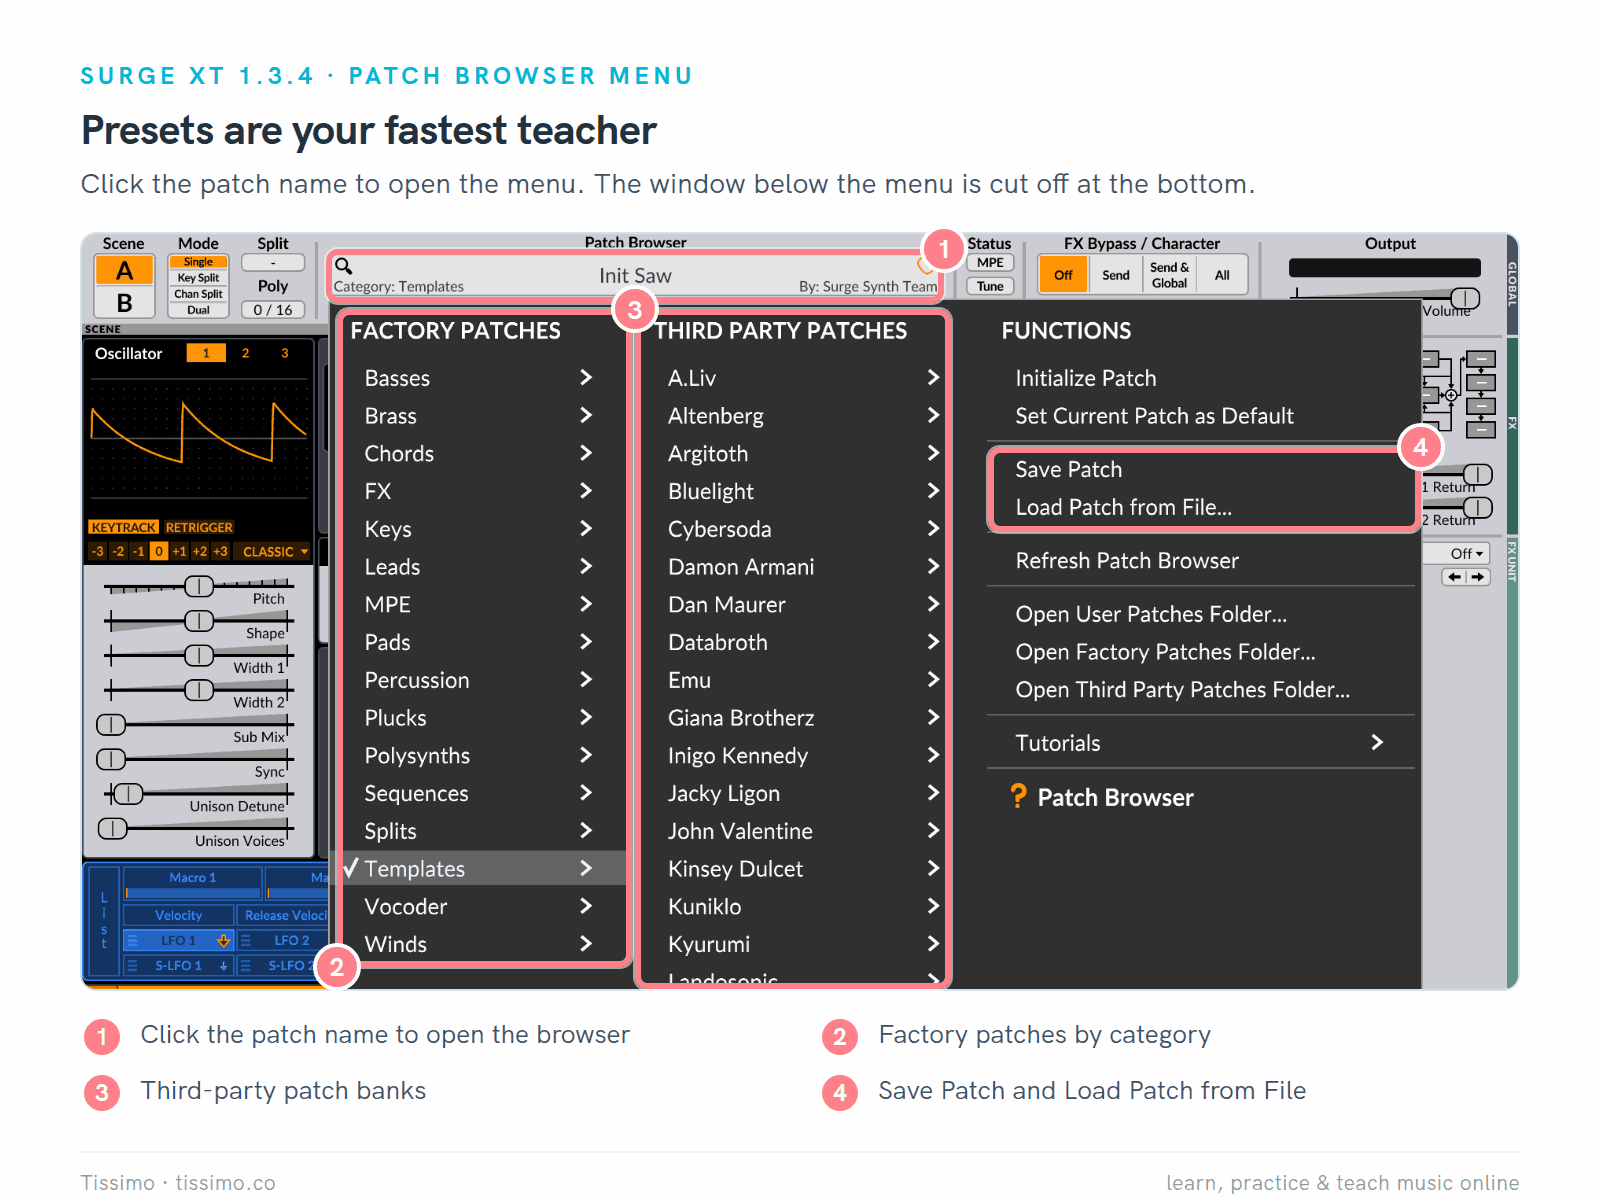
Surge XT's patch menu opens when you click the patch name. The window below the menu is cut off at the bottom.
The mix control sets how much effect you hear: to taste on an insert (often just a little for reverb and delay), 100 percent on a send.
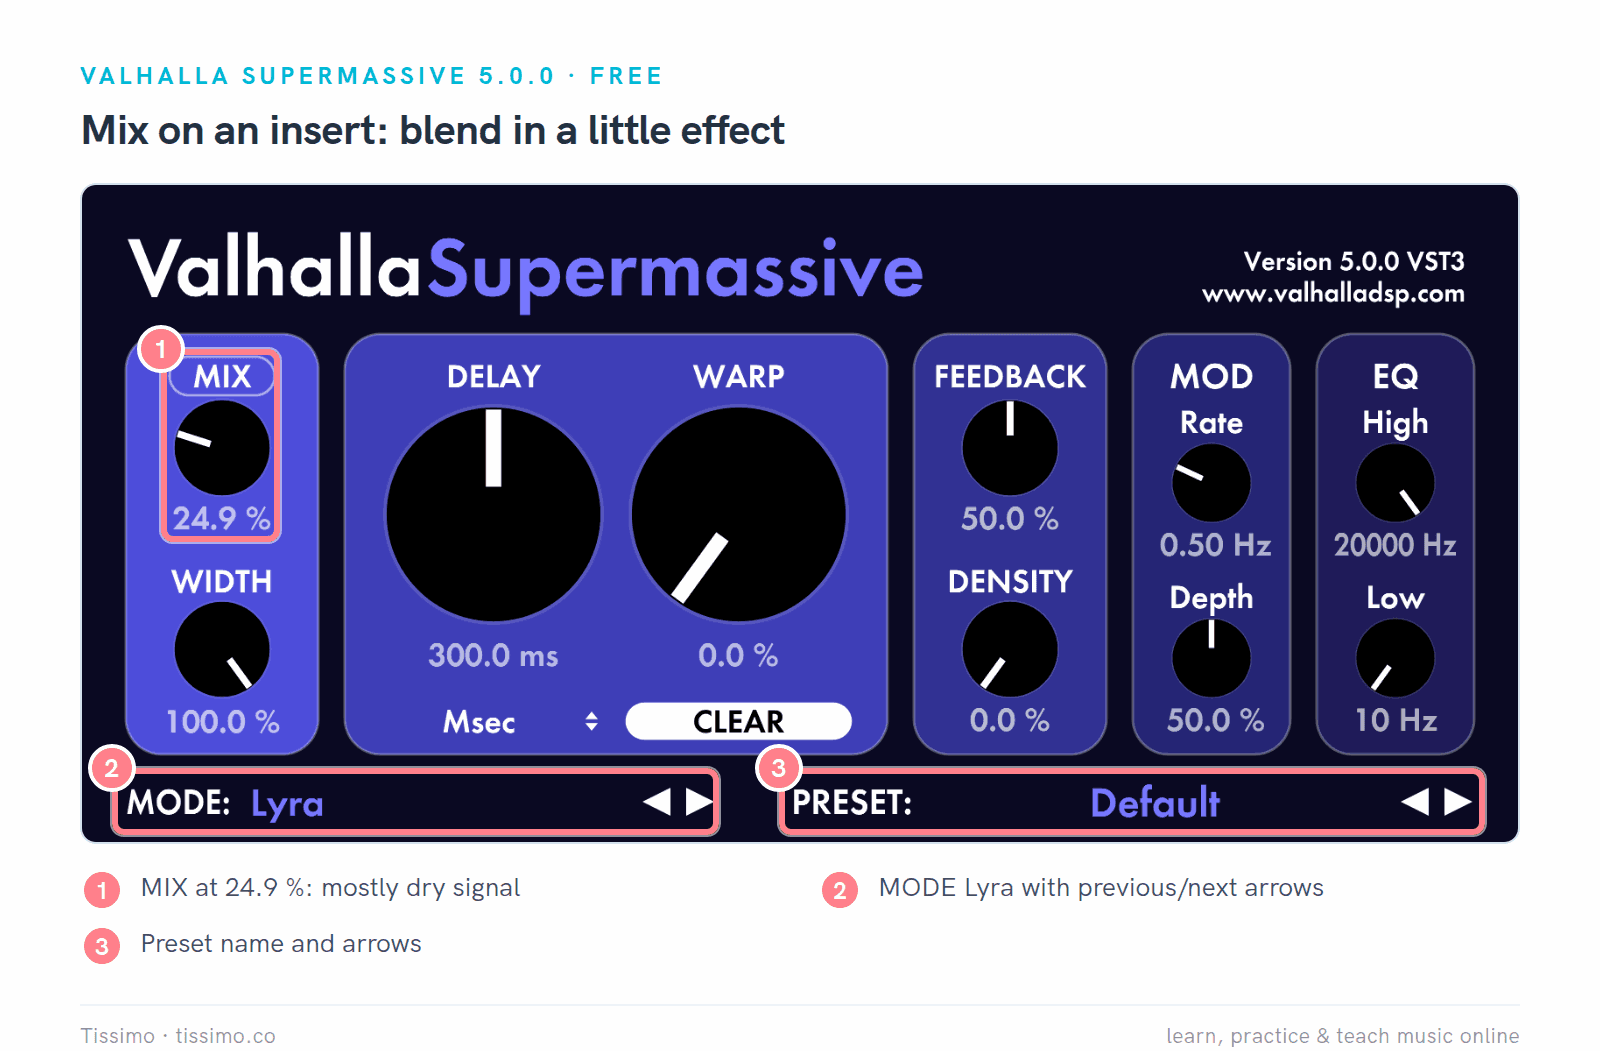
Valhalla Supermassive 5.0.0 on an insert: MIX at 24.9 % keeps most of the dry signal.
Supermassive is a free reverb and delay from Valhalla DSP with 22 modes, chosen with the arrows next to MODE. Click its MIX label to lock the mix, and the value stays put while you browse presets.
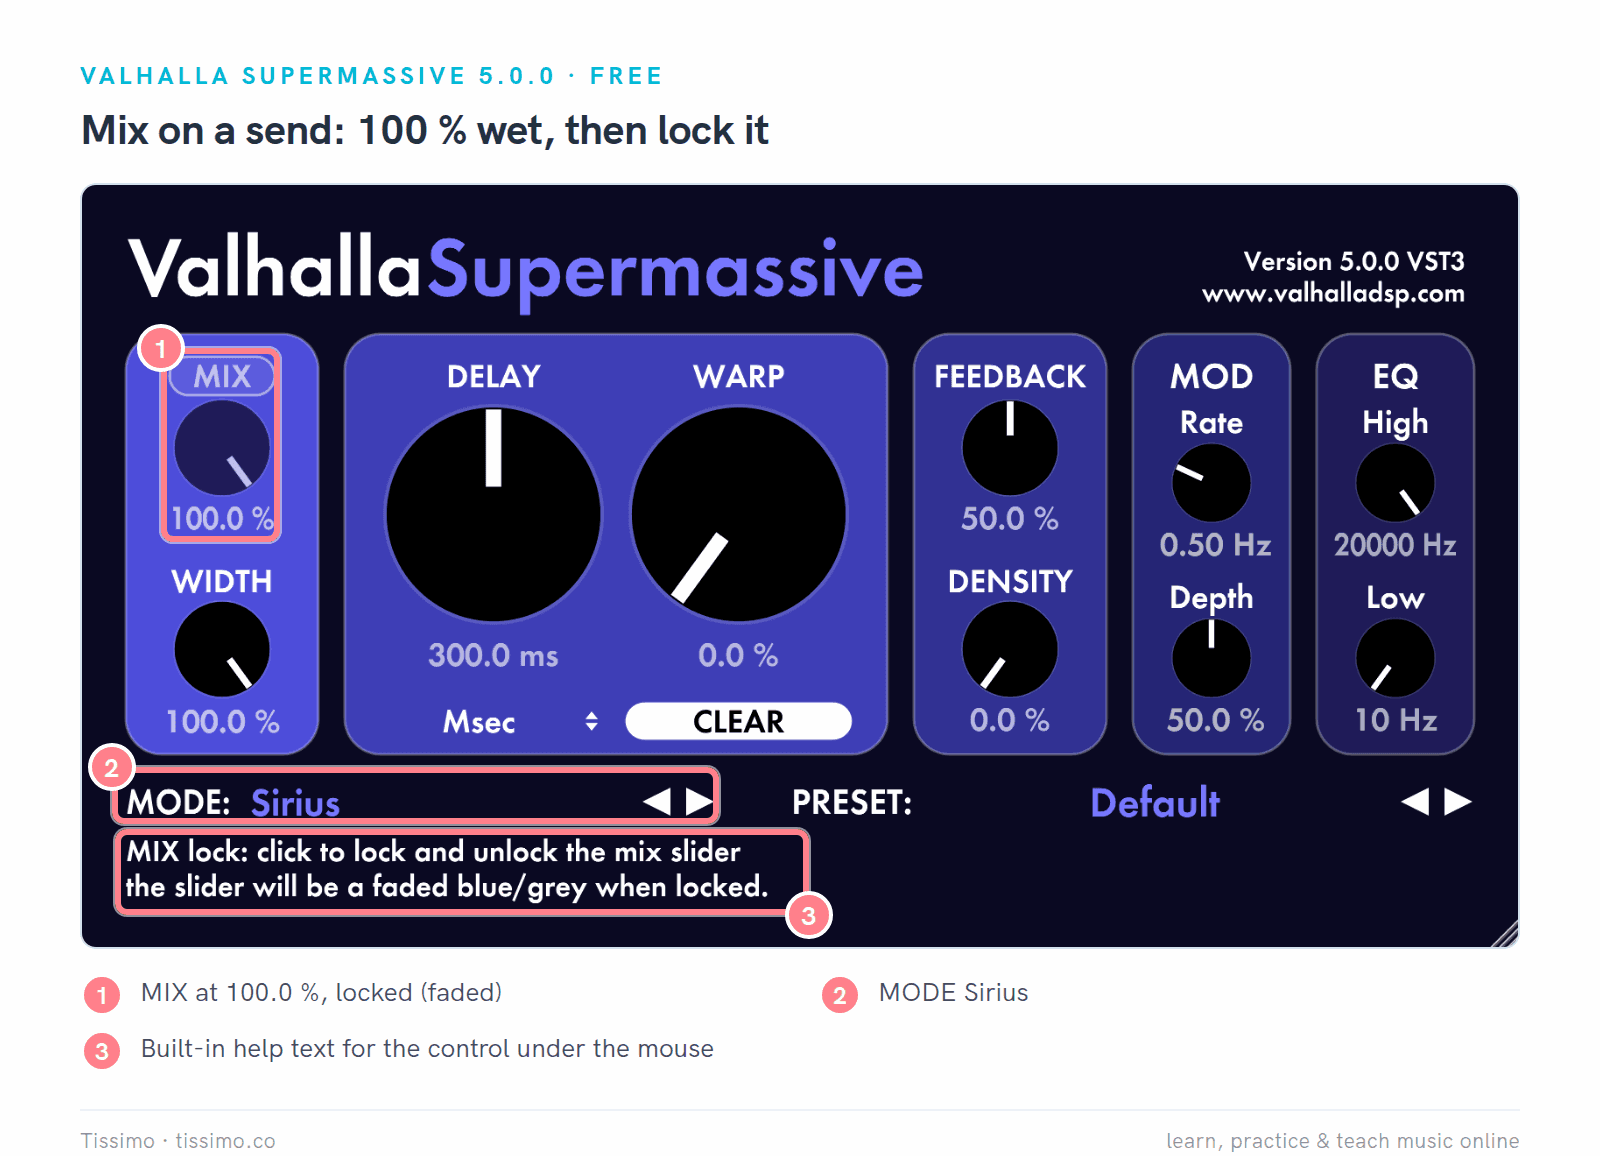
The same plugin set up for a return track: MIX at 100.0 %, locked (the faded knob), with mode Sirius. The help line at the bottom describes whatever control is under the mouse.
Many quality settings control oversampling: the plugin runs its processing at a higher sample rate internally. ChowTapeModel's manual says more oversampling gives "a higher quality sound with fewer aliasing artifacts" but uses more CPU. Sound On Sound adds that you do not always need it, and that it can add latency.
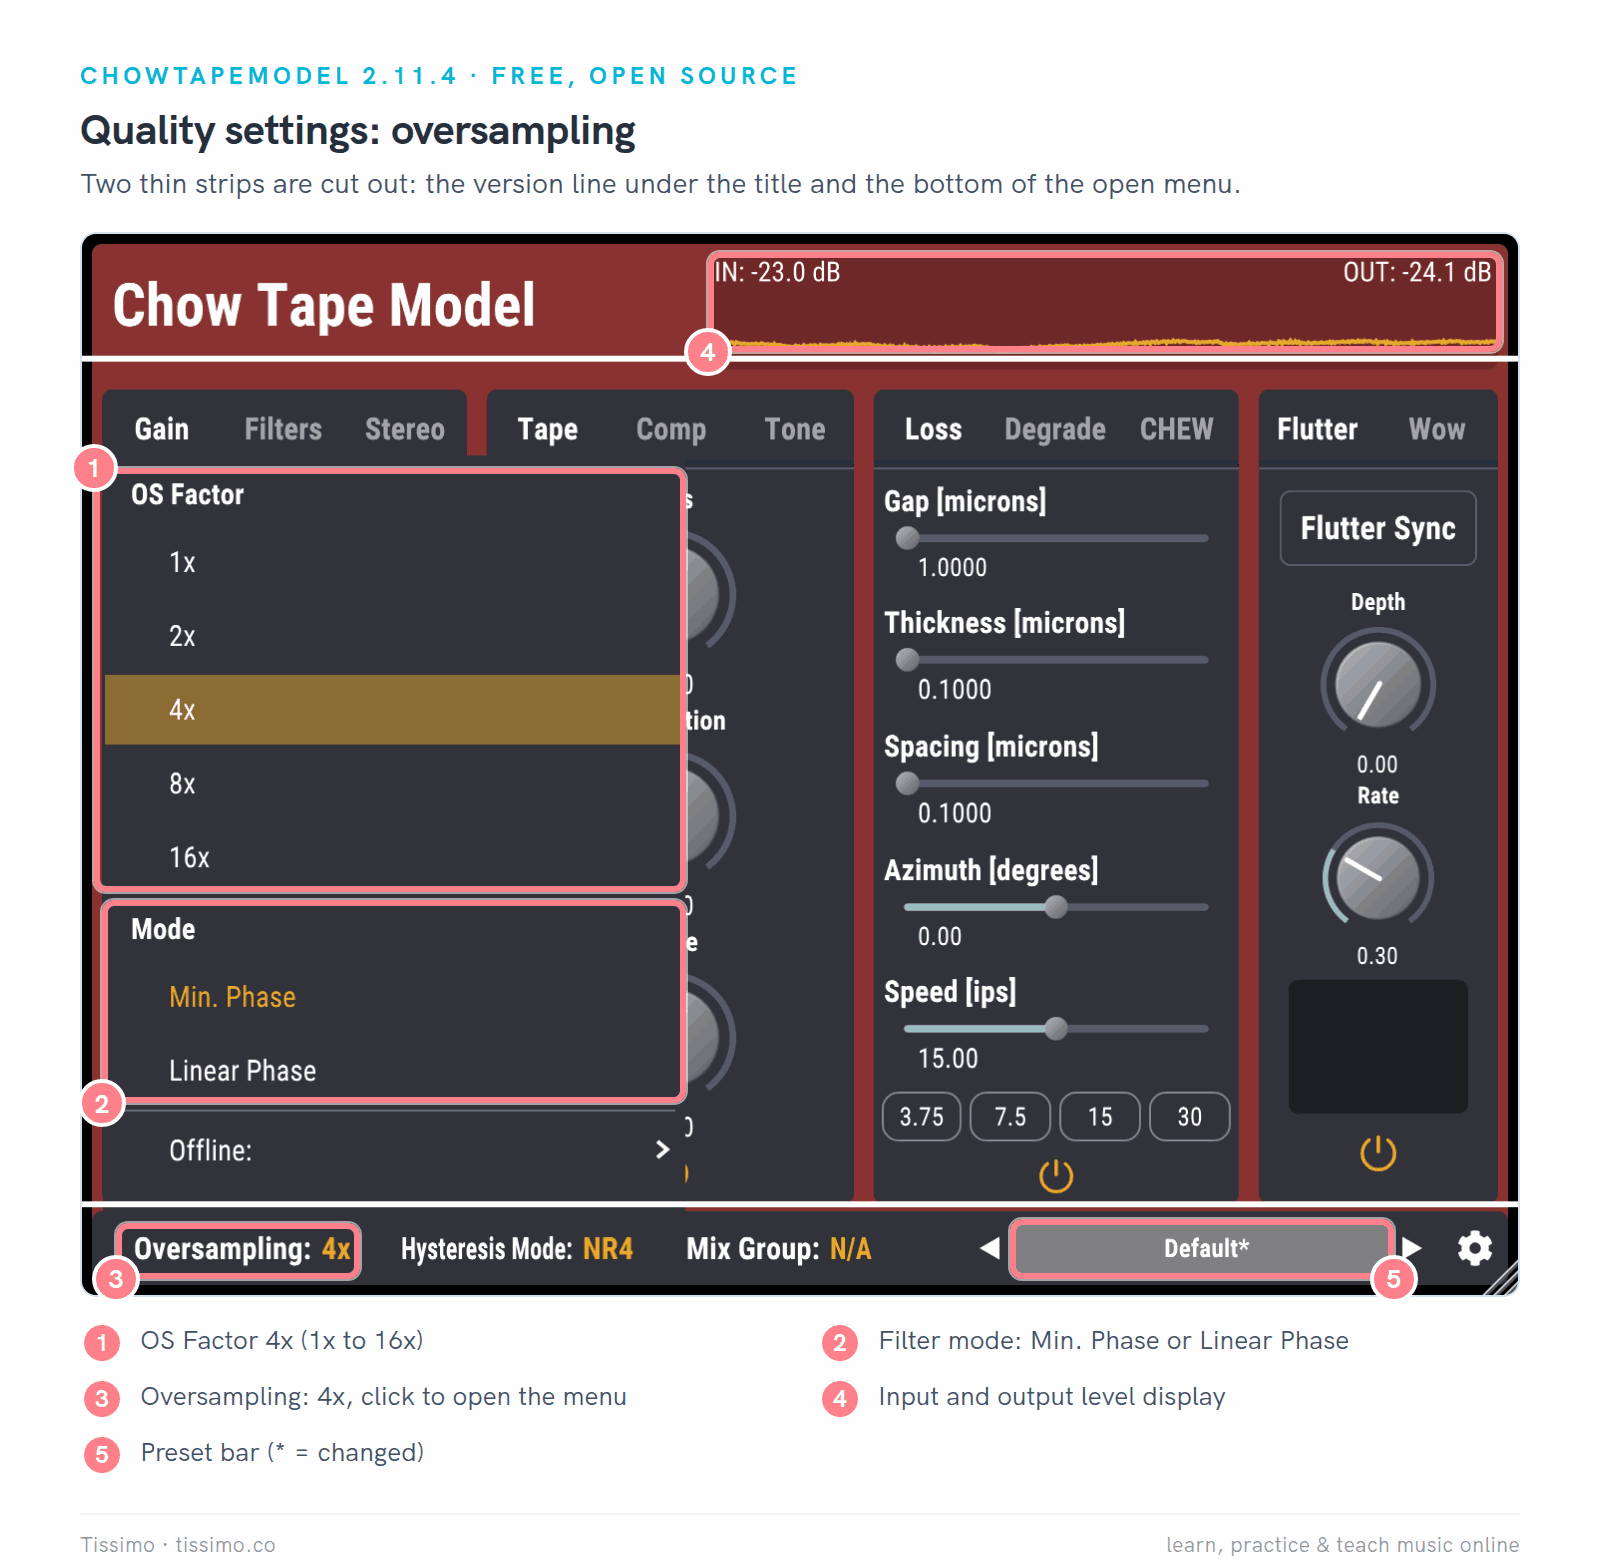
ChowTapeModel 2.11.4, a free tape emulation, with oversampling set to 4x. Two thin strips are cut out: the version line under the title and the bottom of the open menu.
Free, trial, demo and paid
- Free: TDR Nova and Valhalla Supermassive cost nothing. Tokyo Dawn Labs also sells a paid Gentleman's Edition of Nova with more features.
- Open source: Surge XT and ChowTapeModel are free under the GPL-3.0 license, and their source code is public.
- Trial: the full product for a limited time. FabFilter's downloads are "fully functional 30-day trial versions"; a purchased license key turns one into the full version.
- Demo: usually no time limit, but a catch (developers use "trial" and "demo" loosely, so read the terms). u-he's demos are fully functional, then play a short vinyl-like noise roughly every 30 seconds after a few minutes of use. FL Studio's trial never expires, but it cannot reopen a saved project until you buy an edition.
- Paid: you buy a license once or subscribe; how it is unlocked is the copy protection described below.
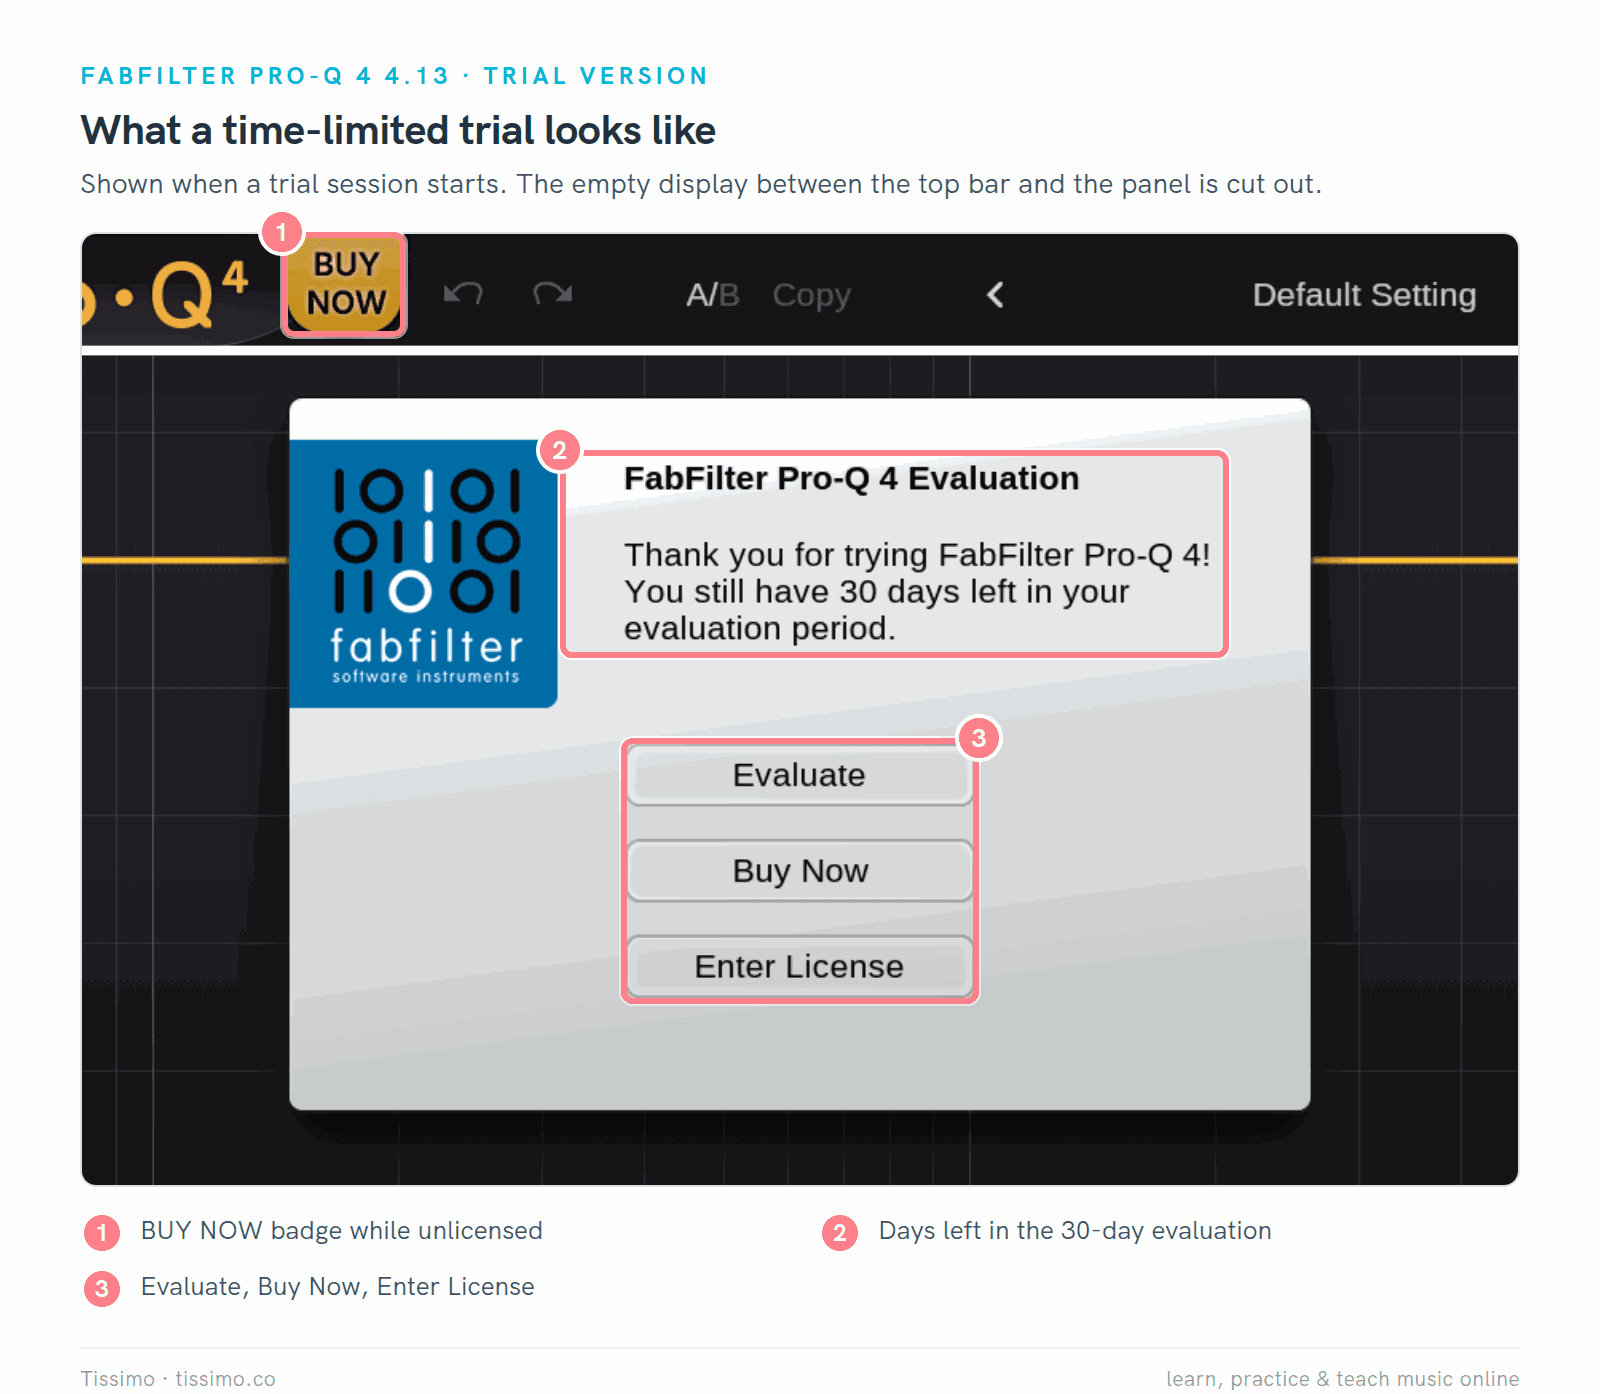
A time-limited trial: FabFilter Pro-Q 4 shows this panel when a trial session starts, and a BUY NOW badge until you enter a license.
Copy protection differs too. u-he uses a serial number and needs no internet connection to install, activate or use its plugins; FabFilter uses a license key. Working offline? Read the licensing FAQ before you buy.
Five habits that make plugins work better
1. Gain staging. Plugins, especially analog-modeling ones, can misbehave when fed very hot levels. Sound On Sound's Matt Houghton suggests letting your loudest sound peak between -12 and -18 dBFS, keeping roughly the same level out of each plugin as goes in, and bypassing each plugin in turn to check.
2. Start from a sensible order. Sound On Sound's Paul White gives an all-purpose insert order of gate, compressor, EQ, with reverb and other delay-based effects last. Mike Senior adds that there are "no hard and fast rules": he usually equalizes after the compressor, but cuts low thumps before it when they make the compressor react unevenly.
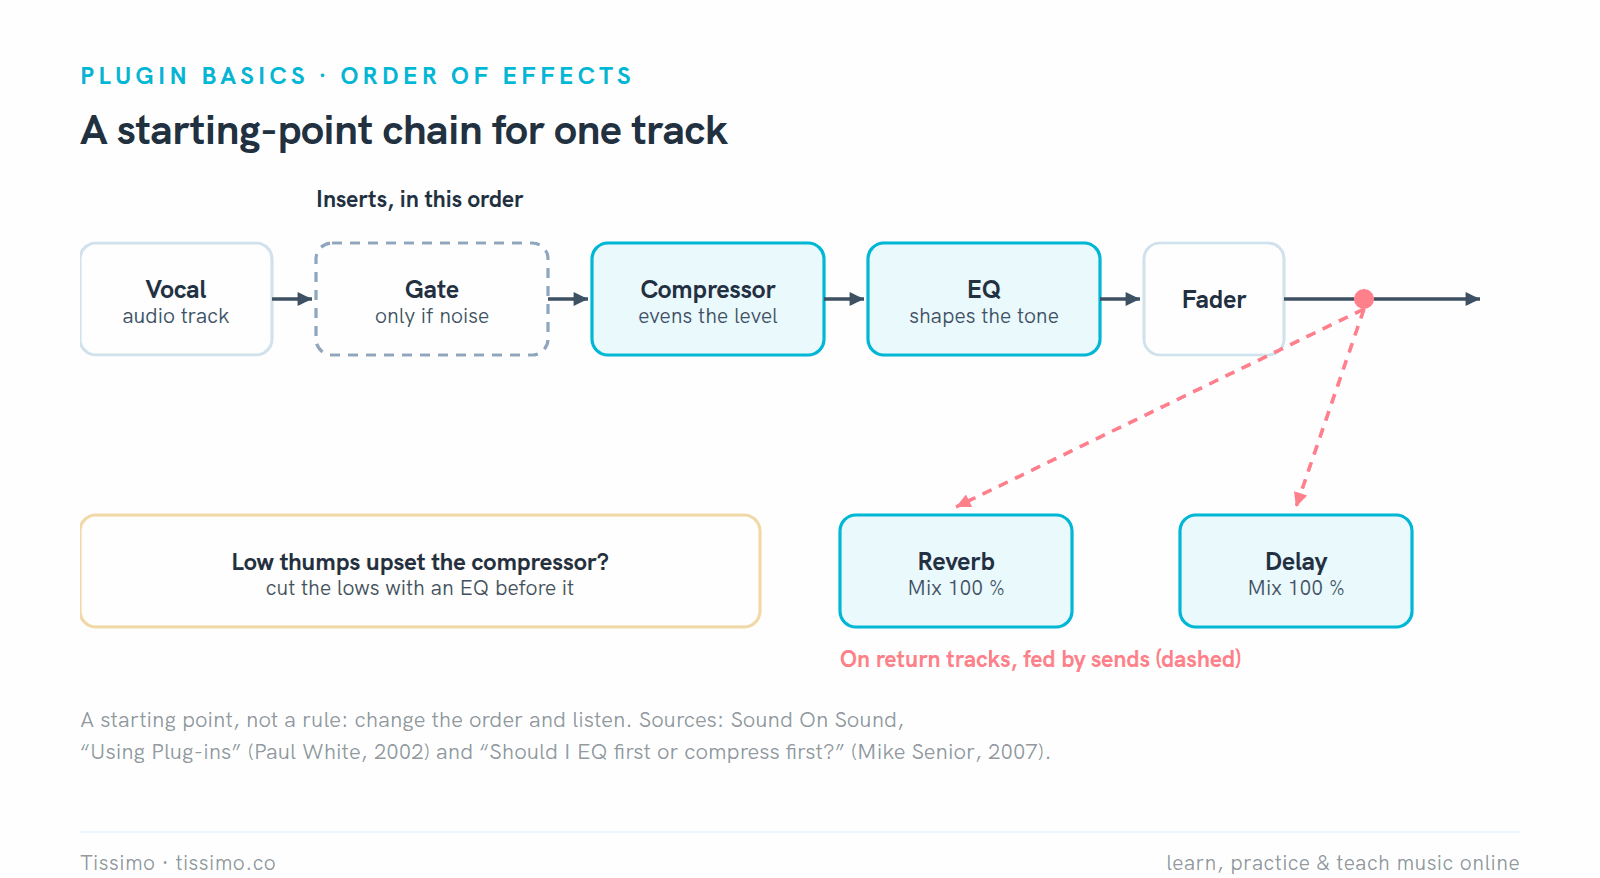
A starting point from Sound On Sound, not a rule. Swap two plugins and listen; the order is part of the sound.
3. Compare at equal loudness. Houghton notes that perceived loudness affects what we think sounds good, so a plugin that only makes a track louder can fool you. Match levels before you judge, with the output knob or an auto-gain button (FabFilter calls Pro-Q 4's make-up gain "an educated guess"). His caveat: matching helps most on the master or a soloed sound, while EQ moves in a mix are judged against everything else. Mixing in Ableton Live 12 with Stock Devices compares at matched levels throughout.
4. Save your own presets. When a setting works, save it: Surge's Save Patch, Nova's Save As New Global User Preset (kept across DAWs, up to 20) or your DAW's presets. Next time you start from your sound.
5. Freeze or bounce heavy tracks. Freezing renders a track to audio so its plugins stop using CPU, and you can unfreeze it to make changes: Freeze Track in Live's Edit menu, the Freeze button in Logic's track header. In Live 12.2 and later, Bounce Track in Place commits for good, replacing the track with audio that includes its device processing.
Some plugin settings delay the audio, which is called latency. Pro-Q 4's Linear Phase mode at Medium resolution, for example, adds 5,120 samples at 44.1 kHz, about 116 milliseconds, according to FabFilter.
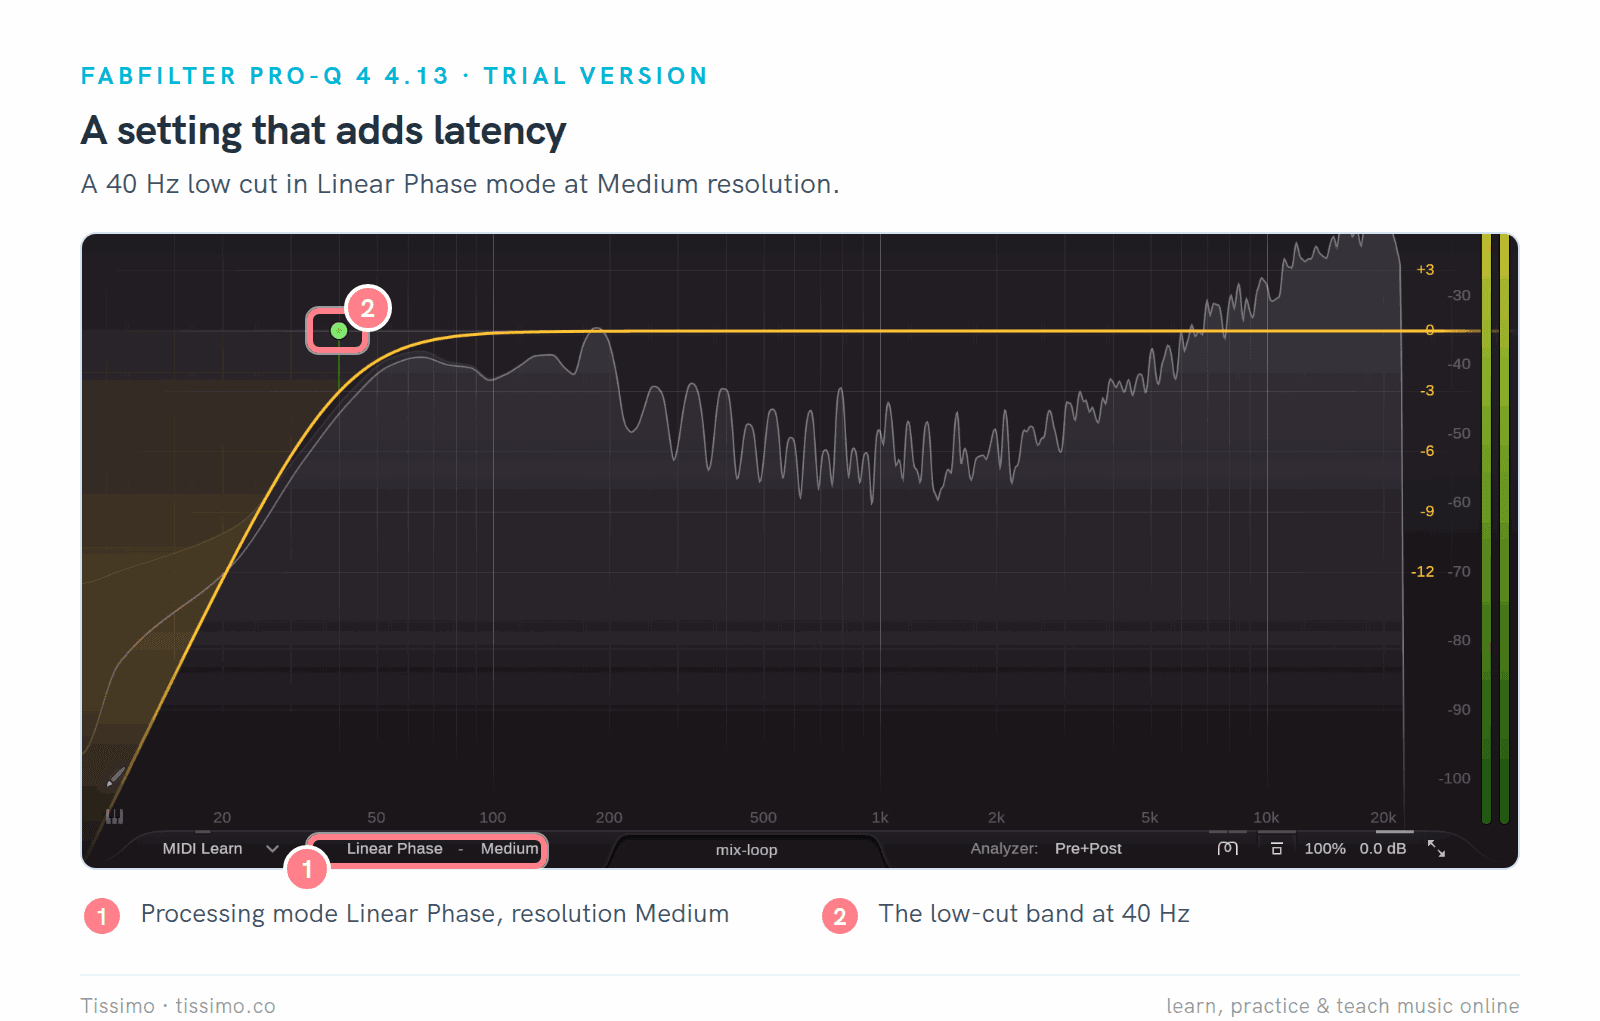
A setting that adds latency: Pro-Q 4 in Linear Phase mode at Medium resolution, with one 40 Hz low-cut band.
Your DAW hides this by holding the other tracks back: Live's delay compensation is on by default, and Logic delays other channel strips to match the slowest. The cost shows when you record: you hear yourself late through a high-latency plugin, so bypass it while recording, or use Live's Reduced Latency When Monitoring or Logic's Low Latency Monitoring mode.
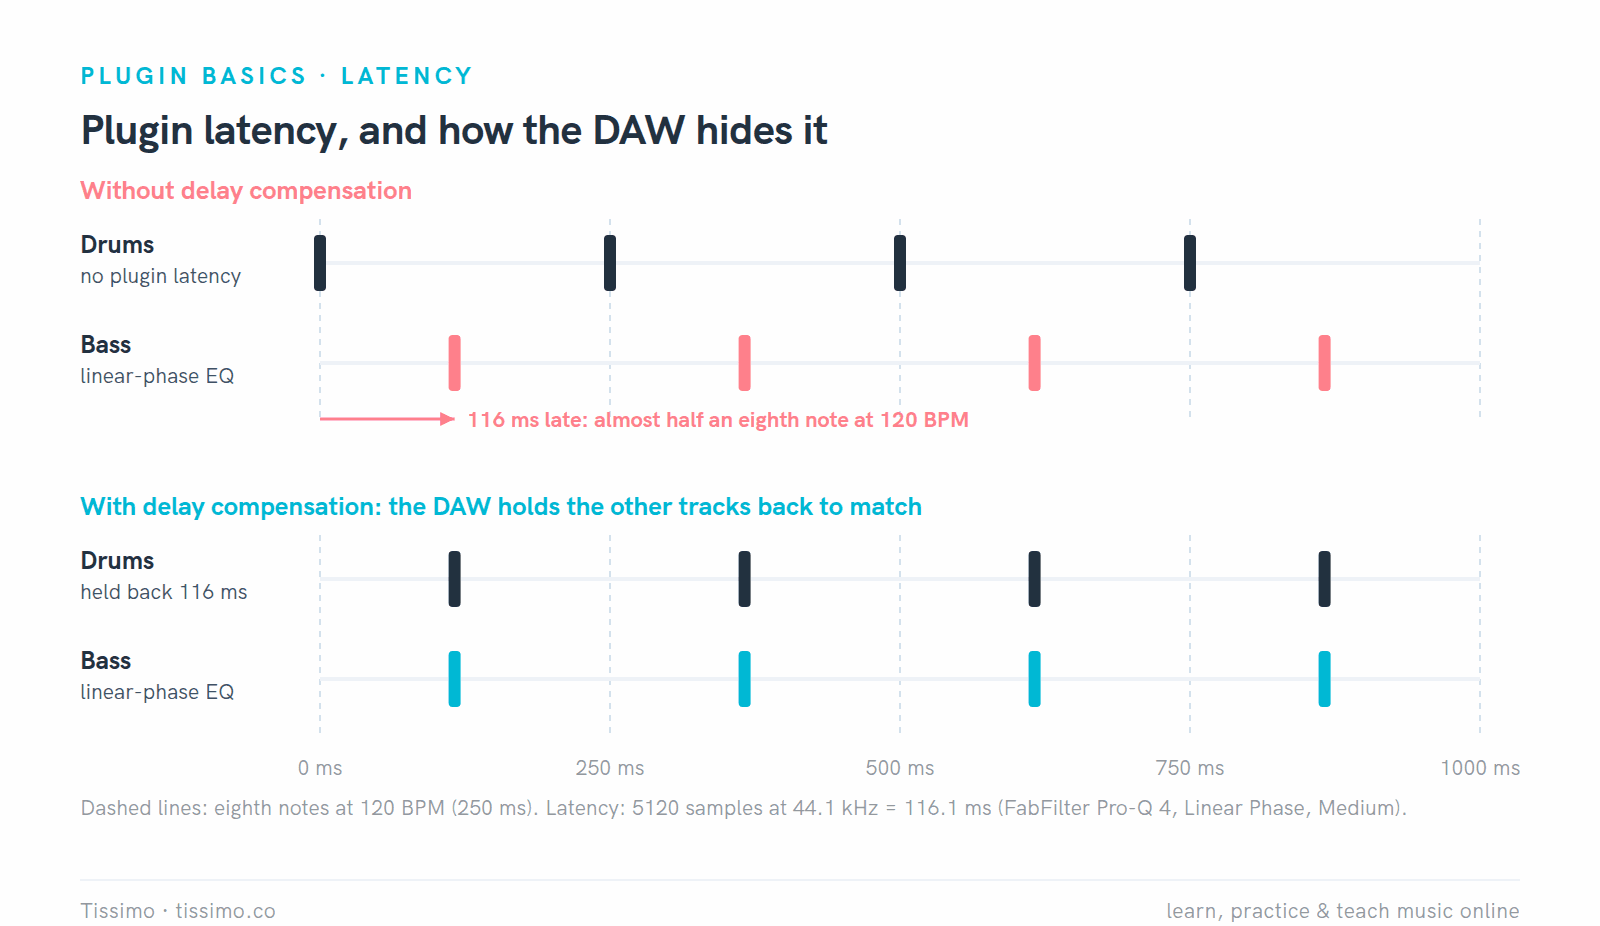
Delay compensation in pictures: the latency does not disappear, but every track arrives together.
The rest of this series
Most articles compare plugins of one kind; three go by DAW.
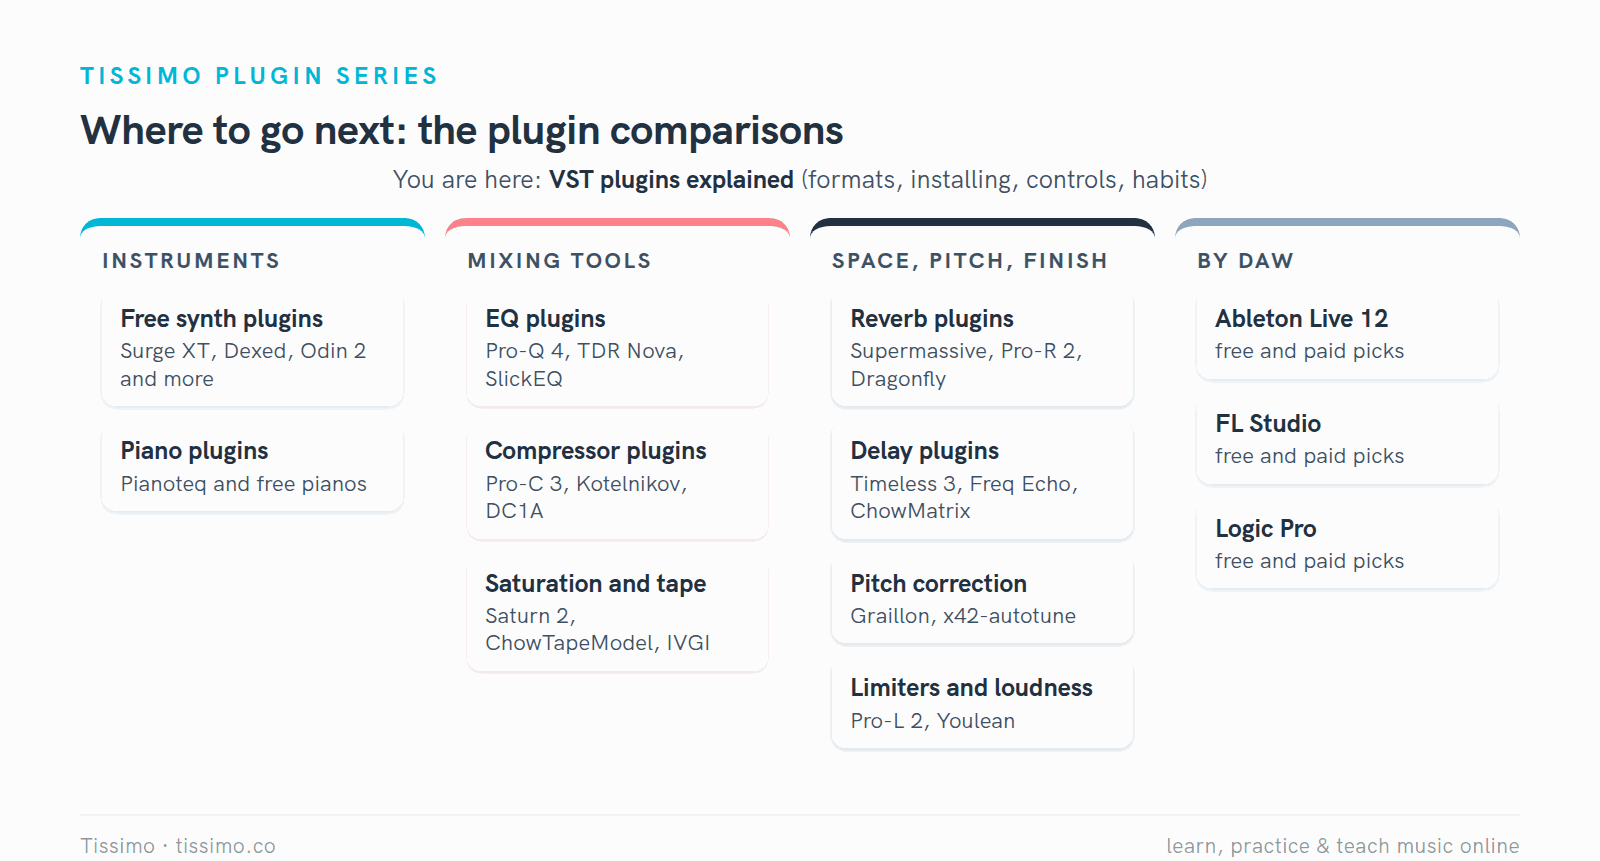
Where to go next. Every article is linked in the list below.
- Free synth plugins compared
- Piano plugins compared
- EQ plugins compared
- Compressor plugins compared
- Saturation and tape plugins compared
- Reverb plugins compared
- Delay plugins compared
- Pitch correction plugins compared
- Limiter and loudness meter plugins compared
- The best plugins for Ableton Live 12
- The best plugins for FL Studio
- The best plugins for Logic Pro
If you are still choosing a DAW, read How to Start Producing Music at Home first. And if you would like someone to look at your session with you, a Tissimo music production teacher can do that in a live online lesson.
Sources
- Using Plug-Ins, Live 12 Reference Manual — Ableton
- Using VST plug-ins on Windows — Ableton Help Center
- Plug-in Locations, VST 3 Developer Portal — Steinberg
- Using VST 2 Plug-ins in Cubase/Nuendo 14 and newer — Steinberg Help Center
- Installing Plugins, FL Studio manual — Image-Line
- Use the Plug-in Manager, Logic Pro User Guide — Apple
- The Story and Mission of CLAP — CLever Audio Plug-in
- Pro-Q 4 help: Processing mode — FabFilter
- Using Plug-ins (Paul White) — Sound On Sound
- Gain Staging In Your DAW Software (Matt Houghton) — Sound On Sound
- Q. Should I EQ first or compress first? — Sound On Sound
- Q. Should I use my plug-ins' automatic level compensation? — Sound On Sound
- Demos and licenses FAQ — u-he
- TDR Nova manual — Tokyo Dawn Labs
- ValhallaSupermassive — Valhalla DSP
- ChowTapeModel user manual — Chowdhury DSP
- When Should You Use Oversampling? (Sam Fischmann) — Sound On Sound
- Download (trial terms) — FabFilter
- Pro-Q 4 help: Output options — FabFilter
- FL Studio download and trial — Image-Line
Read this article online: https://tissimo.co/articles/vst-plugins-explained-formats-installing-and-using-plugins



Comments