 Back
Free Pitch Correction Plugins Compared: Graillon, x42-autotune and the Tools in Ableton Live, FL Studio and Logic Pro
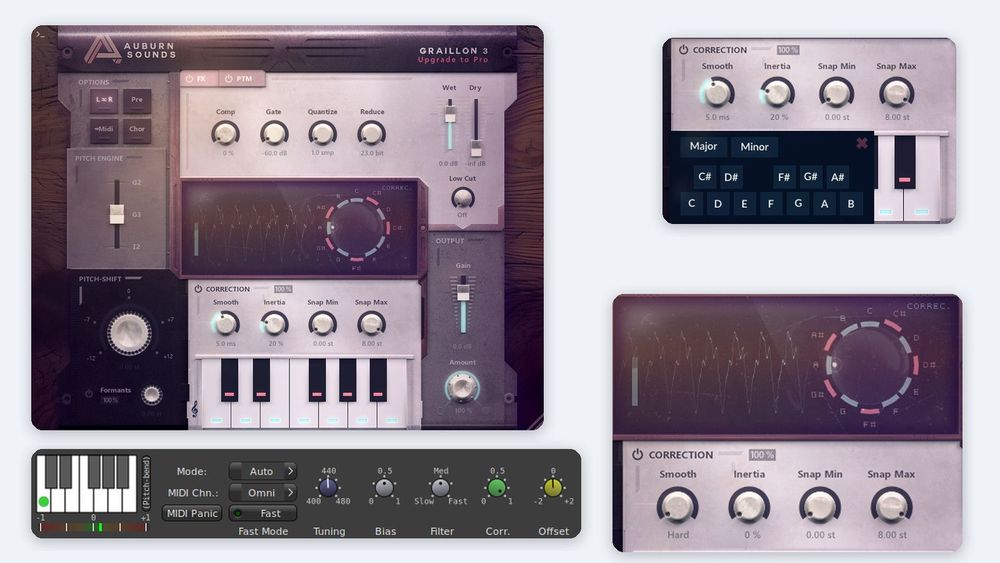
A pitch correction plugin listens to one voice, works out which note you were aiming for, and nudges the pitch onto it. Set gently, it tidies a good take; set to its fastest, it gives the stepped, robotic sound. This guide compares two free plugins, Graillon 3 Free Edition from Auburn Sounds and the open-source x42-autotune, and the tools already built into Ableton Live, FL Studio and Logic Pro. Every screenshot uses the same original test melody: a sung-style line in C major, slightly off pitch, with vibrato. Prices and versions are as of November 2026.
If plugins are new to you, start with our guide to VST plugin formats and installing plugins.
How automatic pitch correction works
Every automatic pitch corrector repeats four steps many times a second. It detects the pitch of the incoming voice. It chooses a target: the nearest note that you have allowed. It moves the pitch toward that target, quickly or slowly. And many can also keep the formants, the resonances of the throat and mouth that make a voice sound like itself, so a shifted note doesn't sound like a cartoon character.

The four steps, with the controls that act on each one in the two plugins compared here. x42-autotune has no formant step: its developer says to use it for small errors only.
All of this works on one note at a time. Image-Line says its Pitcher "won't work with choirs, chords or complete mixes," and Apple says the same of polyphonic recordings in Logic Pro's Pitch Correction. Effects get in the way too: Image-Line advises putting Pitcher first in the chain because reverb, chorus and phasing can hurt pitch detection, and Sound On Sound's Paul White notes that Auto-Tune tends to pass sounds treated with delay or reverb through uncorrected. So tune the dry recording, before other effects.
The target step is why the key matters. With all 12 notes allowed, a singer who is 30 cents sharp of C♯ is pulled to C♯. Tell the plugin the song is in C major, and C♯ is no longer a choice: the same pitch goes to D.
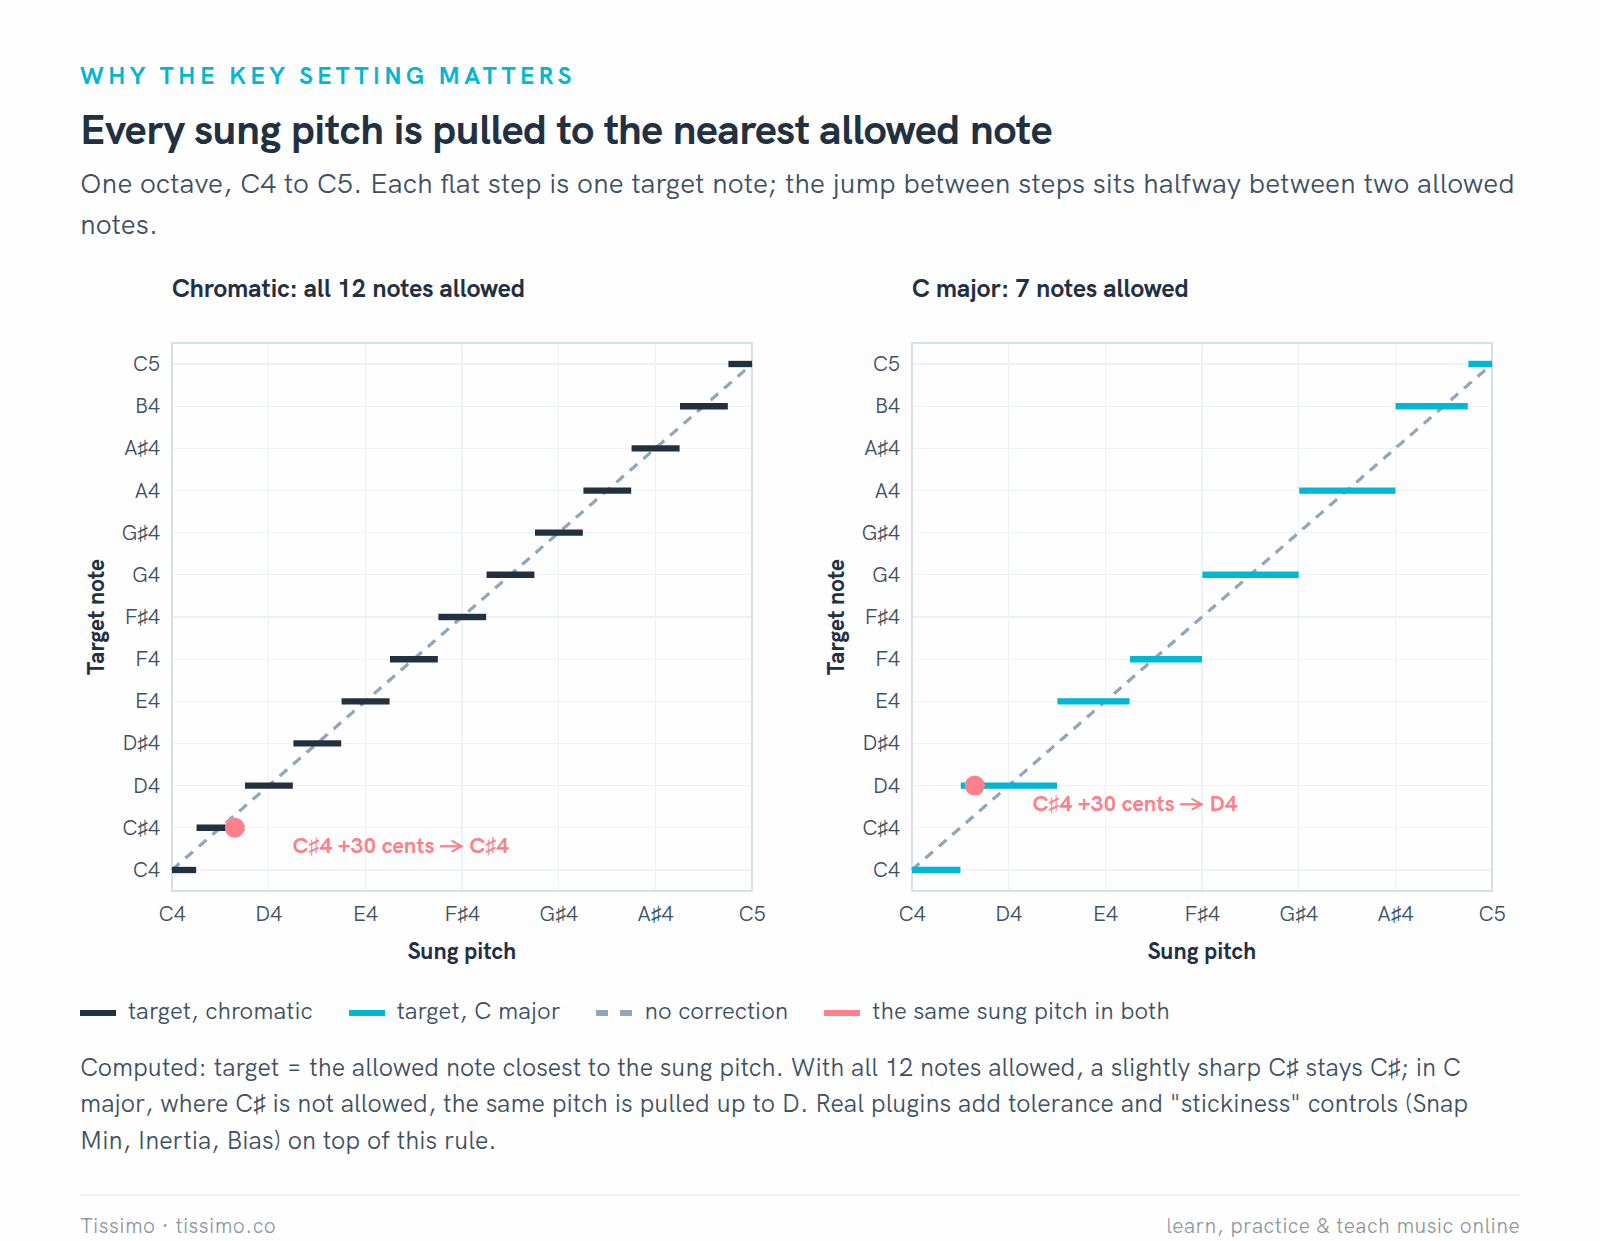
Computed: each step is one target note, and the jump sits halfway between two allowed notes. With fewer allowed notes, the steps get wider and no note outside the key can be a target.
Natural correction or the hard-tuned effect
The famous robotic sound isn't a separate effect. It is the same plugin with the speed turned all the way up. Sound On Sound's Mike Thornton explains that for the "Cher effect," first heard on her single "Believe," the retune speed is set to zero, so the pitch lands on the note from the very start, with none of the singer's natural slide into it. Paul White's advice for a natural result, given for Auto-Tune's Retune control, is the opposite: set it at its halfway point or below and adjust from the slow end, so bends, scoops and vibrato pass while sustained notes are still pulled into tune.

A model of the test melody: its pitch detected in code, then pulled toward the nearest C-major note with a 1 ms and a 50 ms glide. The fast glide erases the vibrato; the slow one keeps much of it.
Many of these plugins add a second way to stay natural: a tolerance zone where nothing is corrected. Graillon calls it Snap Min; Logic Pro calls it Tolerance.
Two free plugins, and what your DAW already has
Both plugins are free; the built-in tools cost nothing extra if you already own the DAW (in FL Studio, from the Signature Bundle up).

The lineup at a glance, from the developers' own pages and manuals in November 2026. None of the three DAWs loads LV2, x42-autotune's plugin format.
Graillon 3 Free Edition: the free all-rounder
Graillon 3.2 from Auburn Sounds is a vocal processor with pitch correction at its center. The free edition does everything shown here; the Full Edition, US$38.67 at its regular price (on sale for US$29 when we checked in November 2026), adds Pitch-Tracking Modulation (a ring-modulation and frequency-shift effect), per-note tuning outside equal temperament and a vocal doubler.
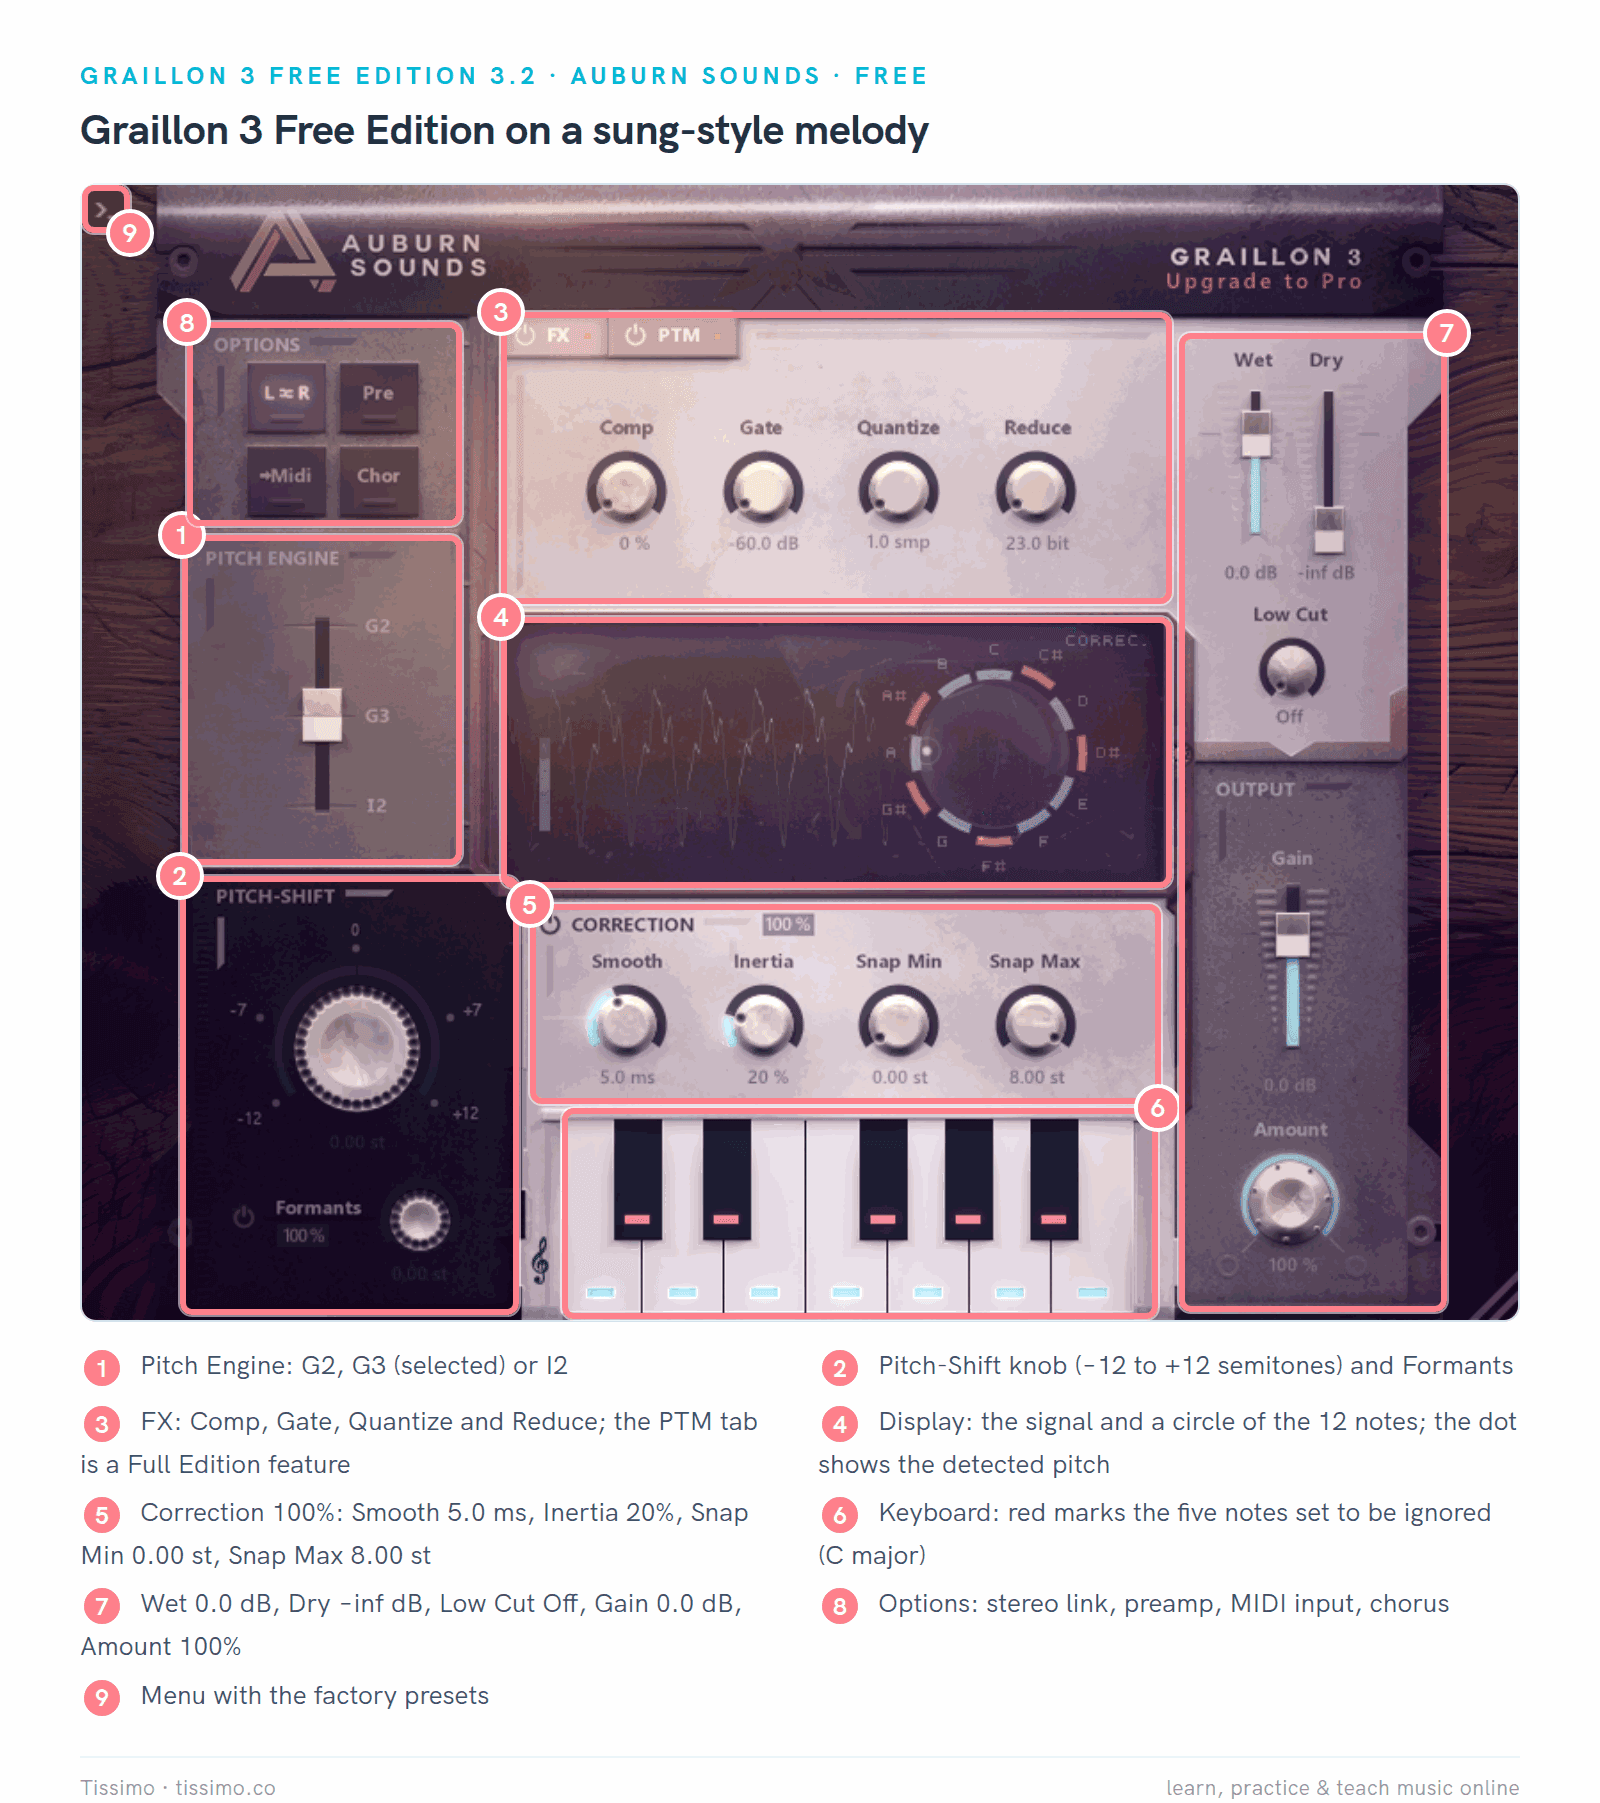
Graillon on the test melody, set to C major: Smooth 5.0 ms, Inertia 20%, Snap Min 0.00 st, Snap Max 8.00 st (semitones). Auburn's cheat sheet explains the colors: red notes are ignored, and blue notes are the ones the pitch sticks to.
The four correction knobs are worth learning by name. Smooth sets how fast the pitch moves to the note. Inertia makes a chosen note "stick," which the manual calls "quite a critical setting." Snap Min is the smallest error worth correcting, and Snap Max is how far a note may be pulled (8 semitones by default). The manual lists four ways to make correction less obvious: lower the correction amount, raise Smooth, raise Snap Min or lower Snap Max.
There is more in the free edition than tuning. The FX row holds a compressor modeled on a classic FET and opto pair, a fast vocal gate and a bitcrusher, and the Options buttons add a preamp, a chorus and MIDI input for the target note.
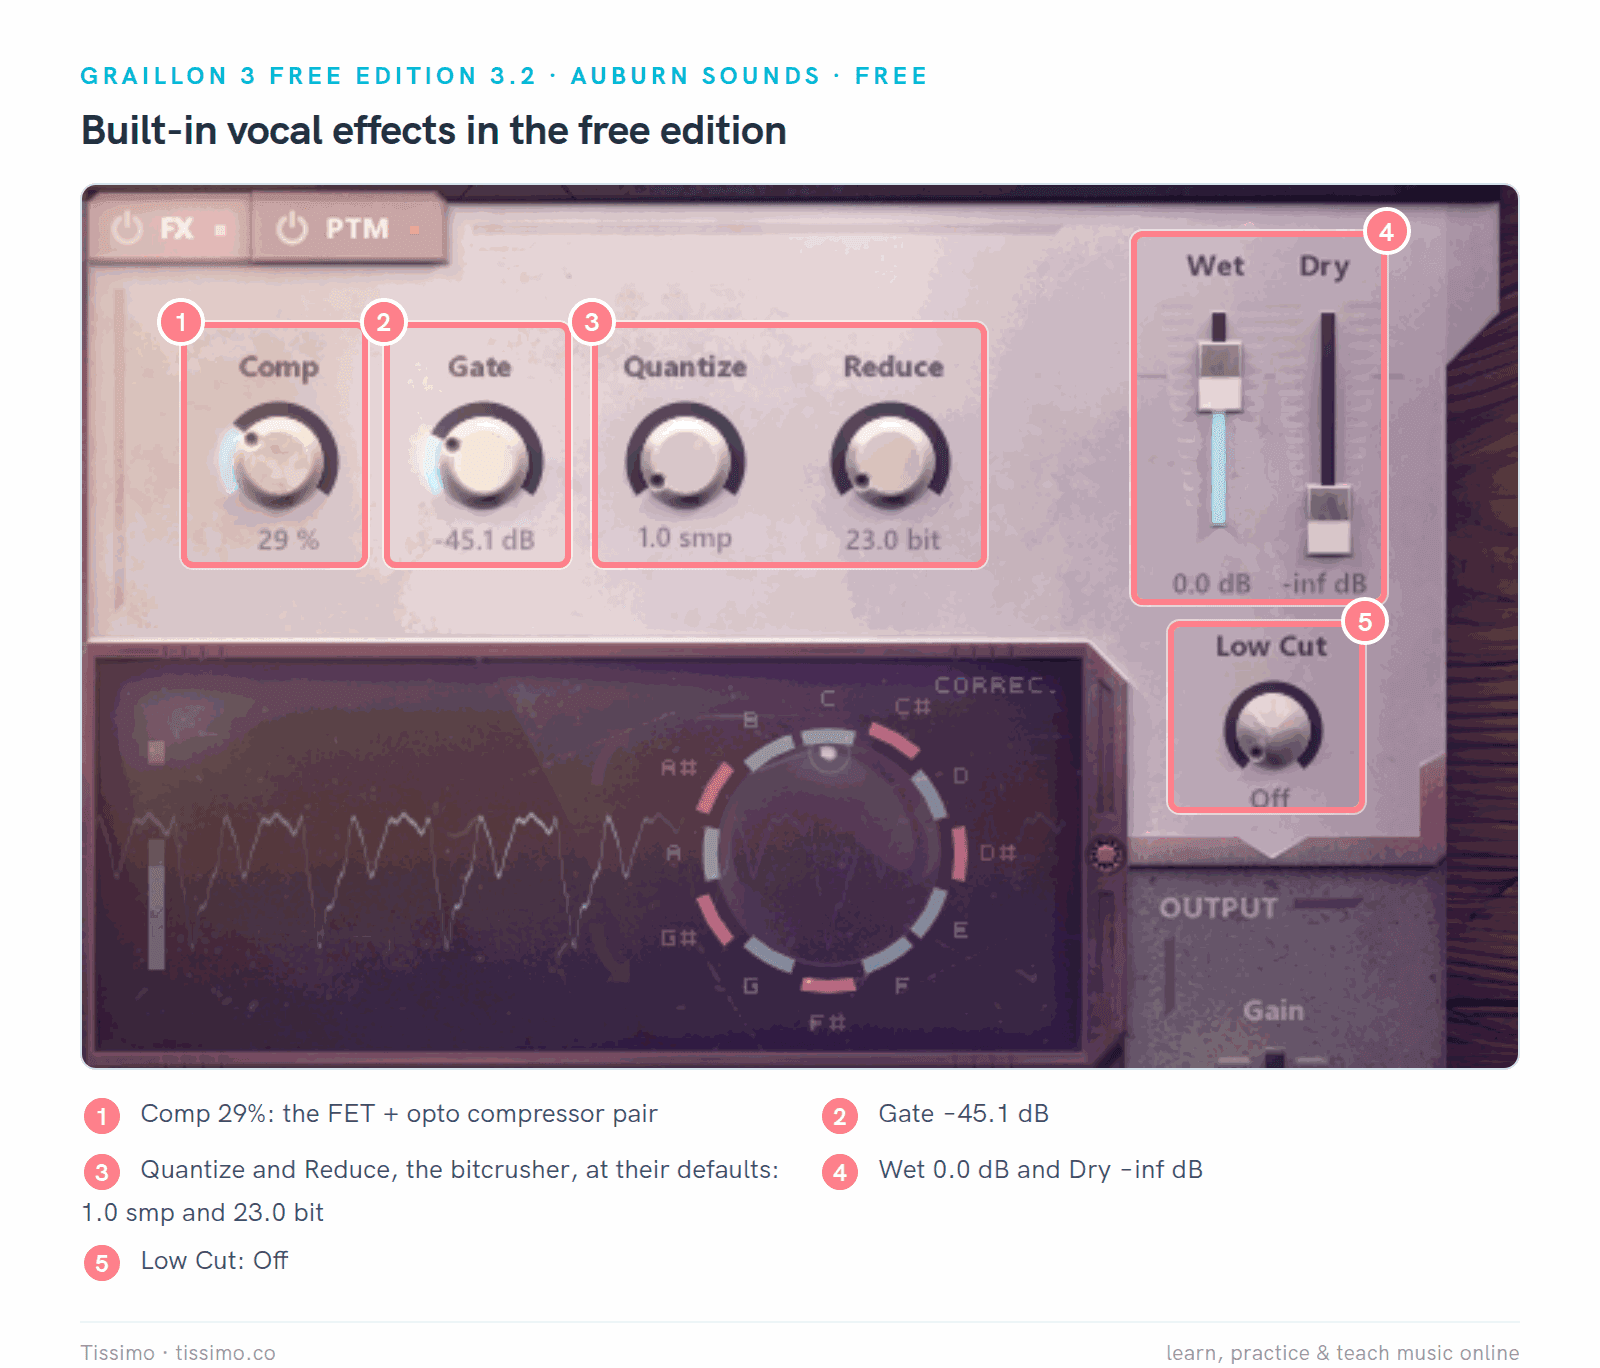
The built-in effects on the same melody: Comp 29%, Gate −45.1 dB. Quantize and Reduce (the bitcrusher) stay at their defaults, 1.0 smp (samples) and 23.0 bit.
Pros:
- Free, with correction, pitch shift (±12 semitones), formant control and vocal effects in one window.
- VST3, VST2 (not on Linux), AU, AAX, CLAP and LV2, plus FL Studio's own format on Windows; Windows 7 or newer, macOS 10.15 or newer and Ubuntu 22.04 or newer.
- The note circle and red keyboard marks show the key at a glance, and the treble clef opens a scale menu.
- Factory presets, including Hard Tune, Pop Standard, C Major, C Minor and Harmonic Minor.
- MIDI input can choose the target note.
- Three pitch engines: G2 keeps the older Graillon 2 sound, and I2 improves the naturalness of pitch shifting, at what the manual calls a "hefty CPU usage."
Cons:
- The data sheet in Auburn's free download lists about 24 ms of latency at 44.1 kHz, which you are likely to notice if you monitor yourself through it while recording (x42-autotune's normal figure is similar, but it has a Fast mode).
- The scale menu offers only major and minor; beyond that there is a Harmonic Minor factory preset, and any other scale means switching notes on and off by hand.
- No note-by-note editor: it corrects whatever comes in, live.
- The manual warns that Snap Min "doesn't sound that good" when you want the robotic effect, so the natural and hard settings need different starting points.
x42-autotune: small fixes, open source
x42-autotune 0.8.11 is Robin Gareus's plugin version of AT1, an autotuner by Fons Adriaensen. It is free software under the GPL, with an optional donation, and comes as an LV2 plugin plus a standalone app for the JACK audio system, on Windows, macOS and Linux.

x42-autotune at its defaults on the test melody: Tuning at 440 Hz, Bias at its 0.5 mark, Filter at Med, Corr. at 1 (full correction), Offset at 0. The meter under the keyboard shows the pitch error within one semitone either way.
Its developer says it "should be used to correct small errors only and not to really transpose a song," because it has no formant correction. Bias adds a preference for the current note, Filter smooths the correction while a note holds steady, and Corr. sets how much of the error is corrected. In Auto mode, incoming MIDI notes take priority over the keyboard, so a MIDI part can tell it exactly which note to sing.
Pros:
- Free and open source, with no license file needed for this plugin.
- Small and quick to read: one strip, one meter, five knobs.
- MIDI control of the target note, and a Fast mode that, in the developer's words, "reduces latency by allowing initially uncorrected signal" (AT1's guide puts the normal latency at around 21 ms).
Cons:
- As a plugin it is LV2 only, so it does not load in Ableton Live, FL Studio or Logic Pro; you need an LV2 host such as Ardour, Harrison Mixbus or REAPER.
- No formant correction, which is why its developer recommends it for small errors, not for transposing.
- Setting a scale is basic: a left click switches one note, and the right-click dialog offers only common major and minor scales.
- No glide between notes: Filter smooths only within a held note, and the correction jumps at once when the note changes.
Four moves on real captures
These are starting points, not rules. Loop a short phrase and compare against the bypassed vocal as you go.
Move 1: set the key and scale
Decide the key before you touch anything else. If you aren't sure, our guide to finding the key of a song walks through it. A major scale is always the same recipe of whole and half steps (the major scale handout shows it on a keyboard), and a natural minor key uses the same notes as its relative major: A minor and C major share all seven. Our key signatures chart pairs every major key with its relative minor.
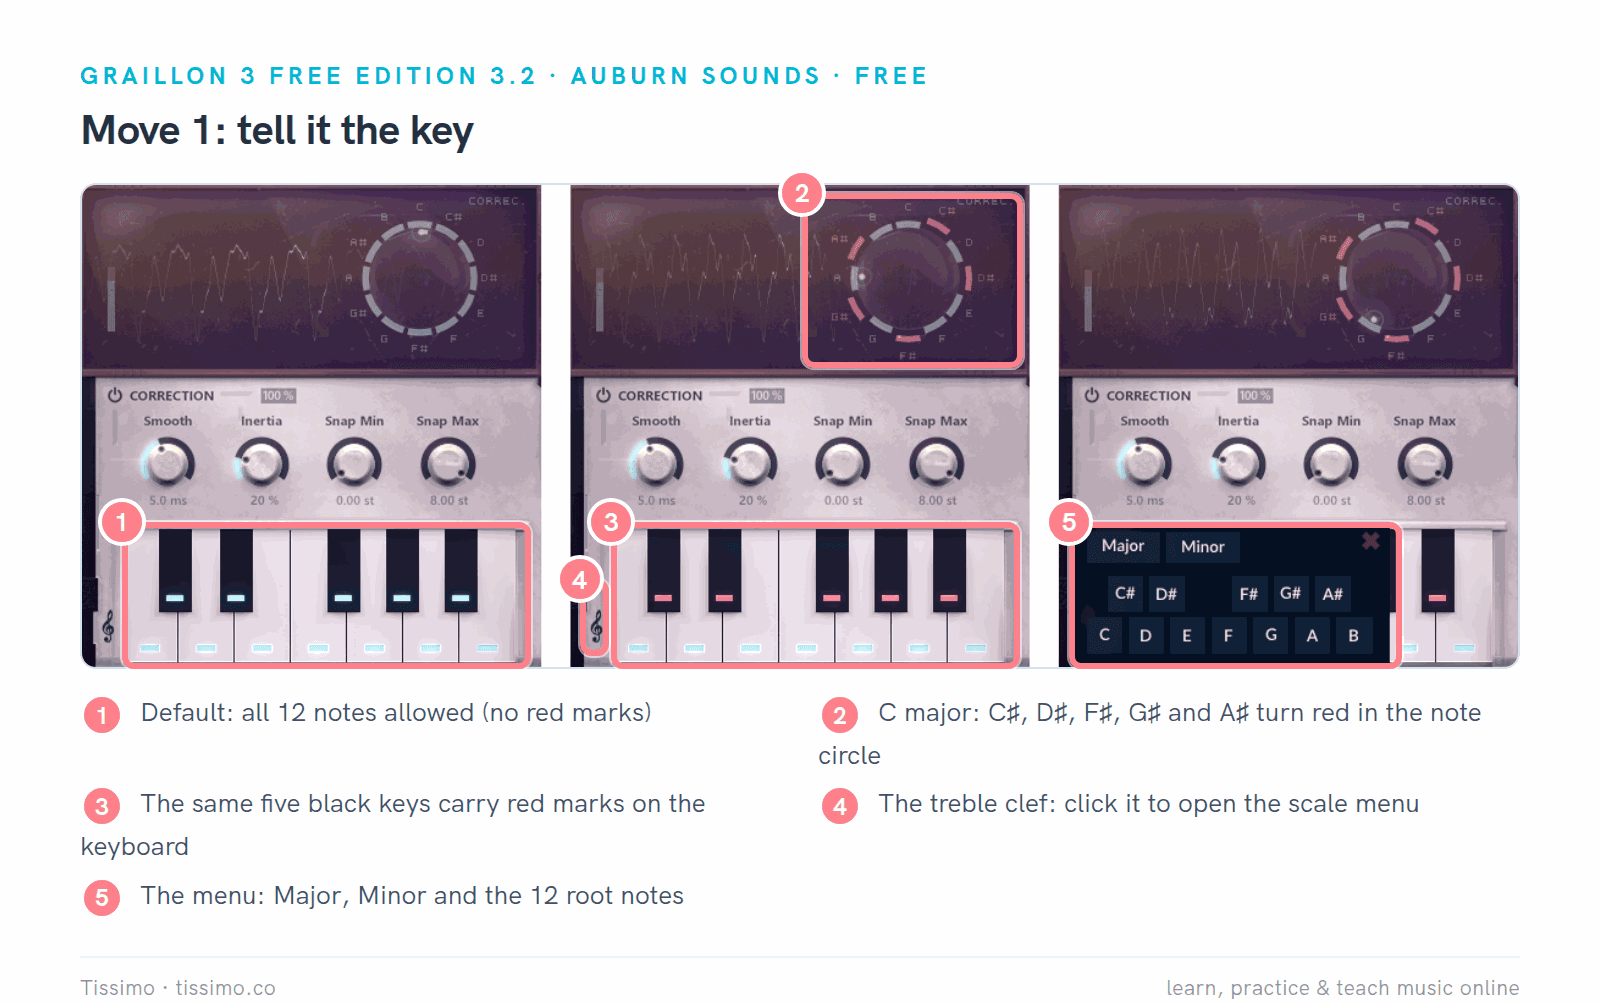
In Graillon, notes outside the key turn red in the circle and on the keyboard. Click the treble clef for the scale menu: Major or Minor, then the root.
In x42-autotune, click a note to switch it off, or right-click the keyboard for a dialog of common major and minor scales.

x42-autotune with all 12 notes (top) and with C major only (bottom). Gray keys are excluded.
If a song changes key, switch the scale where it changes, or correct the sections on separate tracks. Logic Pro's manual notes that its Scale and Root parameters can be automated to follow the harmony.
Move 2: choose the retune speed
For the hard-tuned effect, turn the speed control to its fastest and remove any tolerance. For natural correction, slow it down and give vibrato some room. Graillon's Smooth knob reads "Hard" at its minimum. Graillon also ships factory presets for both jobs, Hard Tune and Pop Standard, in the menu behind the button at the top left of its window; load one, set the key again (a preset brings its own note set: all 12 notes in these two) and adjust from there.

Left, the effect: Smooth "Hard," Inertia 0%, Snap Min 0.00 st. Right, a natural starting point: Smooth at its slowest, 50.0 ms, Snap Min 0.20 st, Inertia back at 20%.
In x42-autotune, the Filter knob runs from Slow to Fast and Corr. sets how much of the error is fixed. Turning Corr. down leaves part of every wobble in place. Filter works only while a note is held: the developer notes that when the note changes, the filter is bypassed and the correction jumps straight to the new note, so slowing it down will not smooth a slide between notes.

Top: Filter fully at Fast, Corr. at 1. Bottom: Filter fully at Slow and Corr. just past its 0.5 mark, which corrects a little over half of each error. Bias, Filter and Corr. show no value readout; read them from the marks.
Listen on held notes and on slides between notes. If a slide turns into steps, slow down; Apple's manual for Logic Pro's Response control describes that exact artifact. If held notes still waver, speed up a little or lower the tolerance.
Move 3: shift the pitch, mind the formants
Pitch shifting moves the whole line up or down, for a harmony or an octave double. Without formant correction, a voice shifted by more than a few notes takes on what FL Studio's manual likens to the sound of inhaled helium. In Graillon, switch Formants on before you shift. To hear the original under the shifted copy, raise the Dry slider or put Graillon on a duplicate of the track.

Pitch-Shift 5.00 st (up a perfect fourth) with Formants on at 100% and the formant shift at 0.00 st. The correction settings are unchanged.
The manual adds that full formant preservation can sound harsh and "should be scaled back," so try the Formants amount below 100% too. x42-autotune's Offset knob shifts by up to ±2 semitones (a constant shift when Corr. is at 0), with no formant correction.
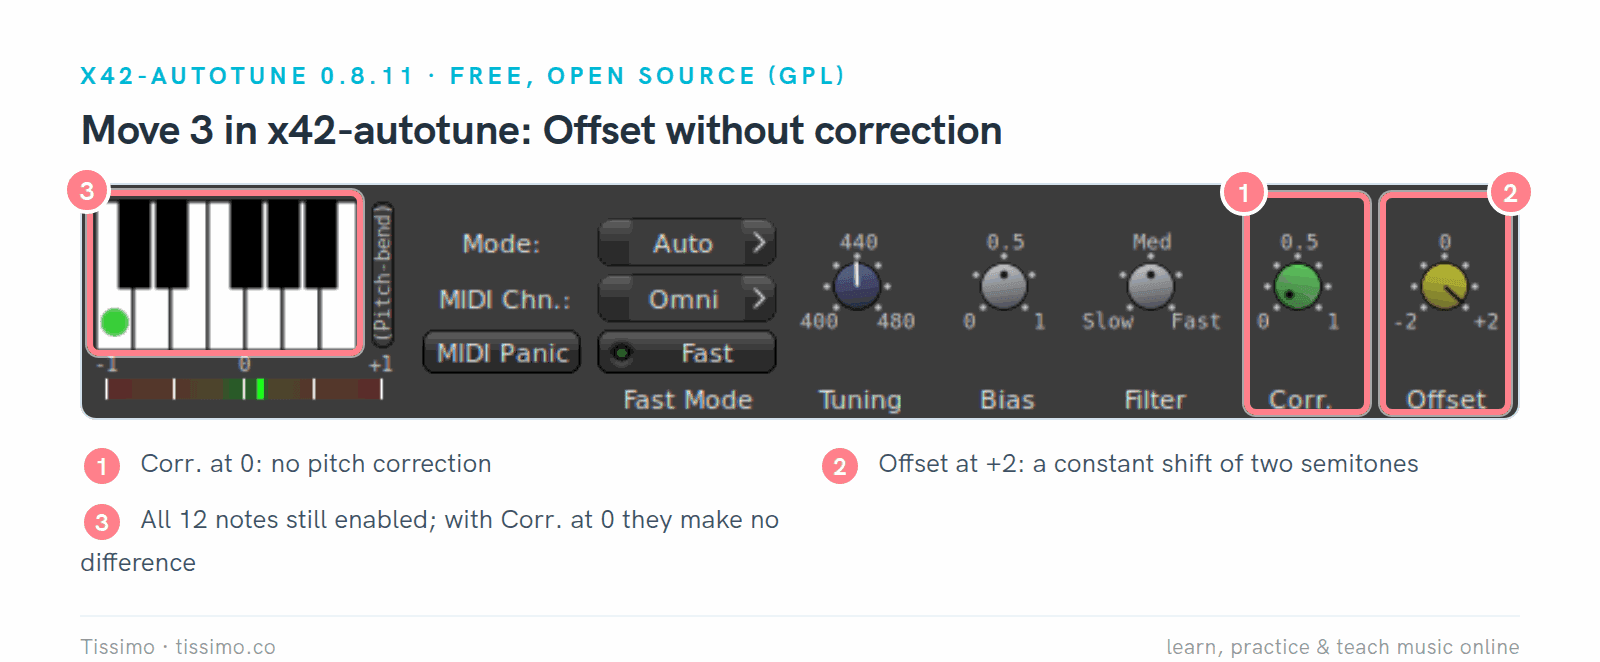
Corr. at 0 and Offset at +2: no correction, just a constant shift of two semitones up.
Move 4: know when to edit by hand
Automatic correction treats every note alike. When one or two notes are wrong and the rest is fine, a note editor is often the better tool. Sound On Sound's Mike Senior recommends keeping processing to a minimum, working phrase by phrase, fixing the most problematic notes first and leaving the small variations that give a performance its character. He also says to avoid processing consonants and breaths where you can.
Note editors show each sung note as a block you can drag. Logic Pro's Flex Pitch and FL Studio's Newtone are built in.

FL Studio's Newtone with this guide's test melody: every note is a block you can drag, and the orange line is its detected pitch. Center, Variation and Trans act on all notes: pitch center, vibrato and pitch errors, and the speed of transitions.
Commercial editors include Celemony Melodyne and the Graph Mode of Antares AutoTune Pro. And if a note is simply wrong rather than out of tune, sing it again: as Paul White puts it, these tools are designed to correct errors of pitching, not entirely wrong notes.
Using them in Ableton Live, FL Studio and Logic Pro
Ableton Live loads VST2 and VST3, plus Audio Units on macOS. FL Studio loads VST, VST3 and CLAP, plus AU on macOS. Logic Pro uses Audio Units for third-party plugins, so Logic users need Graillon's AU version. Each DAW also has its own tools:
- Ableton Live: since 12.1, every Live edition includes Auto Shift, a real-time correction device. You pick a root and scale or follow the clip's scale, set Correction Strength, and turn on Smooth (0 to 200 ms); it also shifts formants and can take target notes from a MIDI track. Ableton says Live 13 (early 2027) will host ARA 2 editors, with Melodyne essential in Suite.
- FL Studio: Pitcher corrects in real time, with Key and Scale, a Correction Speed control ("fast settings sound more artificial and slower settings more natural") and formant preservation. Newtone is an editor for fixing notes one by one. Both come with the Signature Bundle or higher.
- Logic Pro: the Pitch Correction plugin has Root Note and Scale menus, a Response knob for speed and a Tolerance knob for vibrato. Flex Pitch, in the Audio Track Editor, shows the notes so you can drag them, and its Pitch Correction slider and Scale Quantize menus can tune a whole selection.
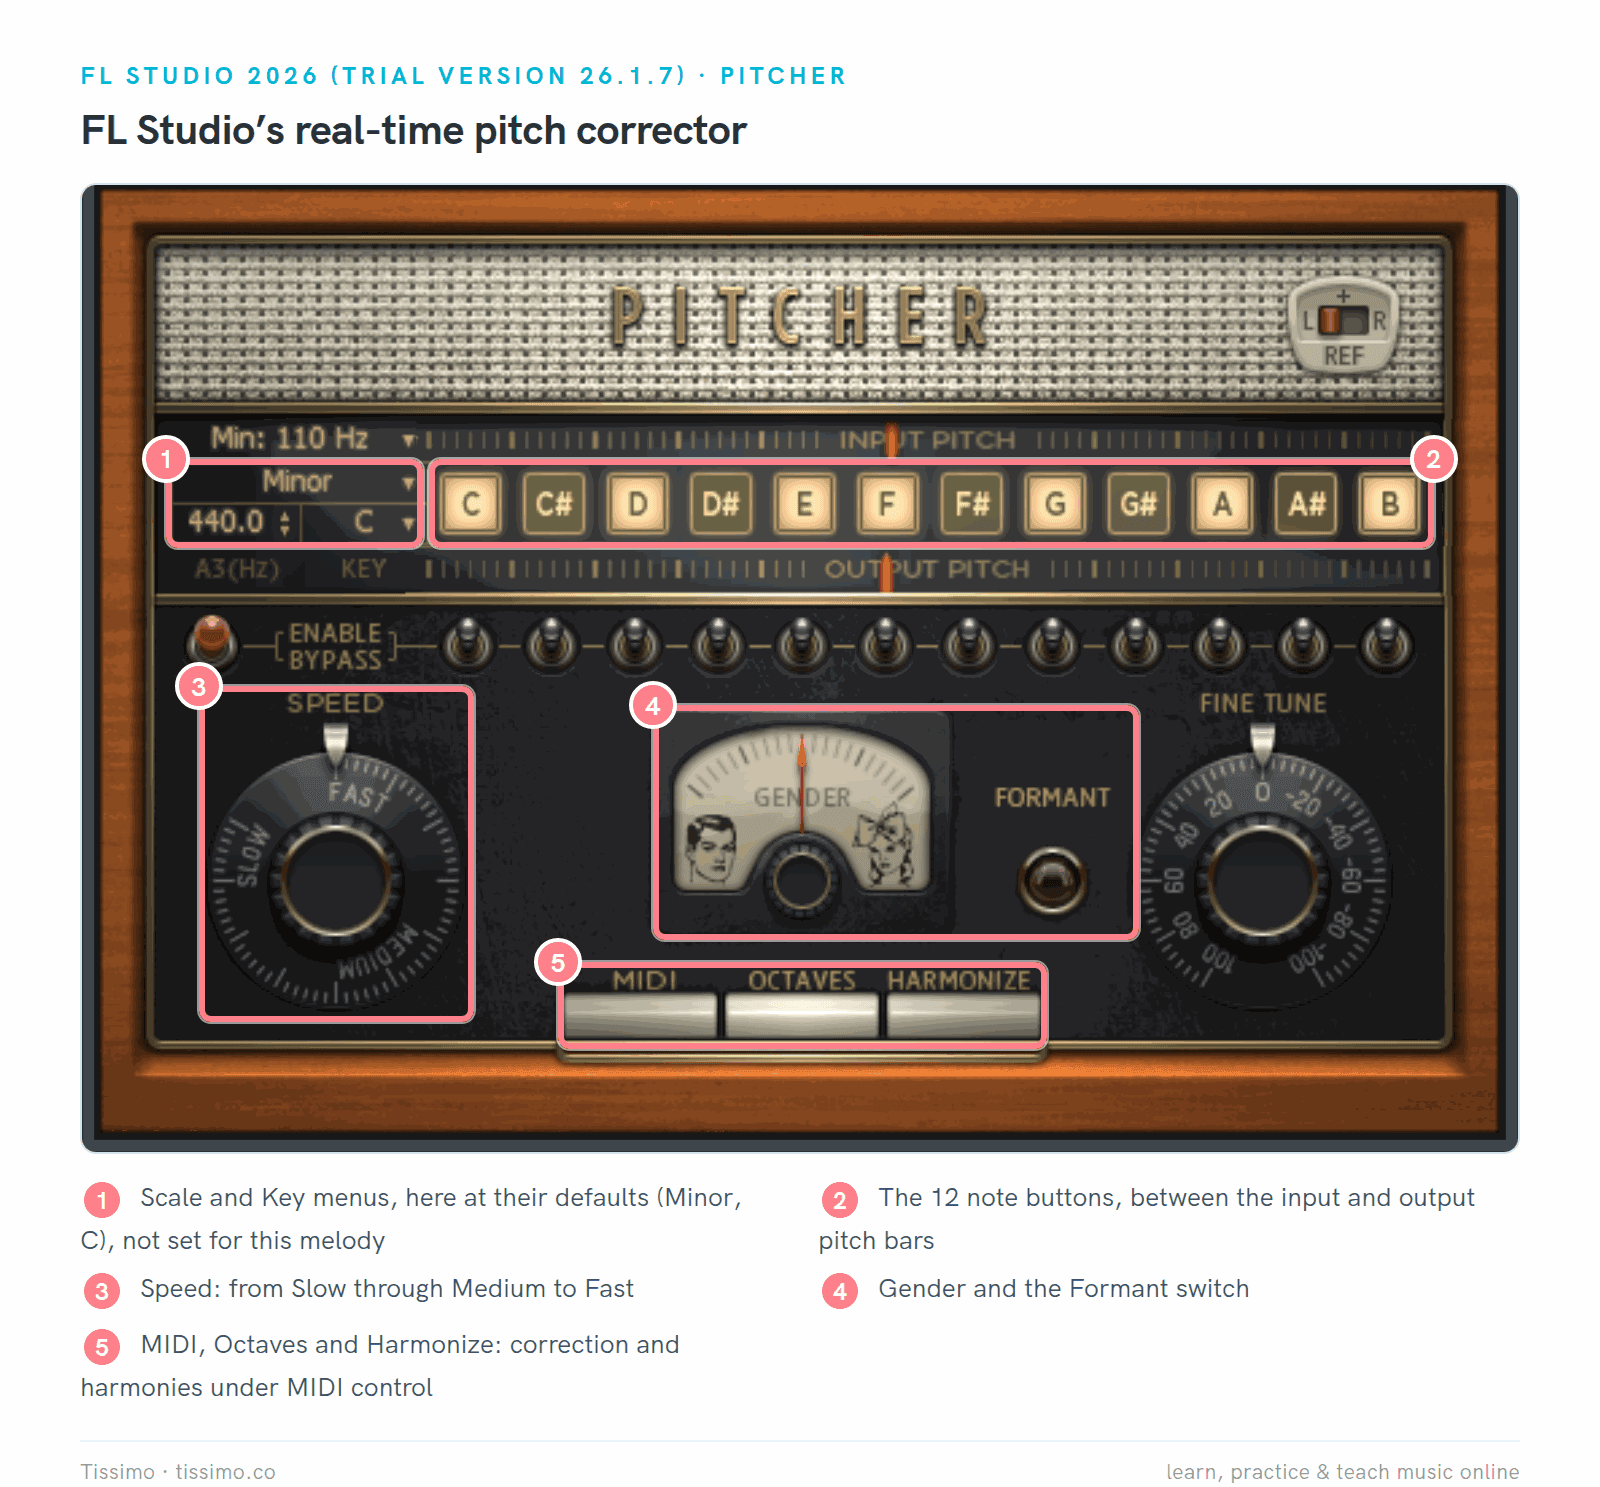
FL Studio's Pitcher at its default settings, with the test melody playing: Scale and Key, the 12 note buttons, the Speed dial, Gender and Formant, and three switches for MIDI-controlled correction and harmonies.
The built-in tool is usually enough if you work in one DAW and want either light correction or the effect. Our companion guides list more plugins for Ableton Live, FL Studio and Logic Pro.
Which one should you use?
Start with what you already have. If your DAW includes a pitch correction tool, learn it first: the same moves apply there (key, speed, formants). Add Graillon 3 Free Edition when you want one free plugin that loads in Live, FL Studio and Logic, or when your FL Studio edition does not include Pitcher. Choose x42-autotune if you record in an LV2 host and want small fixes from open-source software.
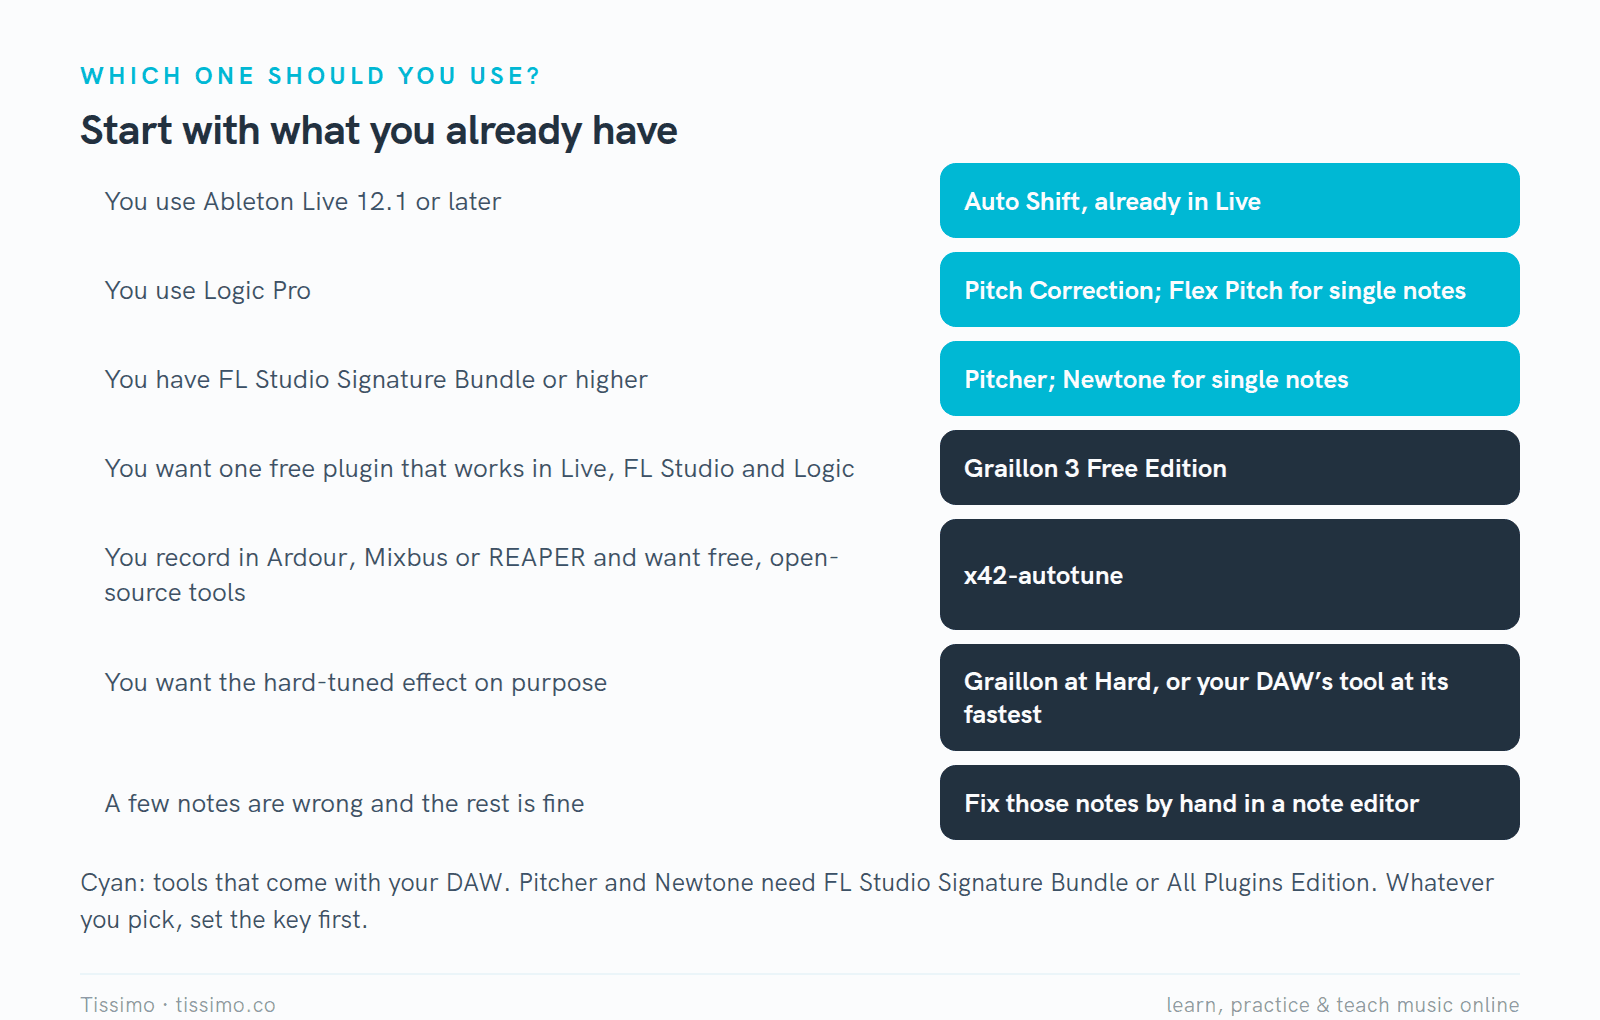
Pick by your DAW and the job. Whatever you choose, set the key first.
Pitch correction works best on a good take. Mike Senior notes that noisy, reverberant recordings are harder for pitch tools to analyze, so record close to the microphone in a quiet room (see our Shure MV7i review). And as Paul White points out, these tools work best when the singer's pitching is reasonable in the first place. Our singing basics guide covers posture, breath and warm-ups, and the guide to producing music at home puts recording and mixing in order. A Tissimo voice teacher can work on your pitching in a live lesson, so the plugin has less to fix.
Free worksheets for this lesson
- The major scale — the whole-and-half-step recipe that tells you which seven notes to allow.
- Key Signatures: Major & Minor — all fifteen signatures with each major key's relative minor, so you can read a song's notes from its key signature.
Sources
- Graillon — Auburn Sounds
- Graillon 3 User's Guide (PDF) — Auburn Sounds
- Graillon 3 cheat sheet — Auburn Sounds
- Graillon 3 — Auburn Sounds on itch.io
- x42-autotune — x42 plugins
- Questions & Answers — x42 plugins
- fat1.lv2 source — Robin Gareus on GitHub
- AT1 quick guide — Fons Adriaensen
- Live Audio Effect Reference: Auto Shift — Ableton Reference Manual 12
- Live 12 release notes — Ableton
- Live 13 — Ableton
- Pitcher — FL Studio Manual, Image-Line
- Newtone — FL Studio Manual, Image-Line
- Compare FL Studio editions — Image-Line
- Pitch Correction effect controls — Logic Pro User Guide, Apple
- Pitch Correction effect — Logic Pro User Guide, Apple
- Edit pitch and timing with Flex Pitch — Logic Pro User Guide, Apple
- Quantize pitch in the Audio Track Editor — Logic Pro User Guide, Apple
- Work with Audio Units — Logic Pro User Guide, Apple
- Using Plug-ins — Ableton Reference Manual 12
- Plugin standards — FL Studio Manual, Image-Line
- How do I keep vocals sounding natural when using Auto-Tune?, Paul White — Sound On Sound
- Pitch-correction Plug-ins, Mike Thornton — Sound On Sound
- Vocal Editing: Pitch & Time, Mike Senior — Sound On Sound
- What is Melodyne? — Celemony
- AutoTune Pro — Antares
Read this article online: https://tissimo.co/articles/pitch-correction-plugins-compared-graillon-x42-autotune-and-more



Comments