 Back

EQ Plugins Compared: FabFilter Pro-Q 4, TDR Nova, SlickEQ and Free EQs, Plus Five EQ Moves to Try
An EQ plugin turns some frequencies up or down. FabFilter's page calls the equalizer "probably the tool you use most while mixing and mastering." You don't have to buy one to start. TDR Nova and TDR VOS SlickEQ are free on Windows and macOS, LSP's 16-band equalizer is free on Linux, and the EQ inside your DAW covers the basics. FabFilter Pro-Q 4 is the commercial reference in this comparison, and its 30-day trial is fully functional.
This guide compares those four plugins, plus x42-eq for LV2 users, with real screenshots of each. Then it shows five EQ moves you can copy, each on a real capture with the settings visible: a high-pass, a low-mid cut, a narrow cut on a harsh spot, a gentle high shelf and a dynamic band. Versions and prices are as of November 2026.
What to look for in an EQ plugin
Every EQ is built from a few filter shapes. A bell boosts or cuts around one center frequency. A shelf lifts or lowers everything above or below a corner frequency. A high-pass (also called a low cut) removes what lies below its cutoff, and its slope, in dB per octave, says how fast.

The shapes behind every EQ on this page, computed from standard digital filter formulas. All three high-pass slopes are 3 dB down at 100 Hz; the steeper ones remove more just below it.
The next control to understand is Q, the width of a bell. A low Q affects a broad area, a high Q a narrow one. An octave is a doubling of frequency, so a band from 100 to 200 Hz is as wide, musically, as one from 1,000 to 2,000 Hz. That's why EQ displays draw their frequency axis on a log scale.

Three cuts of the same depth. At Q 0.7 the cut spans almost two octaves; at Q 6, a quarter of an octave. Plugins define Q slightly differently, so read the curve, not just the number.
Beyond the shapes, these features separate one EQ plugin from another:
- Bands and slopes. A handful of bands covers most single tracks; hunting several problem frequencies at once takes more.
- A spectrum analyzer draws the sound behind the curve. It helps you find a peak, but your ears decide.
- Dynamic bands cut or boost only when a frequency area gets loud. More in move 5.
- Mid/side processing lets you EQ what the two channels share (the mid) separately from what differs between them (the side).
- Linear phase avoids the phase shift that ordinary EQs cause, at the cost of added latency and, in some settings, what FabFilter's help calls "pre-ring", which can make transients such as a kick drum lose their edge. Apple's guide to Logic's Linear Phase EQ suggests it where phase coherence between tracks matters, such as multi-microphone recordings.
- Clean or "character". Most EQs aim to change only the frequency balance. Some, like SlickEQ, offer models with different curve shapes and optional saturation.

The five plugins side by side, from each developer's own pages on November 20, 2026. Only Pro-Q 4 has all four extras; Nova is the only free one with dynamic bands.
The five EQs, one by one
FabFilter Pro-Q 4: the paid all-rounder
Pro-Q 4 (version 4.13) lists at $199, and the download runs as a full 30-day trial. It offers up to 24 bands, slopes up to 96 dB/octave (plus a "Brickwall" setting for high- and low-cut filters), dynamic EQ on bell and shelf bands, a spectral dynamics mode, per-band mid/side, and Zero Latency, Natural Phase and Linear Phase processing. It comes in VST, VST3, AU, CLAP and AAX formats for Windows and macOS.

Pro-Q 4 (version 4.13, trial) on a test loop of drums, bass and chords. The bands sit right on the spectrum (1); the selected band's values (2) and controls (3) float beside it.
- Pros: you add, drag and read bands right in the display; the widest feature set here; an Auto Gain switch that makes up level changes, which helps when you compare settings.
- Cons: $199 after the trial; no Linux version; its Auto Gain is an estimate from the curve, not a measured match (FabFilter's help says so).
- Suits: anyone who EQs every day and wants one plugin for every job, from a quick high-pass to dynamic and mid/side work.
TDR Nova: the free dynamic EQ
Nova (version 2.2.3, free) from Tokyo Dawn Labs is a "parallel dynamic equalizer": four bands that can each become dynamic, plus high-pass and low-pass filters. It runs on Windows, macOS and Linux as VST2 and VST3, with AU on the Mac and AAX for Pro Tools. The paid Gentleman's Edition has six bands and more dynamics options.
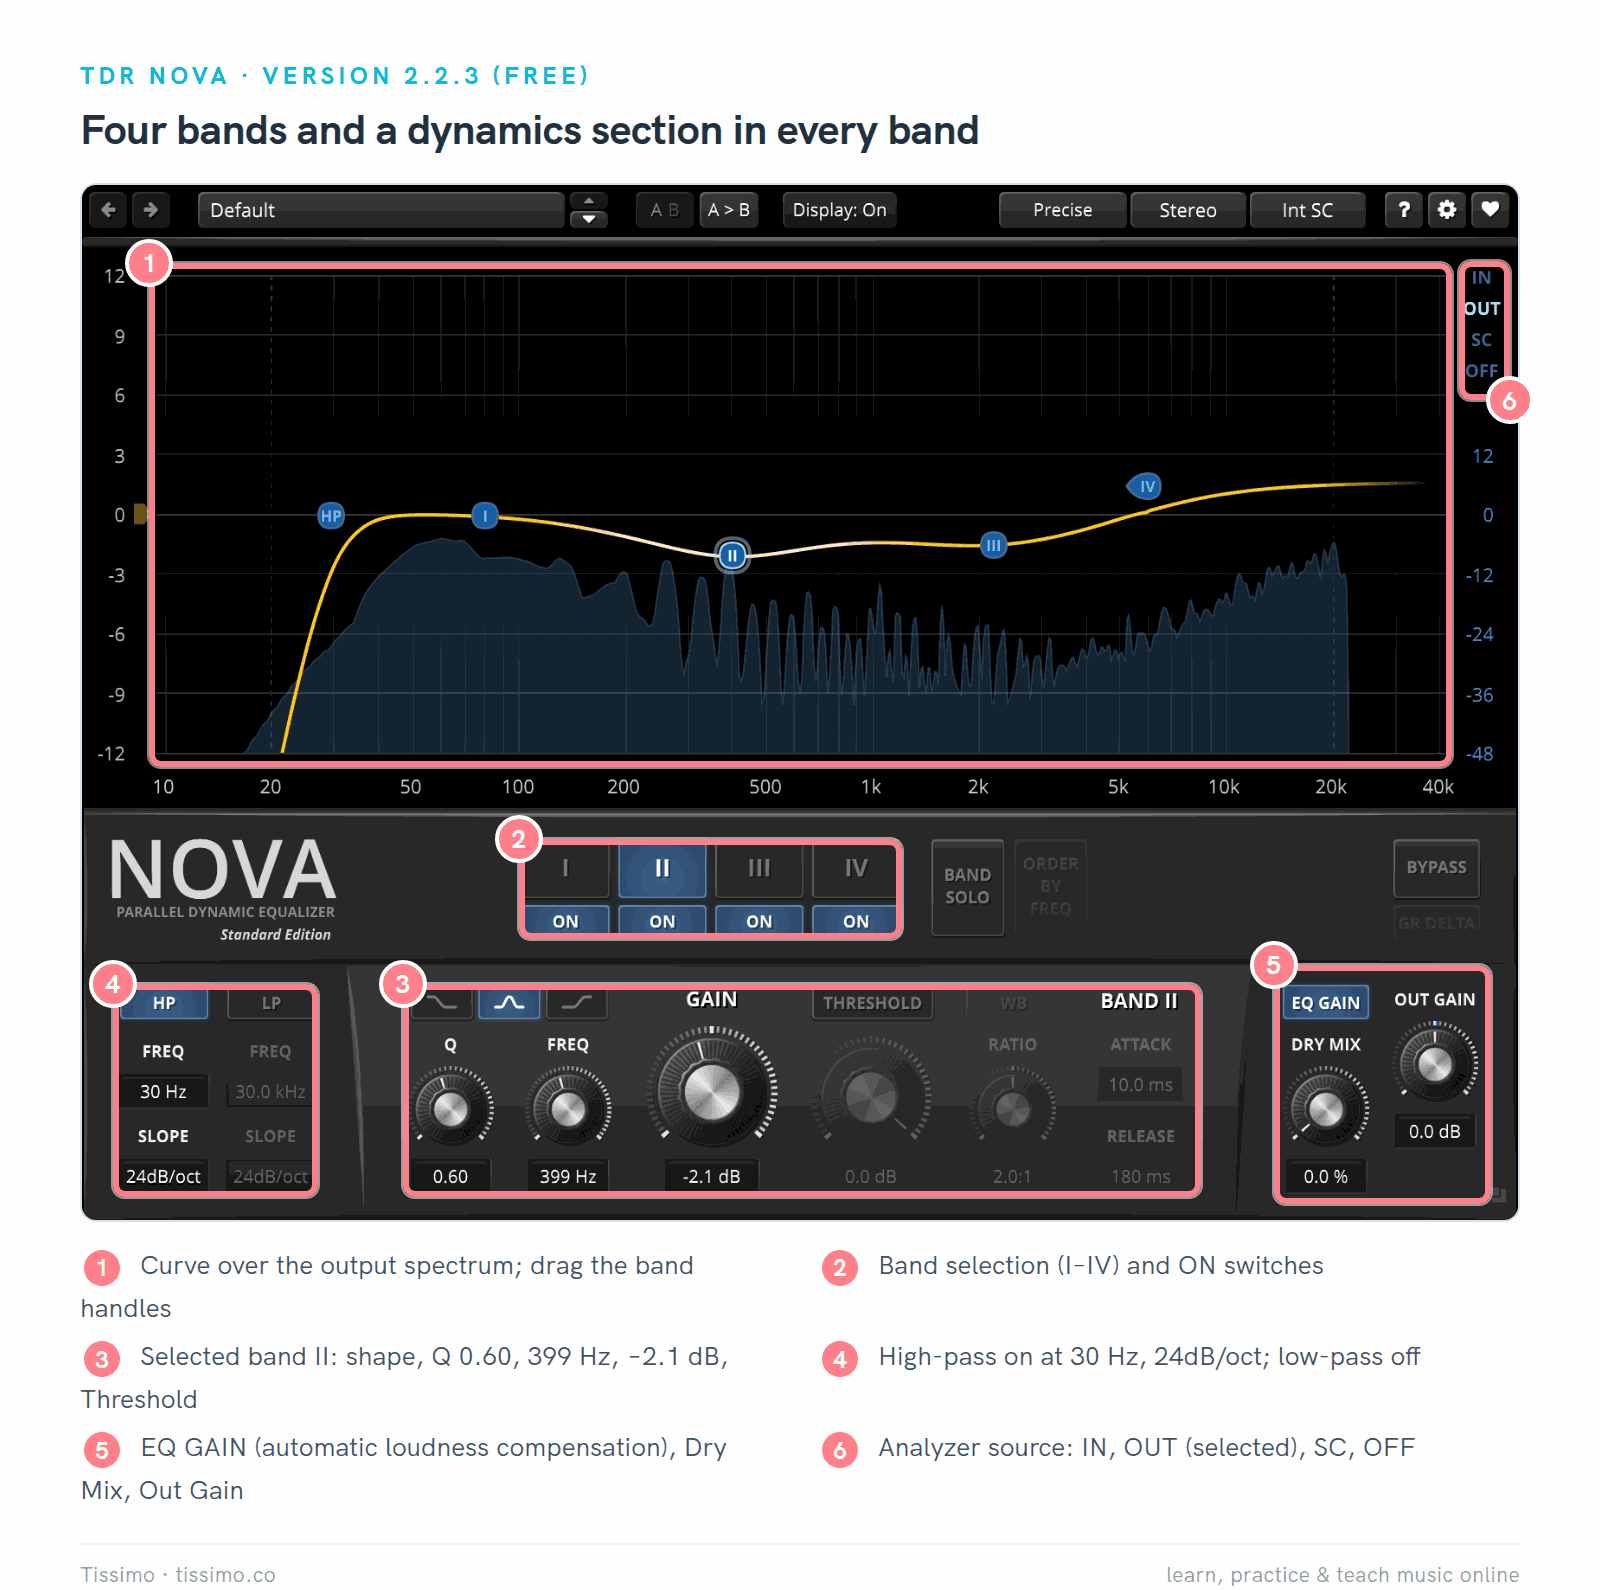
TDR Nova 2.2.3 on the same loop. The selected band's knobs (3) include THRESHOLD, which makes the band dynamic; EQ GAIN (5) compensates the level change of static EQ moves automatically.
- Pros: free on all three systems; every band can turn dynamic; an analyzer that can follow the input or output; automatic loudness compensation for static EQ, so a cut isn't judged as simply "quieter".
- Cons: four bands in the free edition; no linear-phase mode; mid/side ("Sum" and "Diff") applies to the whole plugin, so separate mid and side EQs need two instances, as the manual explains.
- Suits: most readers. If you install one free EQ, this one covers all five moves below.
TDR VOS SlickEQ: free, with character
SlickEQ (version 1.3.9, free), made by Tokyo Dawn Labs with Variety of Sound, is a three-band EQ in a console-style layout: low, mid and high, plus an 18 dB/octave high-pass. There are no Q knobs. Instead, four EQ models (American, British, German and Soviet) each bring their own curve shapes, and the EQ SAT switch and the output stage add saturation. It runs on Windows and macOS (VST2, VST3, AU, AAX).

SlickEQ 1.3.9 in its British model (1), with EQ SAT on (2) and the Silky output stage (3). Low shelf 100 Hz +1.5 dB, mid 399 Hz −2.1 dB, high shelf 11.9 kHz +1.9 dB. The panel color changes with the model.
- Pros: quick to use, with few decisions; four distinct sets of curves; saturation only when you switch it on (Linear, the default output stage, is described in the manual as "as clean as it gets"); automatic gain.
- Cons: no curve display or analyzer in the free version (the paid edition adds one); no Q control; no Linux version.
- Suits: tone shaping on a vocal, a bus or a whole mix when you'd rather listen than look. For more on saturation, see our saturation and tape plugins comparison.
LSP Parametric Equalizer x16 Stereo: many bands, open source
This one comes from the Linux Studio Plugins project (version 1.2.37, open source under the LGPL 3.0). It has 16 filters, each with a type (bell, shelves, high- and low-pass, notch, resonance and more), a filter family, a slope and a Q. A Mode menu switches between zero-latency IIR filters and several linear-phase and minimum-phase modes. Formats are CLAP, LV2, VST2, VST3 and LADSPA. Builds are free for Linux and FreeBSD; ready-made Windows builds are sold by the build service LSP's download page points to, and there is no ready-made macOS build.

LSP's equalizer with the same four moves as the Pro-Q 4 example: Hi-pass at 29.9 Hz, bells at 299.5 Hz (−2.50 dB) and 2999.5 Hz (−2.01 dB), Hi-shelf at 9999.5 Hz (+1.50 dB). Each filter is a column in the table (2).
- Pros: free and open source; 16 bands; linear-phase modes (they add latency, as the manual notes); an analyzer with a note scale; Inspect, which lets you hear just the area around a filter.
- Cons: a dense interface with technical labels (RLC, BWC, BT, MT); filters 9 to 16 sit on a second page; paid on Windows and not available ready-made for macOS. Mid/side needs the separate Mid/Side version.
- Suits: Linux and FreeBSD users who want many bands and linear phase without paying; on Windows, only if you are willing to pay for a ready-made build.
x42-eq: a compact LV2 EQ
x42-eq (version 0.8.13), by Robin Gareus, has four parametric bands, low and high shelves, and high- and low-pass filters at 12 dB/octave, with zero latency and a spectrum display. Its source code is free under the GPL, and the developer notes that Linux users generally get it free from their distribution. The official binaries for Windows, macOS and Linux run as a demo until you buy a license ($29 on the developer's page in November 2026, marked down from $69): the audio processing works normally, but the editor does not respond to the mouse and eventually fades to black.

x42-eq 0.8.13 with the same kind of curve: high-pass at 30.0 Hz, −2.5 dB at 300 Hz, −2.0 dB at 3000 Hz, +1.5 dB shelf at 8.0 kHz. Its ±30 dB scale makes small moves look flat. The watermark is the demo's.
- Pros: small and clear; zero latency; a piano strip that maps frequencies to notes; free from Linux distributions.
- Cons: LV2 only, so it doesn't load in Ableton Live, FL Studio or Logic Pro; the official download needs a license; fixed 12 dB/octave filters.
- Suits: users of LV2 hosts such as Ardour, REAPER or Audacity; Harrison Mixbus ships with it.
Five EQ moves, shown on real captures
Treat every value below as a starting point. Set the move, then judge it in the full mix rather than with the track soloed, as Mike Senior and Paul White advise in Sound On Sound.
1. A high-pass below the part
Many parts have little below their lowest note except rumble, hum or handling noise. Find the lowest fundamental and set a high-pass under it. The test melody here bottoms out at C4, which is 261.63 Hz (our MIDI Notes, Octaves and Frequency sheet shows how notes map to Hz), so a 100 Hz cutoff takes away nothing the melody needs.

Pro-Q 4 on the test melody: Low Cut at 100.00 Hz, 24 dB/oct (1, 2). The note sounding here is E4, about 330 Hz (3); even the melody's lowest note, C4, sits well above the cutoff.
A steeper slope keeps more of what's just above the cutoff; a gentler 12 dB/octave slope changes the sound less abruptly. On a bass or a kick drum, keep the cutoff low or skip it.
2. A broad cut in the low mids
When chords, guitars and keys pile up in the low mids, a mix can sound thick or muddy. Senior and White note that you can often take a lot of low end out of acoustic guitars or synth pads before they sound thin in context. A wide, shallow cut on such parts makes room for the bass and the kick drum.

TDR Nova band II: a bell at 299 Hz, −3.1 dB, Q 0.69 (1). A low Q spreads the cut wide (2).
300 Hz is a place to start searching, not a magic "mud" frequency. Sweep the band while you listen. Our Ableton mixing article makes the same move with Live's EQ Eight in a small mix.
3. A narrow cut on a harsh spot
Harshness often sits in the upper midrange. For a shrill guitar amp, Sam Inglis suggests shaving a few dB off somewhere in the 2 to 4 kHz area with a fairly broad band; when one frequency rings or pierces, a narrower cut like the one below changes less of the sound around it. To find the spot, Paul White and Matt Houghton describe a common method in Sound On Sound: set a band to a Q of about 1, boost it strongly, sweep it until the problem jumps out, then turn the boost into a cut.

LSP filter 1: Bell, 2599.5 Hz, −4.00 dB, Q 4.00 (1). The narrow dip (2) sits on a peak of the test melody near 2.6 kHz.
Keep narrow cuts only as deep as they need to be. Senior and White note that a narrow cut can go much deeper than a natural-sounding boost, but also that a deep notch can lower wanted sound around it.
4. A gentle high shelf
A shelf boost is a common way to add air and presence at the top end, Sam Inglis notes in Sound On Sound; he suggests trying turnover frequencies from 10 or 15 kHz down to the midrange. Start with a dB or two. Remember that you can't boost what isn't there: on a dull recording, a treble boost mostly adds noise. Our Synth Waveforms and Their Harmonics sheet shows which harmonics a tone has.

SlickEQ's high band as a shelf at 10.0 kHz, +1.9 dB (1, 2), with EQ GAIN on (3), so the level stays about the same while you compare.
5. A dynamic band
A static cut works all the time. A dynamic band cuts only when its frequency area gets louder than a threshold, which suits problems that come and go, such as one boomy note. It works like a compressor that listens to one band; our compressor plugins comparison explains threshold and ratio.

An illustration of the idea: the dynamic band (cyan) leaves the quieter passages alone and cuts the loud ones, more the louder they get.
In Nova, select a band, switch THRESHOLD on and lower the threshold until a yellow area appears: that is the gain reduction happening right now. The capture exaggerates the cut, to about 8 dB, so you can see it. Don't copy the threshold number: it depends on how loud your track is. Raise the threshold until the yellow area appears only on the notes that bother you, and start with a few dB of reduction.
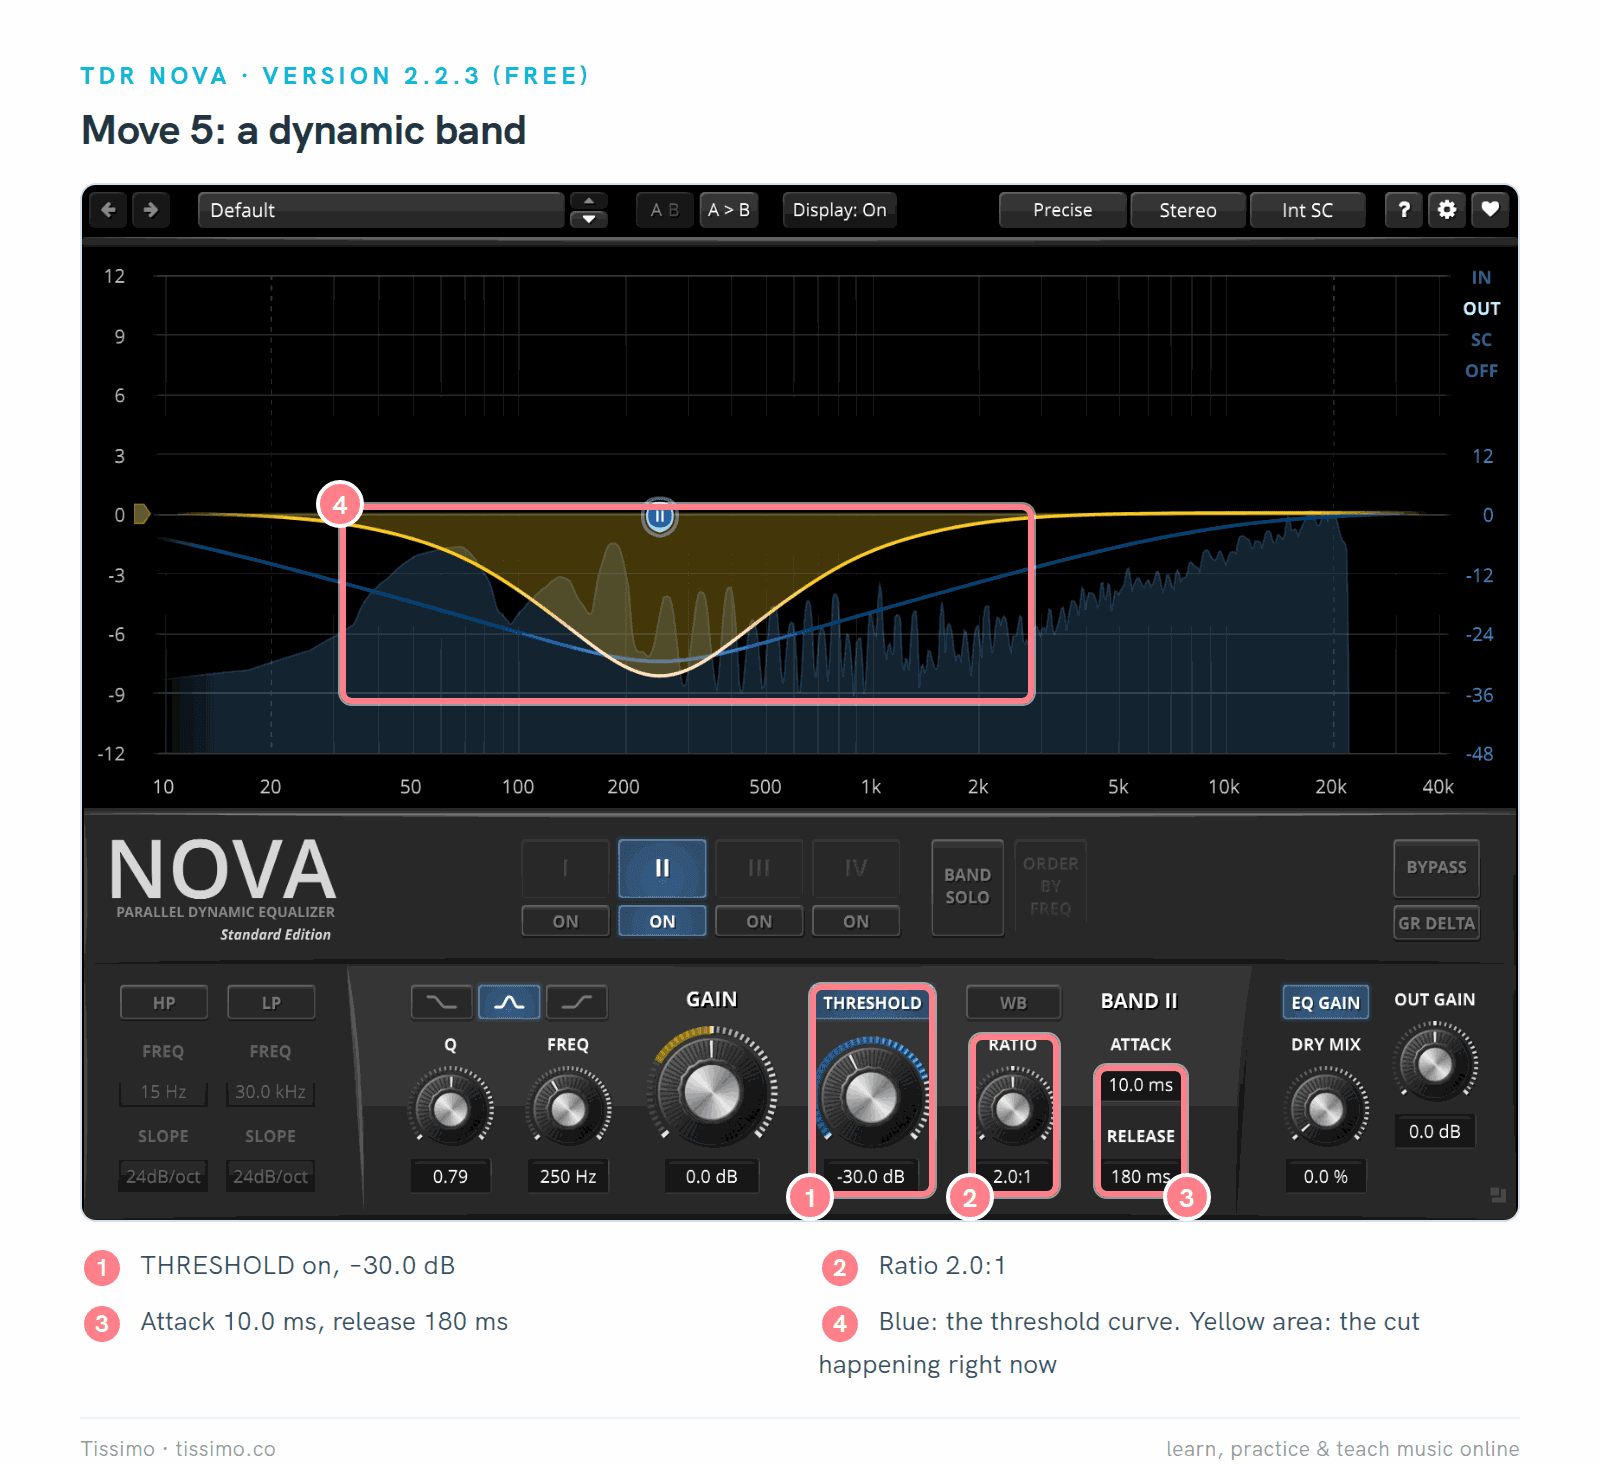
Nova band II at 250 Hz, Q 0.79, gain 0.0 dB, made dynamic: threshold −30.0 dB (1), ratio 2.0:1 (2), attack 10.0 ms and release 180 ms (3). The yellow area (4) is the cut at that moment.
Pro-Q 4 does the same with a ring around the Gain knob: set it to a negative range and the band becomes dynamic.

Pro-Q 4 with a dynamic bell: its readout (5) shows 2600.0 Hz, 0.00 dB and Q 2.000. The ring (1) is set to a dynamic range of −6 dB and the slider (2) to a threshold of −35.0 dB; this view shows those two as positions, not numbers. The green area (4) shows how far it can cut.
Comparing fairly, and common mistakes
An EQ boost makes a sound louder, and louder tends to sound more impressive. Sam Inglis suggests matching the level after a boost with the fader or the plugin's output gain before you judge. Three of these plugins can estimate it for you: Pro-Q 4's Auto Gain, and EQ GAIN in Nova and SlickEQ. Check by ear all the same. Then switch the plugin's bypass on and off at a realistic listening volume. Headphones work for this; our beyerdynamic DT 770 PRO X review looks at one closed pair for home recording.
Common mistakes:
- EQing in solo. A part that sounds thin alone may sit well in the mix.
- Boosting what isn't there. A treble boost on a dull recording adds noise, not brightness.
- Narrow boosts. White and Houghton note that narrow boosts sound far more obvious and unnatural than equally deep cuts.
- Trusting the analyzer over your ears. The display shows energy, not whether it sounds good.
- One setting for every track. A 100 Hz high-pass that helps a vocal can gut a bass.
Using them in Ableton Live, FL Studio and Logic Pro
Each DAW loads certain plugin formats only, so check before you download. Our guide to VST plugins and how to install them covers the steps.
- Ableton Live 12 loads VST2, VST3 and, on the Mac, Audio Units. Pro-Q 4, Nova and SlickEQ all come in formats it loads, and so do LSP's paid Windows builds (VST3). Its own EQ Eight (Standard and Suite) has eight bands, Stereo, L/R and M/S modes and an analyzer; Channel EQ and EQ Three, in every edition, are simpler.
- FL Studio loads VST2, VST3 and CLAP, plus AU on the Mac. Pro-Q 4, Nova and SlickEQ come in formats it loads, and so do LSP's paid Windows builds. Its Fruity Parametric EQ 2 has seven bands, slopes from 12 to 48 dB/octave and a linear-phase mode.
- Logic Pro uses Audio Units for third-party plugins, so install the AU versions of Pro-Q 4, Nova or SlickEQ. Its Channel EQ has eight bands and an analyzer; Linear Phase EQ has the same layout with linear-phase processing and more latency.

EQ Eight in Live 12.4.15 making move 2 on the keys part of the small mix in our Ableton mixing article: a bell at 300 Hz, −3 dB, Q 1.
When is the built-in EQ enough? For moves 1 to 4, in all three DAWs. One exception: Live Intro has no EQ Eight, and its Channel EQ (an 80 Hz high-pass switch, two shelves and one sweepable mid band) has no Q control for the narrow cut of move 3. You'd add a plugin for dynamic bands (none of the built-in EQs named above has them), for more bands, or for a workflow you prefer. Our sibling guides list add-ons for Ableton Live 12, FL Studio and Logic Pro.
Which EQ should you use?
Start with the EQ you have. Add Nova when you want dynamic bands. Try Pro-Q 4's trial when you EQ every day and want to know whether its workflow is worth $199 to you.
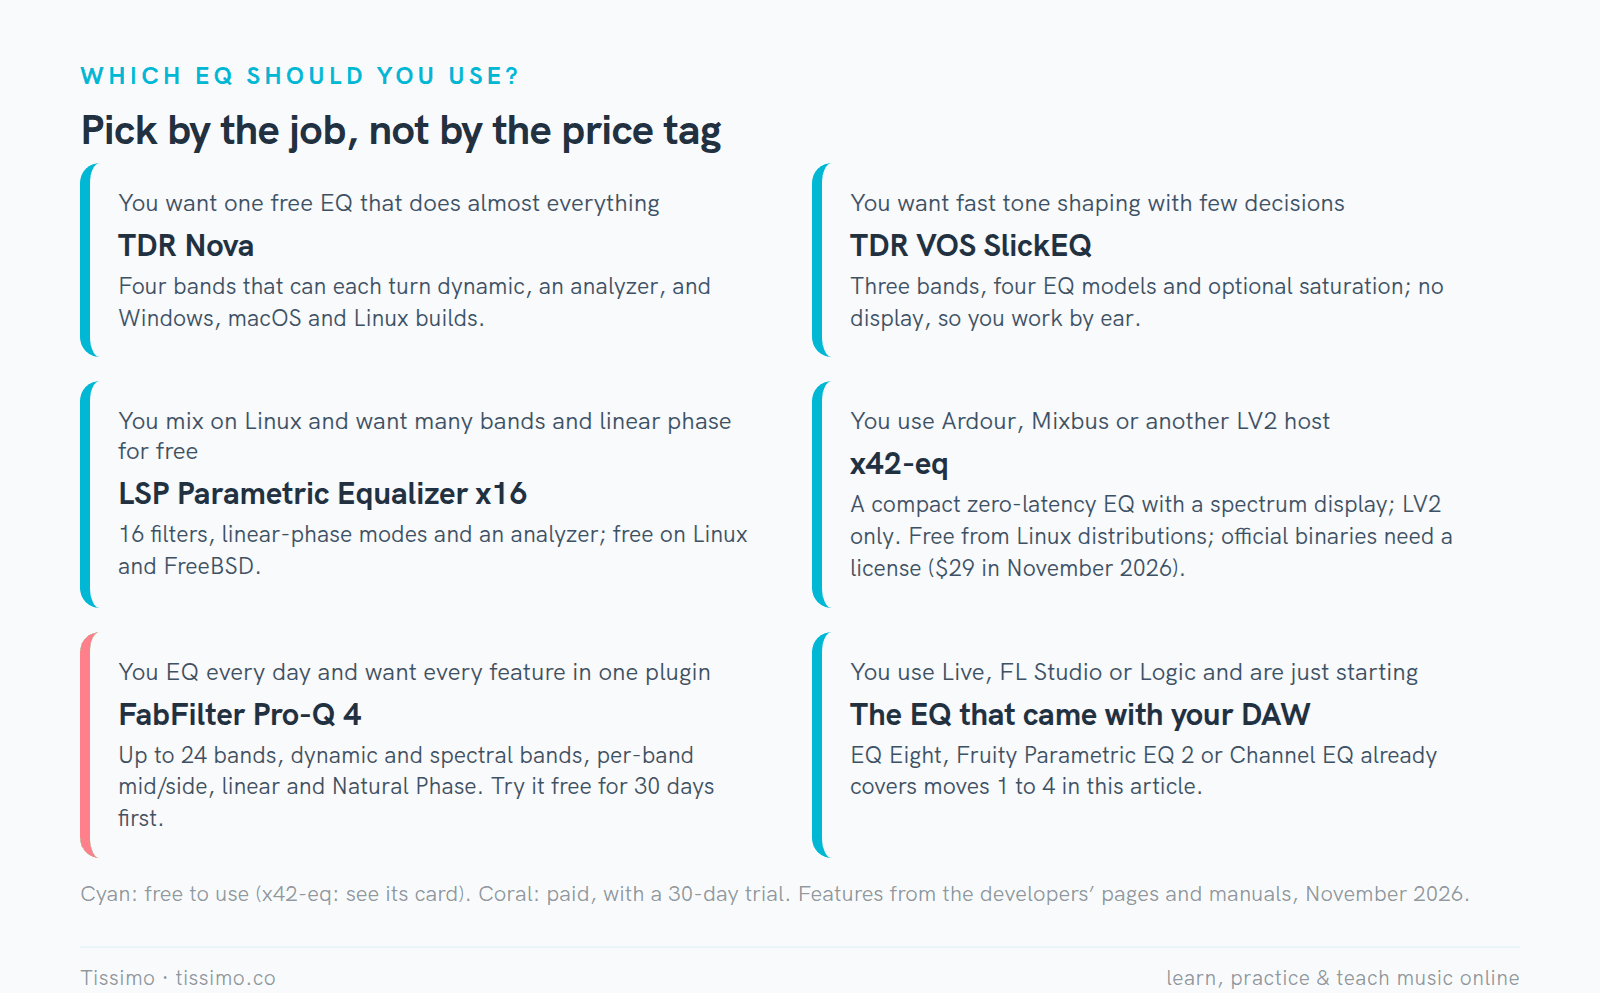
Pick by the job. Every option here can high-pass, cut and shelve; only Nova and Pro-Q 4 add dynamic bands.
If you'd like someone to listen to your mix with you and show where the EQ should go, a Tissimo music production teacher can do that in a live online lesson.
Free worksheets for this lesson
- MIDI Notes, Octaves and Frequency — how notes map to Hz, and how each octave doubles the frequency
- Synth Waveforms and Their Harmonics — the harmonics that make up a tone, which an EQ turns up or down
Sources
- Pro-Q 4 — FabFilter
- Pro-Q 4 help: dynamic EQ — FabFilter
- Downloads and trial terms — FabFilter
- Shop — FabFilter
- TDR Nova manual — Tokyo Dawn Labs
- TDR VOS SlickEQ manual — Tokyo Dawn Labs
- Parametric Equalizer x16 Stereo — LSP Plugins
- Downloads — LSP Plugins
- x42-eq — x42 plugins
- FAQ — x42 plugins
- Audio EQ Cookbook — W3C
- Using EQ, Mike Senior and Paul White — Sound On Sound
- EQ: What Do All Those Knobs Do?, Sam Inglis — Sound On Sound
- What's The Frequency?, Paul White and Matt Houghton — Sound On Sound
- Live 12 Reference Manual: audio effects — Ableton
- Fruity Parametric EQ 2 — Image-Line
- Linear Phase EQ overview — Apple
Read this article online: https://tissimo.co/articles/eq-plugins-compared-pro-q-4-tdr-nova-slickeq-and-free-eqs



Comments