 Back
Compressor Plugins Compared: FabFilter Pro-C 3, TDR Kotelnikov, Klanghelm DC1A, Xfer OTT and More
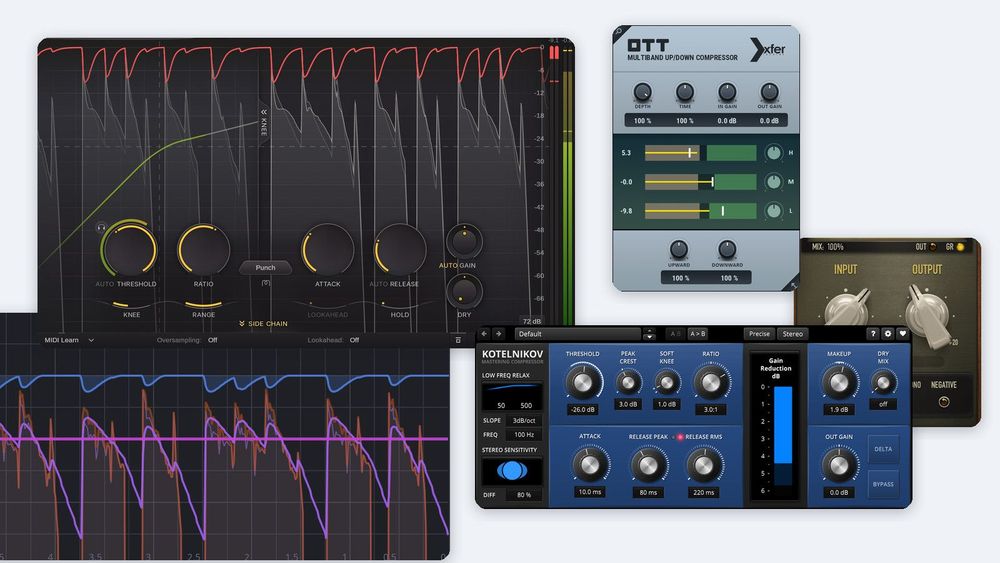
A compressor turns a sound down when it gets louder than a level you choose, and how fast, how much and how smoothly it does that is the whole art. This guide compares five compressor plugins you can try today: FabFilter Pro-C 3 (paid, with a full 30-day trial), TDR Kotelnikov, Klanghelm DC1A, Xfer OTT and LSP Compressor Stereo (all free, though LSP's free builds are for Linux and FreeBSD). The plugins are shown in real screenshots, most of them with a drum loop playing so you can see the gain reduction. Prices and versions are as of November 2026.
First, the six controls most compressors share, drawn from the math. Then each plugin with its pros and cons, four practical moves you can copy, and what to use if you'd rather stay with your DAW's own compressor. If plugins themselves are new to you, start with our guide to VST plugin formats and installing plugins.
The controls in one picture
Threshold is the level where compression starts. Ratio says how much of the signal above the threshold gets through: at 4:1, an input that rises 8 dB above the threshold comes out only 2 dB above it. Knee decides whether compression starts abruptly at the threshold (a hard knee) or eases in around it (a soft knee). Makeup gain turns the whole result back up, because compression makes the loud parts quieter. Gain reduction is what the meter shows: how many decibels the compressor is taking away right now.
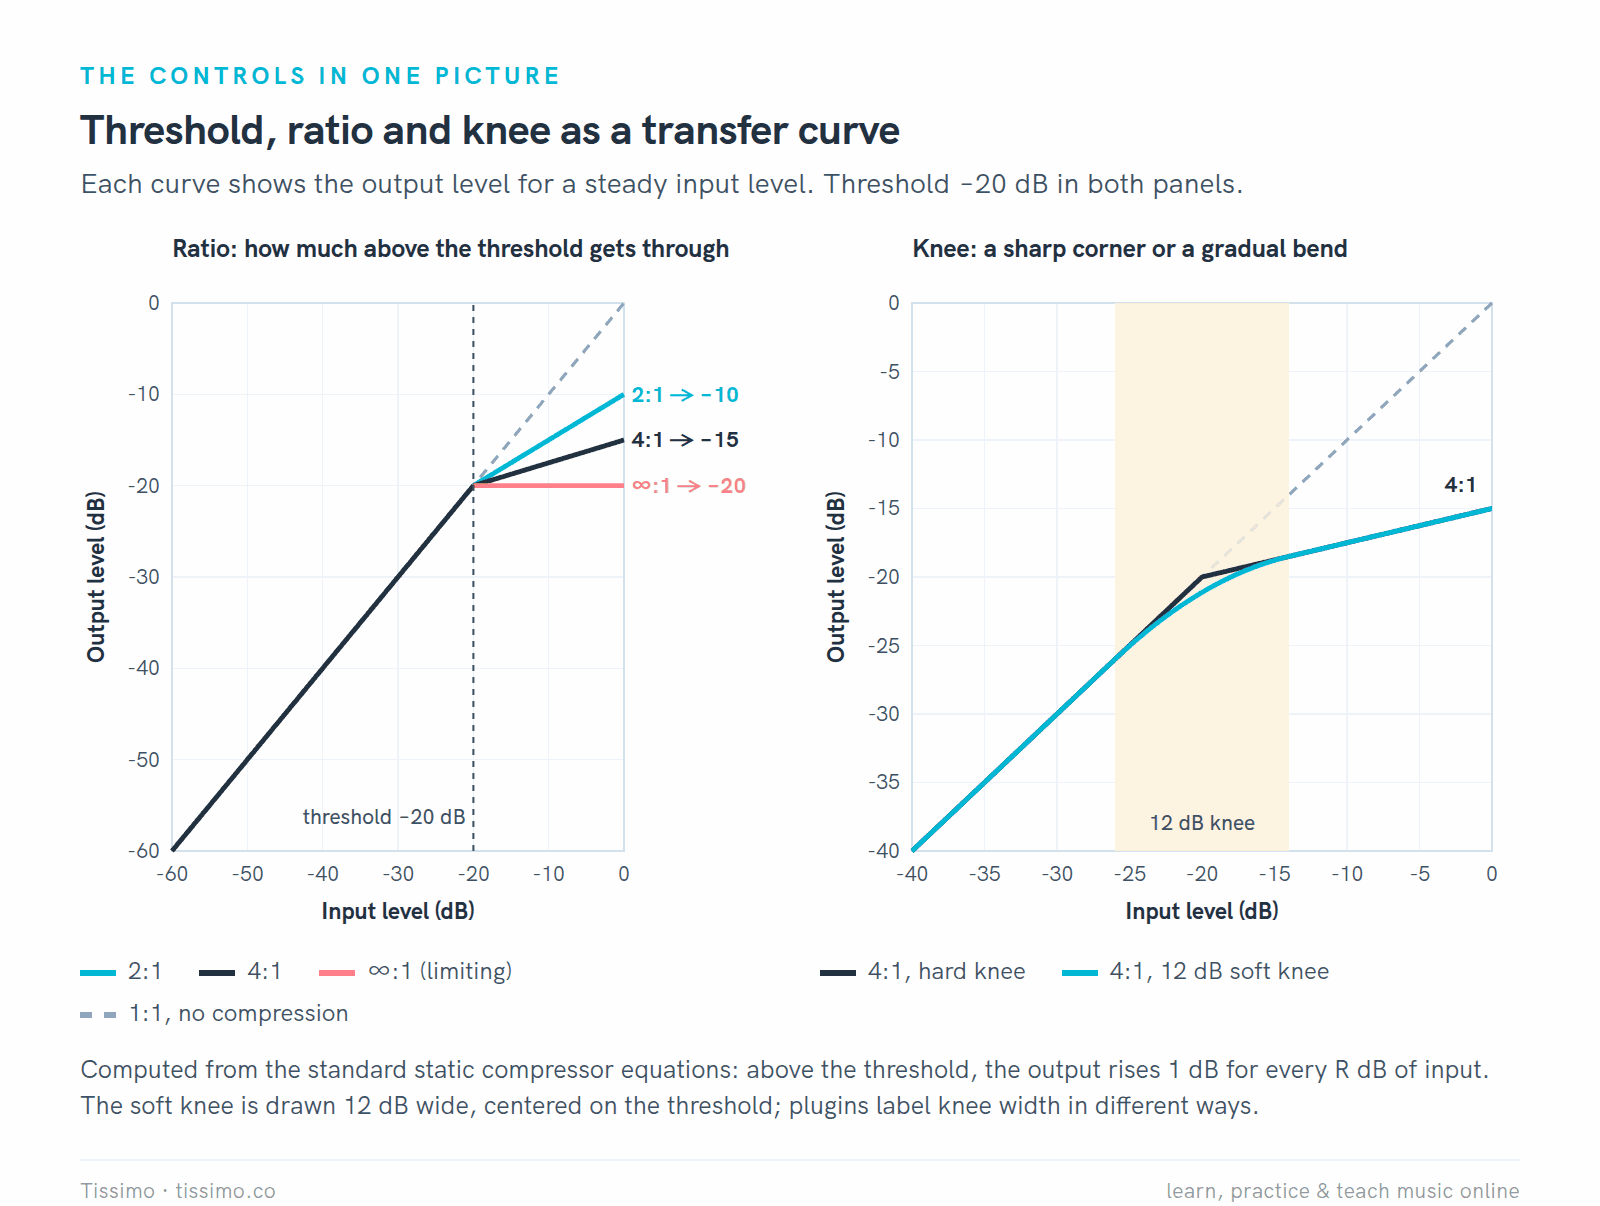
Transfer curves, computed: below the threshold, output equals input; above it, the ratio sets the slope. A soft knee rounds the corner. Plugins measure knee width differently, so a "12 dB knee" in one plugin is not exactly the same curve in another.
Attack is how quickly the gain reduction arrives once the signal crosses the threshold, and release is how quickly it lets go afterward. Ableton's manual makes the trade-off clear: an attack of 10 to 50 ms lets peaks through and keeps the start of each note, while very short attack times take the "life" out of a signal and can add distortion. Short release times can cause audible pumping.
One more term you'll meet below: the detector, also called the side-chain, is the part of a compressor that measures the level and decides how much to turn down. It can follow the highest peaks or the average level (RMS), and some compressors let you filter what it hears or feed it a different track.
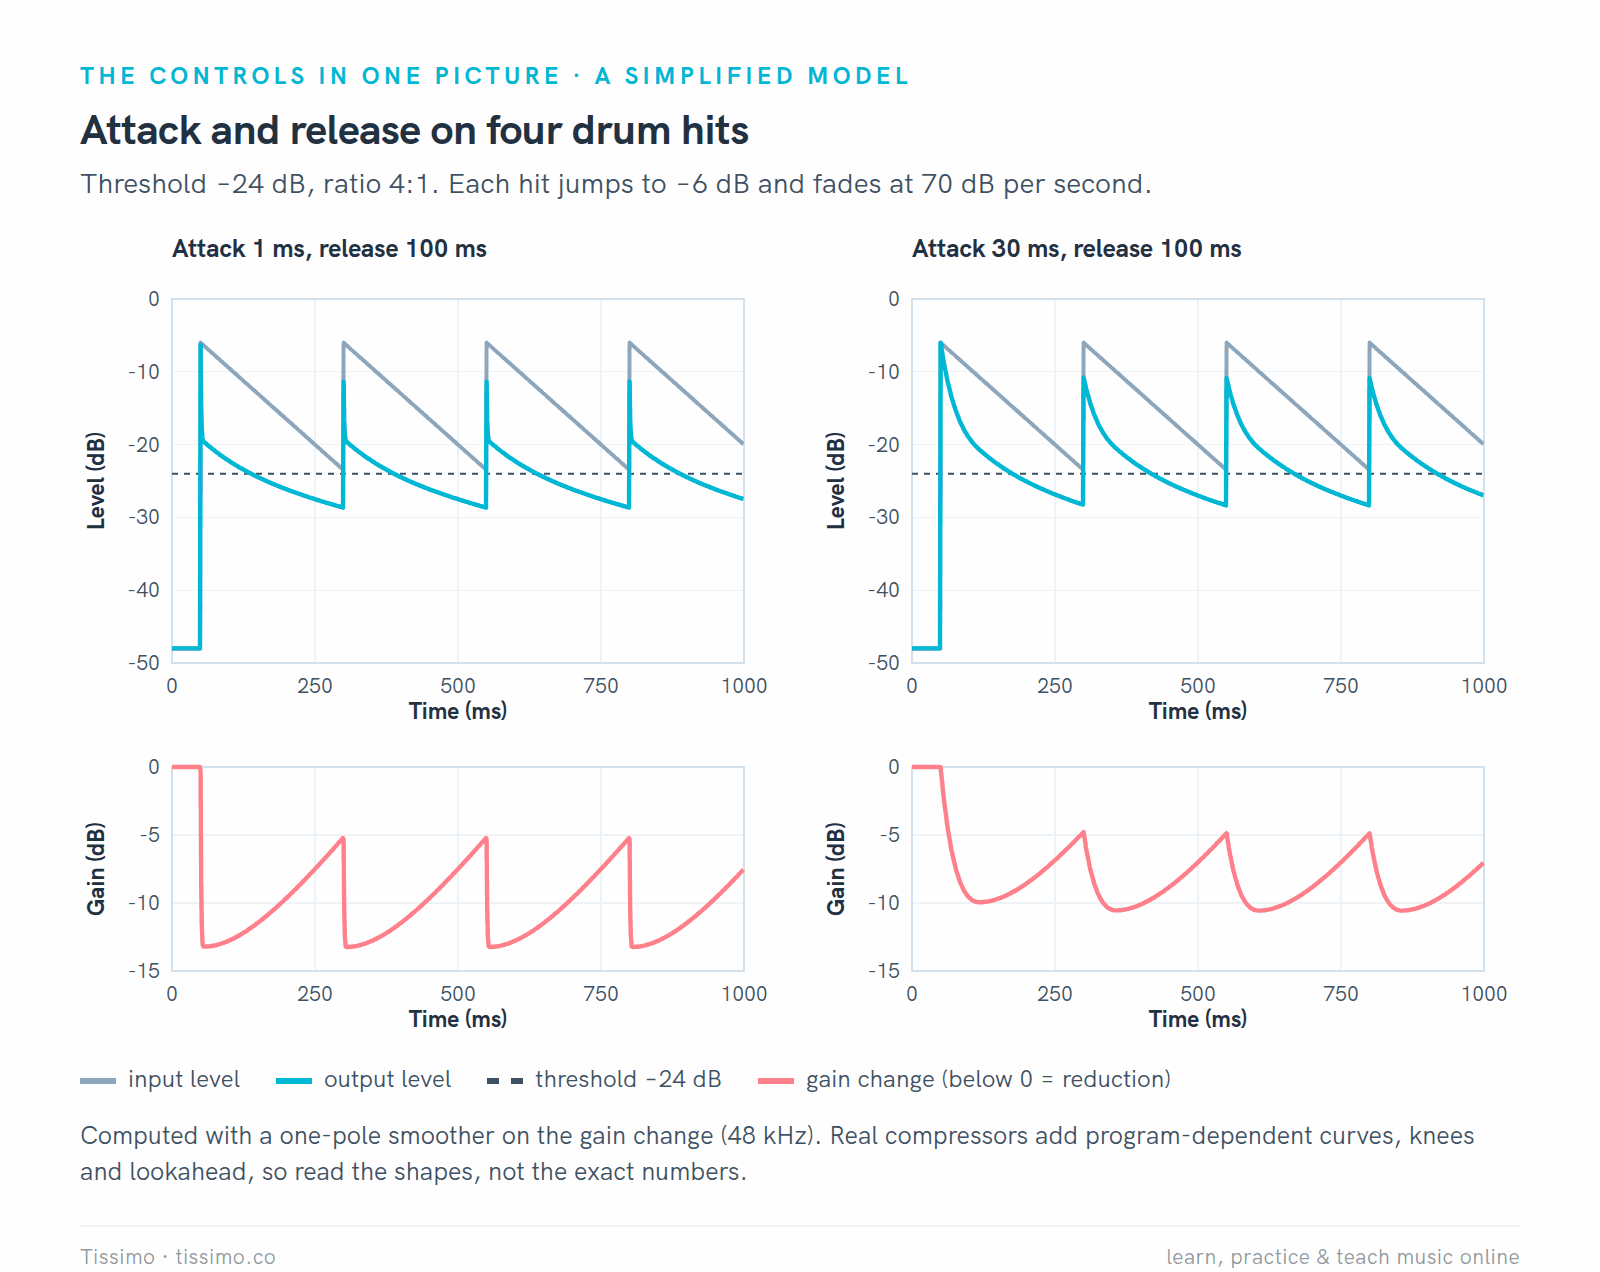
Attack and release in a simplified model (threshold −24 dB, 4:1, release 100 ms). With a 30 ms attack the front of each hit passes before the gain comes down, which is why slower attacks are a classic way to keep drums punchy.
Five compressors, compared
Here is the lineup. Four of the five run on both Windows and macOS; LSP's free builds are for Linux and FreeBSD.
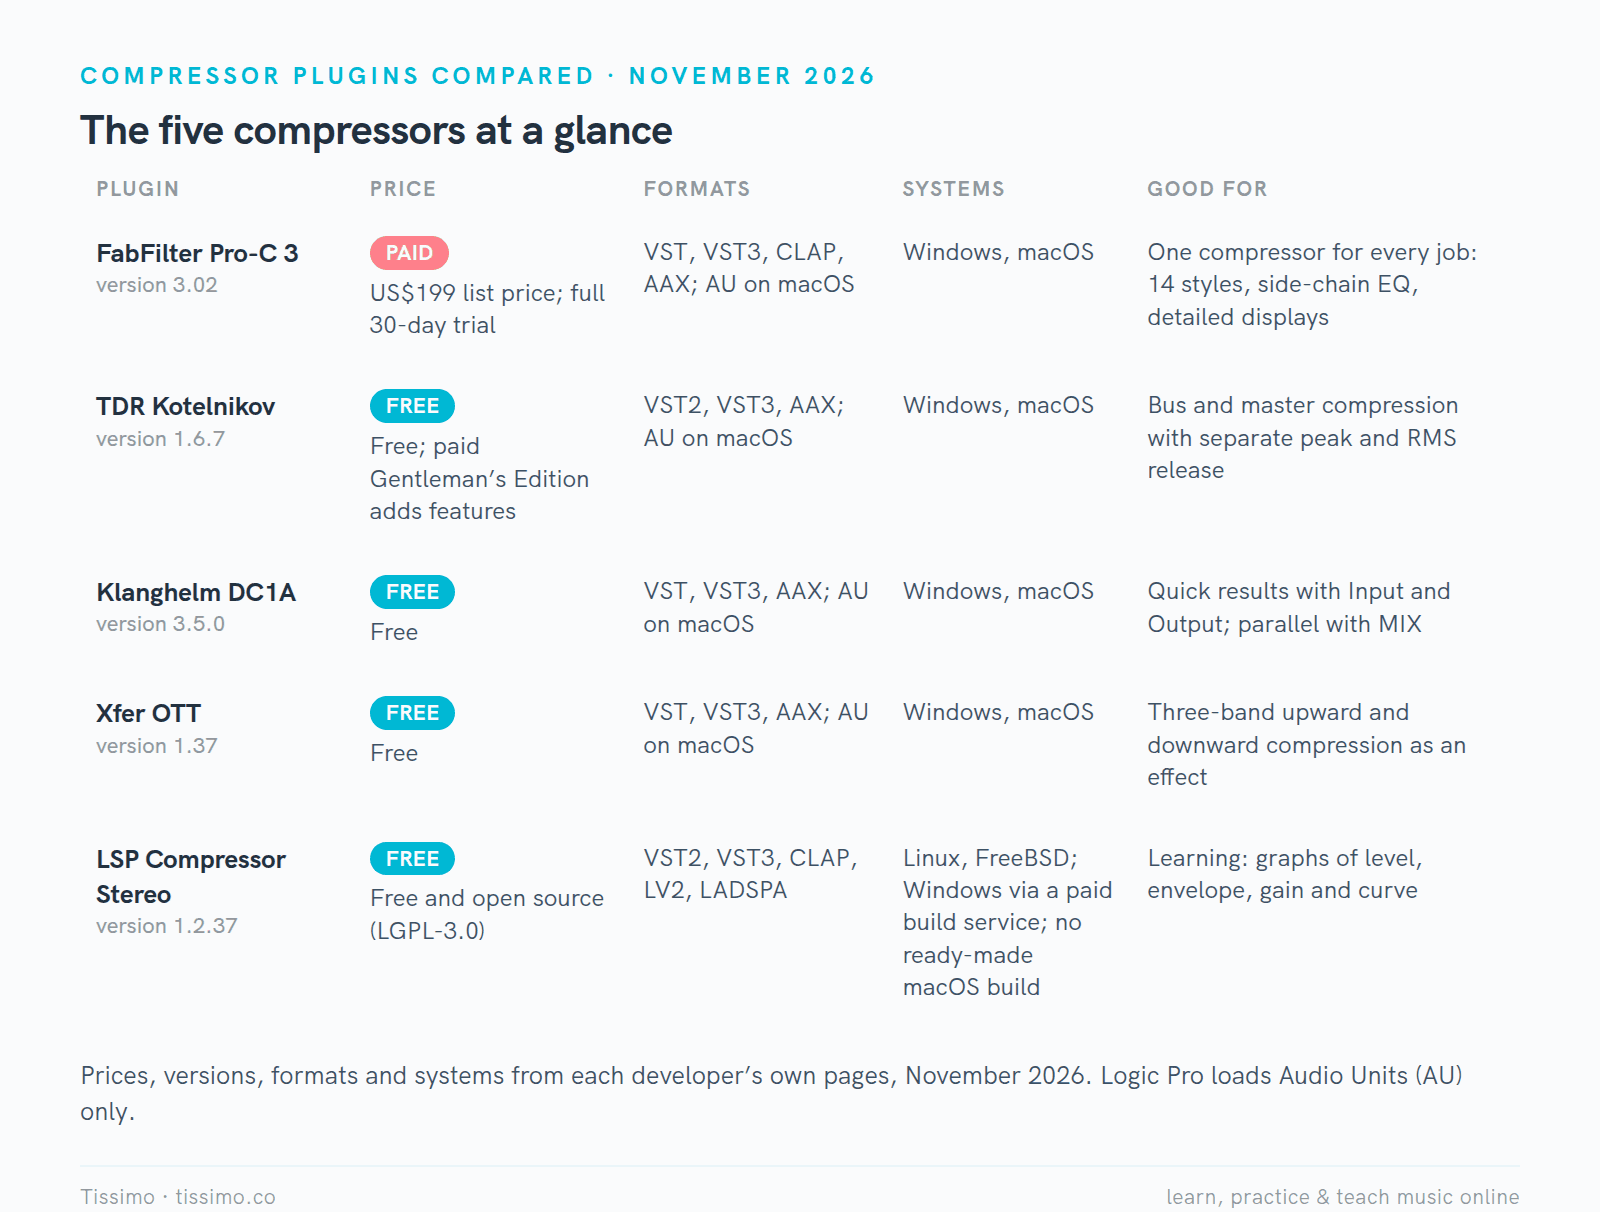
The five plugins at a glance, from each developer's own pages in November 2026. Logic Pro users need the AU version, which four of the five offer.
FabFilter Pro-C 3: one compressor for nearly every job
Pro-C 3 (version 3.02) is FabFilter's general-purpose compressor. It offers 14 compression styles in three groups (Modern, Classic and Utility), so the same knobs can behave like a clean digital compressor, an opto, a vari-mu or a bus compressor. A Character panel adds Tube, Diode or Bright saturation, and the side-chain section takes up to six EQ bands. The list price is US$199, and the download runs as a fully functional 30-day trial.
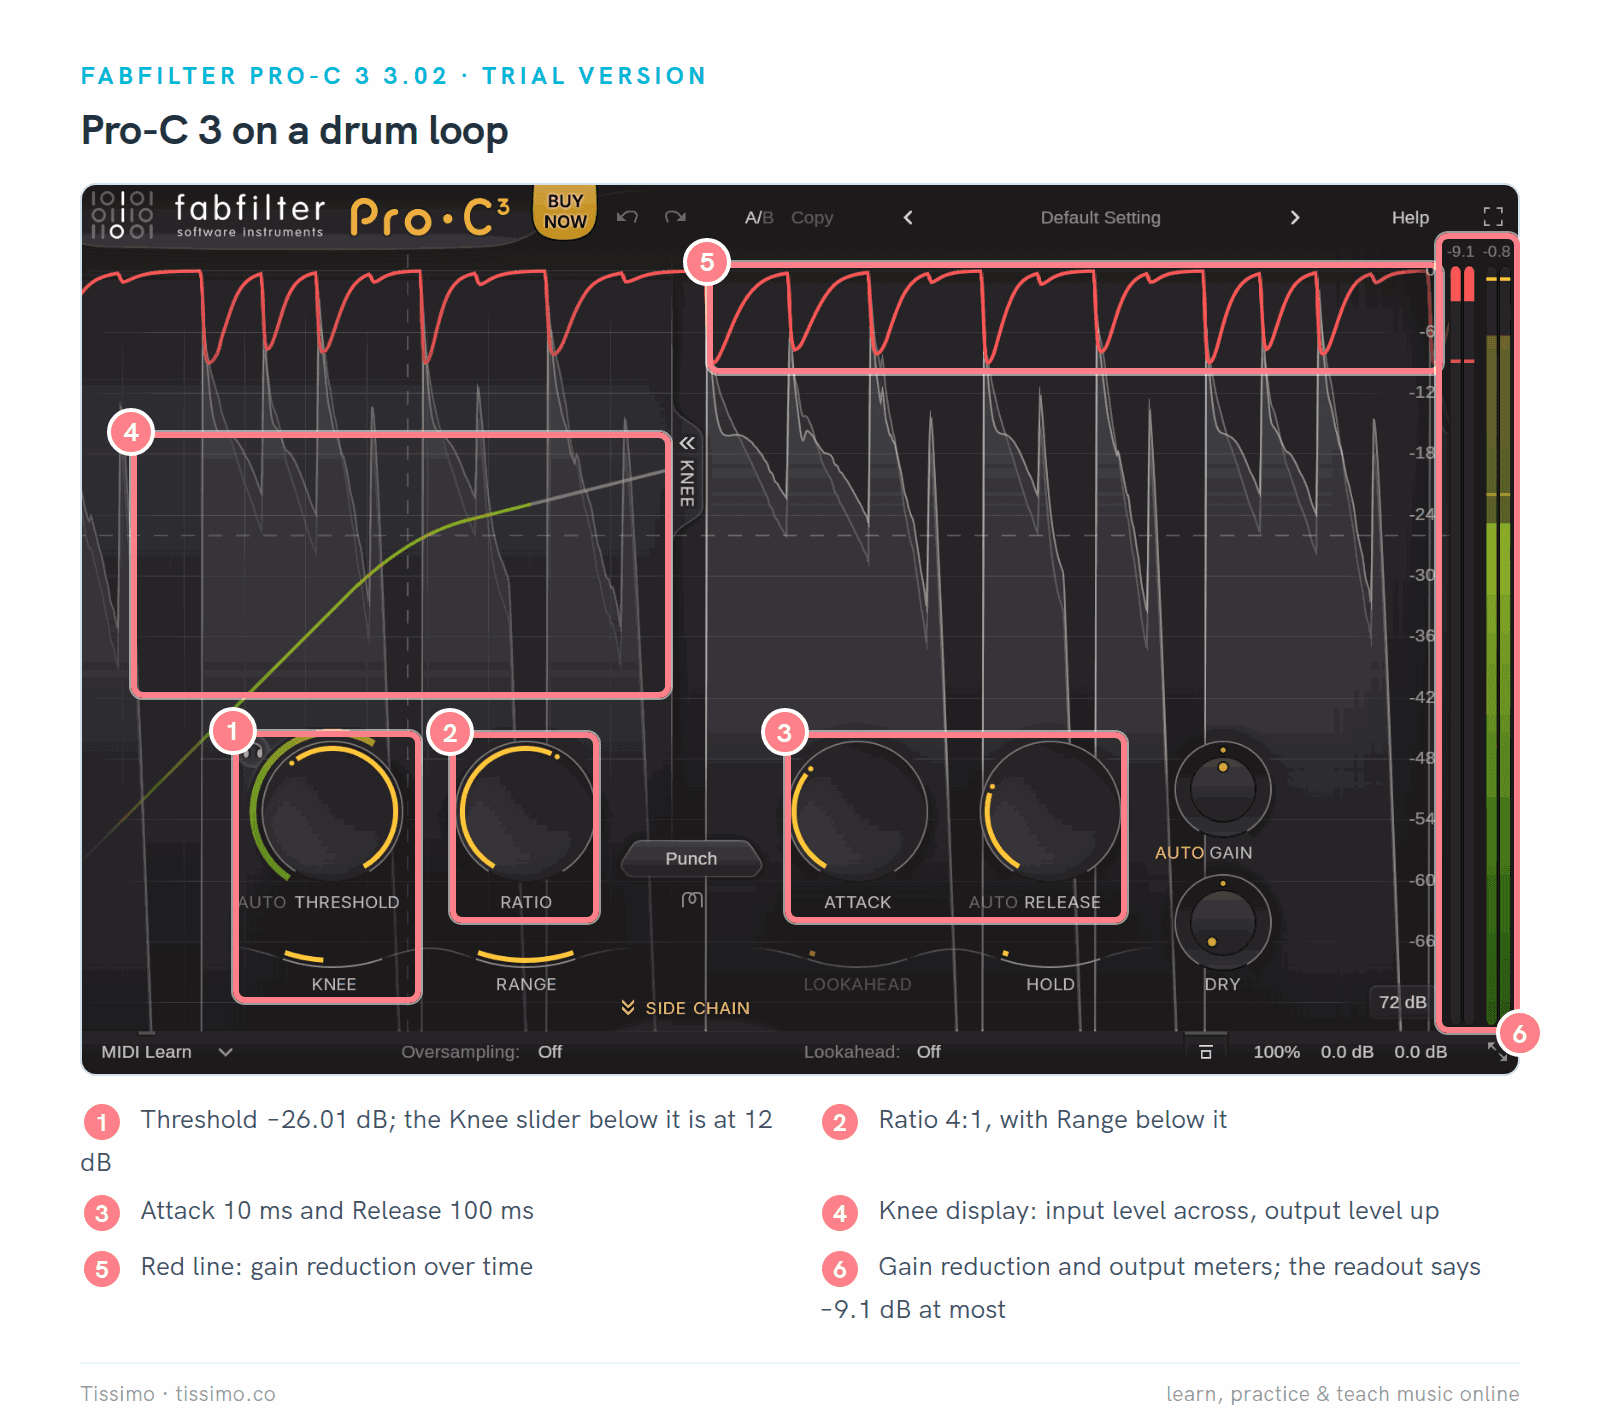
Pro-C 3 on the drum loop, Punch style: threshold −26.01 dB, ratio 4:1, knee 12 dB, attack 10 ms, release 100 ms, Auto Gain on. The red line is gain reduction over time; the readout above the meters held a maximum of −9.1 dB.
Pros:
- The level display draws input, output and gain reduction over time, and the optional knee display shows the transfer curve as the music plays.
- The attack runs from 0.005 ms to 250 ms, the knee from 0 to 72 dB, and lookahead (the detector reads up to 20 ms ahead) and oversampling (up to 32x) are there when you need them.
- A Dry knob for parallel compression, and a Mix setting that scales the gain change from 0% to 200%.
- VST, VST3, CLAP and AAX on Windows and macOS, plus AU on macOS.
Cons:
- The list price is US$199, and the trial ends after 30 days.
- Lookahead adds latency, which matters while you record.
- Auto Gain is, in FabFilter's words, "an educated guess," so you may still need to adjust the output by ear.
TDR Kotelnikov: a free bus and mastering compressor
Kotelnikov 1.6.7 from Tokyo Dawn Labs is a wideband compressor built for the stereo bus. Its big idea is two detectors running side by side: a peak path for short transients and an RMS path for the steady body of the sound, each with its own release knob. Two small lights between the two release labels show which release path is active. Peak Crest sets how far above the RMS threshold the peak path starts; the manual suggests 3 to 8 dB.
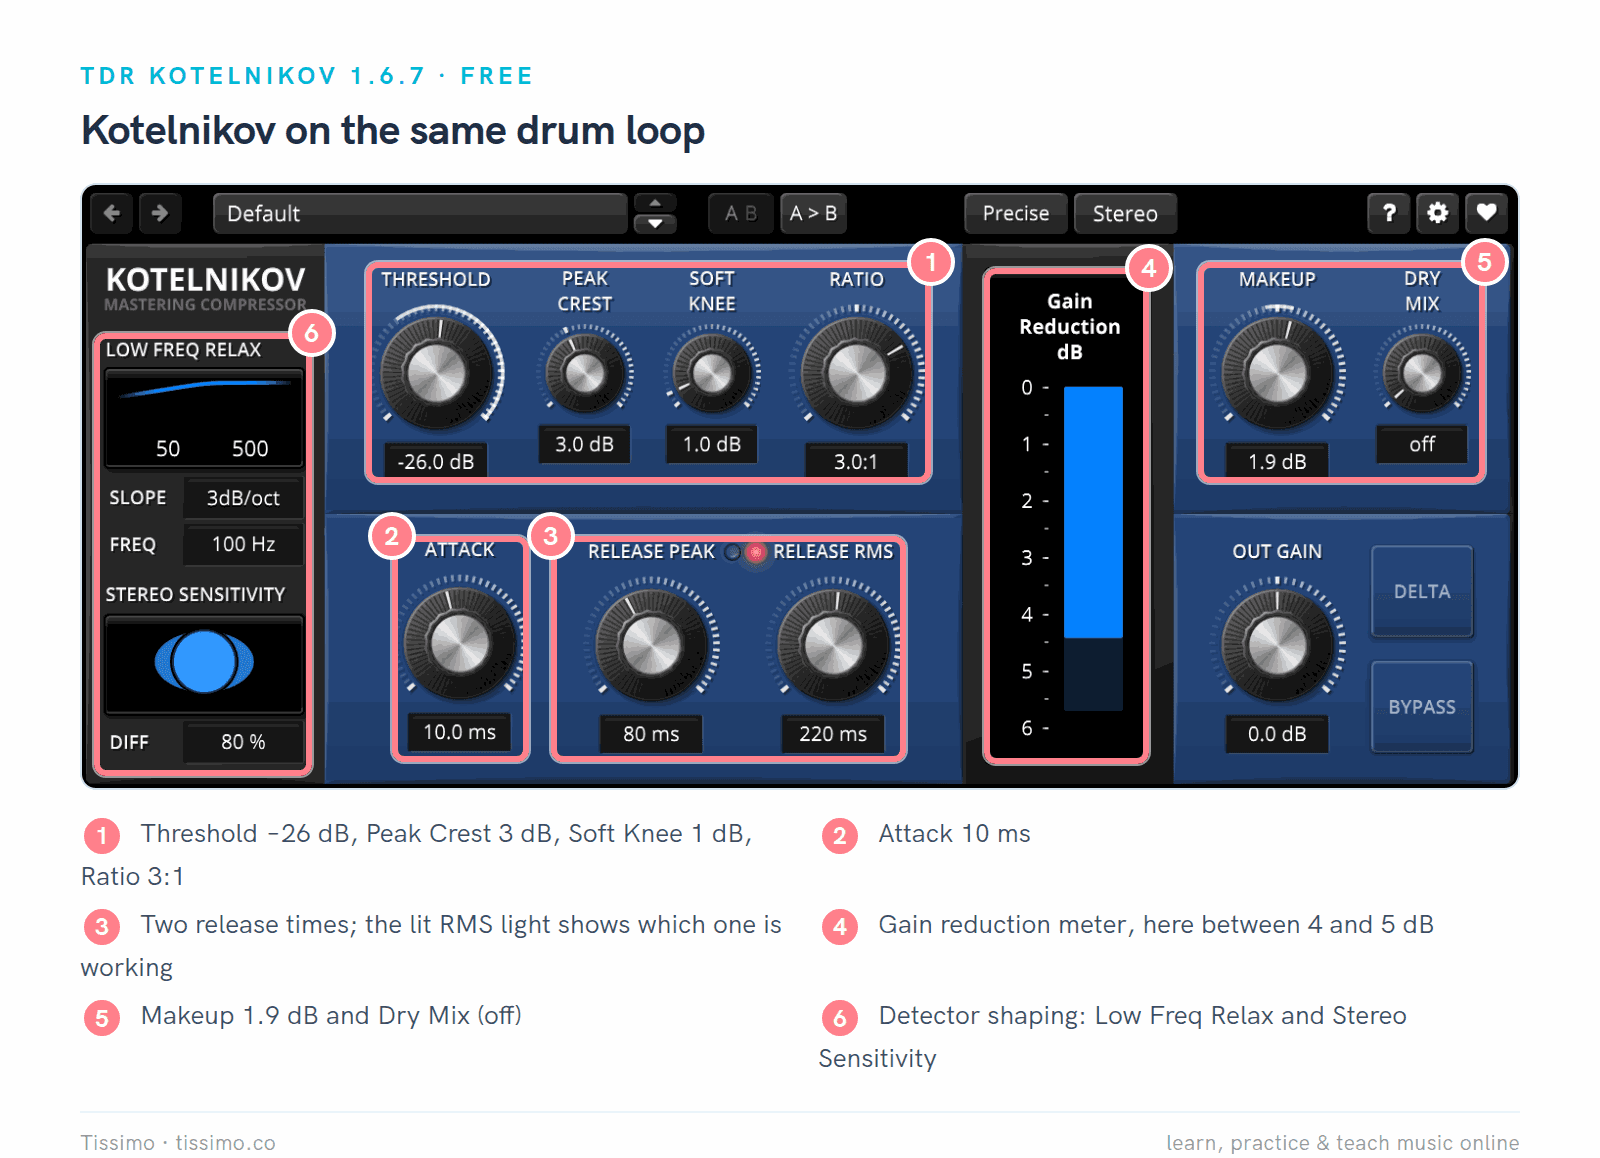
Kotelnikov on the same drum loop: threshold −26 dB, ratio 3:1, attack 10 ms, Release Peak 80 ms and Release RMS 220 ms. The lit light next to Release RMS shows that release path was active at this moment.
Pros:
- Free, in VST2, VST3 and AAX, plus AU on macOS.
- Separate peak and RMS release times, a Delta button to hear only what the compressor removes, and a Dry Mix knob for parallel compression.
- Low Freq Relax and Stereo Sensitivity shape what the detector listens to without changing the sound directly.
Cons:
- Ratio stops at 7:1, so it is not a limiter.
- The free edition has no external side-chain input; that and other features come with the paid Gentleman's Edition.
- Its controls follow their own logic: the manual notes that the attack value is "just a rough reference point" and that the threshold reacts to RMS level, which sits well below the peaks a level meter shows.
Klanghelm DC1A: two knobs and done
DC1A 3.5.0 is the free little brother of Klanghelm's paid DC8C. There's no threshold, ratio, attack or release: you turn Input up to compress harder and set Output for the level afterward. Four switches change the behavior. Deep adds a high-pass filter to the detector so bass-heavy material pumps less, Relaxed gives gentler compression with longer times and less saturation, Dual Mono compresses left and right separately, and Negative switches to a curve with negative ratios for obvious pumping effects.
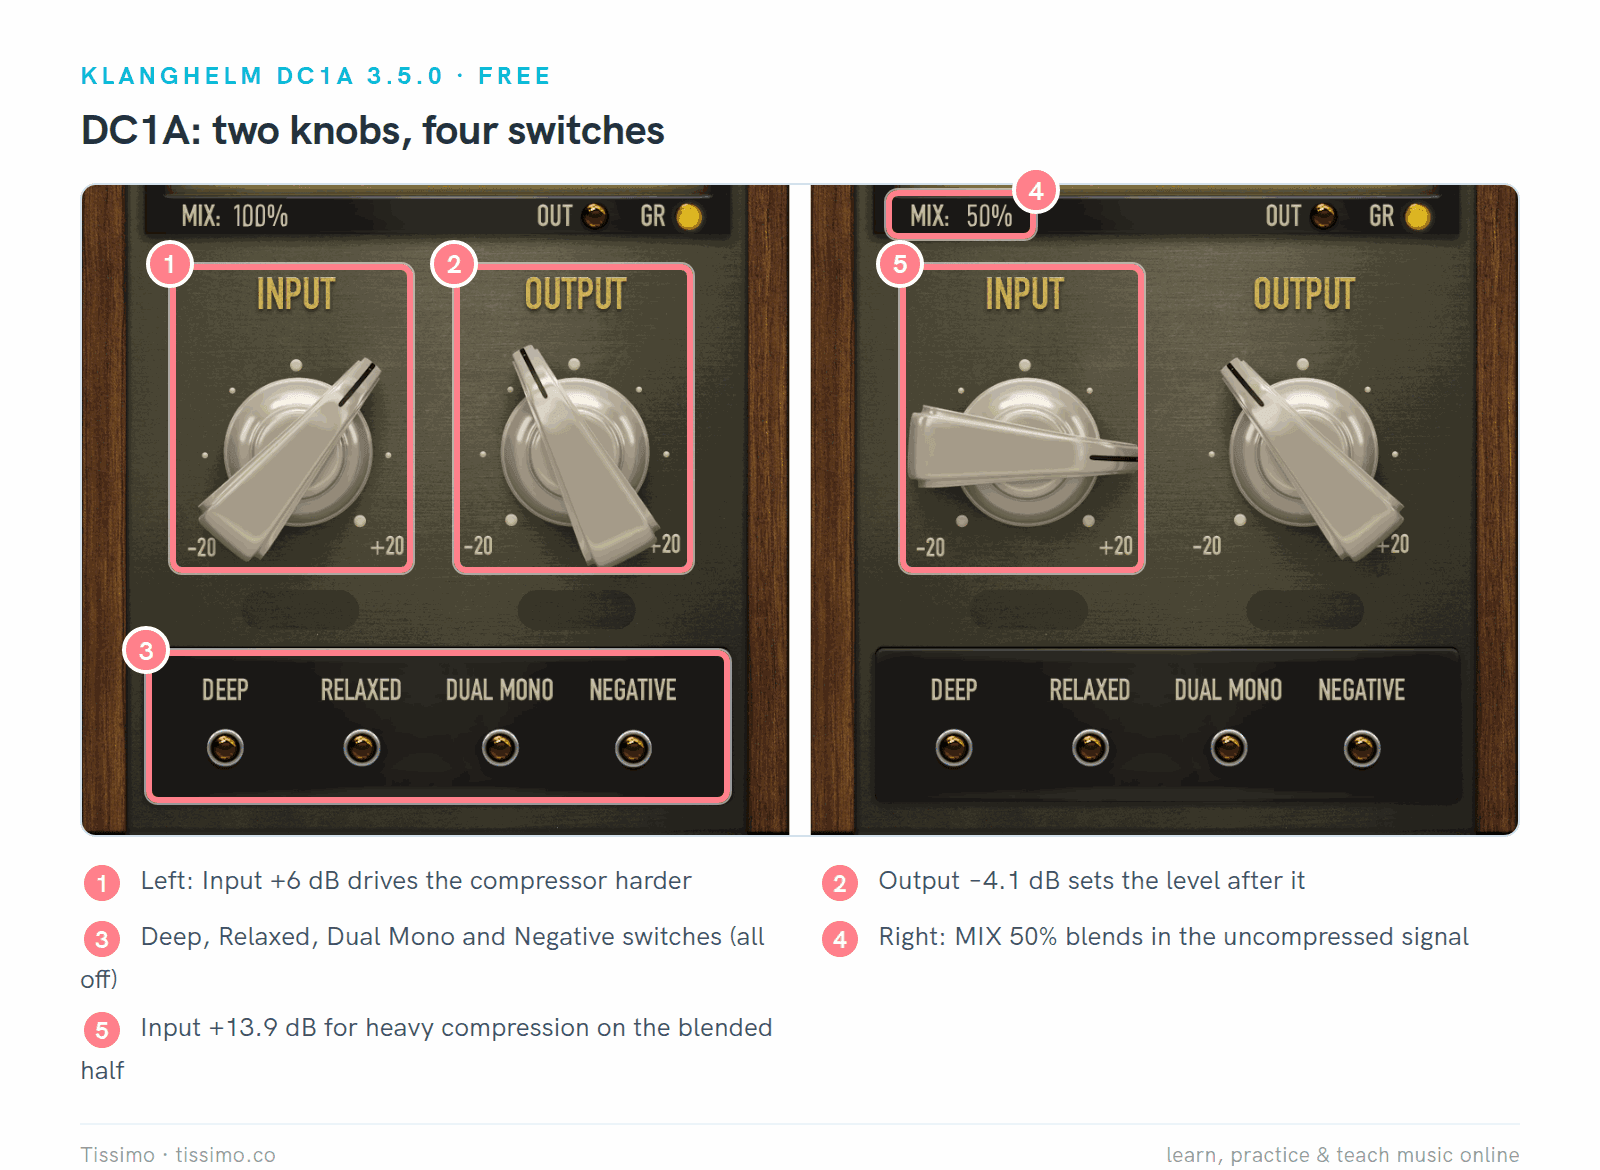
DC1A's controls in two settings for the drum loop (the VU meter above them is cropped out). Left: Input +6 dB, Output −4.1 dB, a moderate setting. Right: Input +13.9 dB with MIX at 50%, a parallel setup that blends compressed and dry drums. Drag the MIX readout to change it.
Pros:
- Free, in VST, VST3 and AAX, plus AU on macOS.
- The fastest of the five to set: one knob for amount, one for level.
- A MIX control for parallel compression and a VU meter that shows gain reduction or output level.
Cons:
- You can't set attack, release or ratio directly; only the Relaxed switch changes the timing.
- No visual display of the compression over time, only the VU meter.
Xfer OTT: multiband upward and downward compression as an effect
OTT 1.37 is a free plugin from Xfer Records. When it came out in 2012, KVR Audio described it as a re-creation of a popular aggressive multiband compressor setting, with upward and downward compression. It splits the sound into high, mid and low bands. In each band it turns loud parts down (downward compression) and quiet parts up (upward compression), so everything ends up closer together and denser. Depth scales the whole effect, and Time scales the attack and release of all three bands.
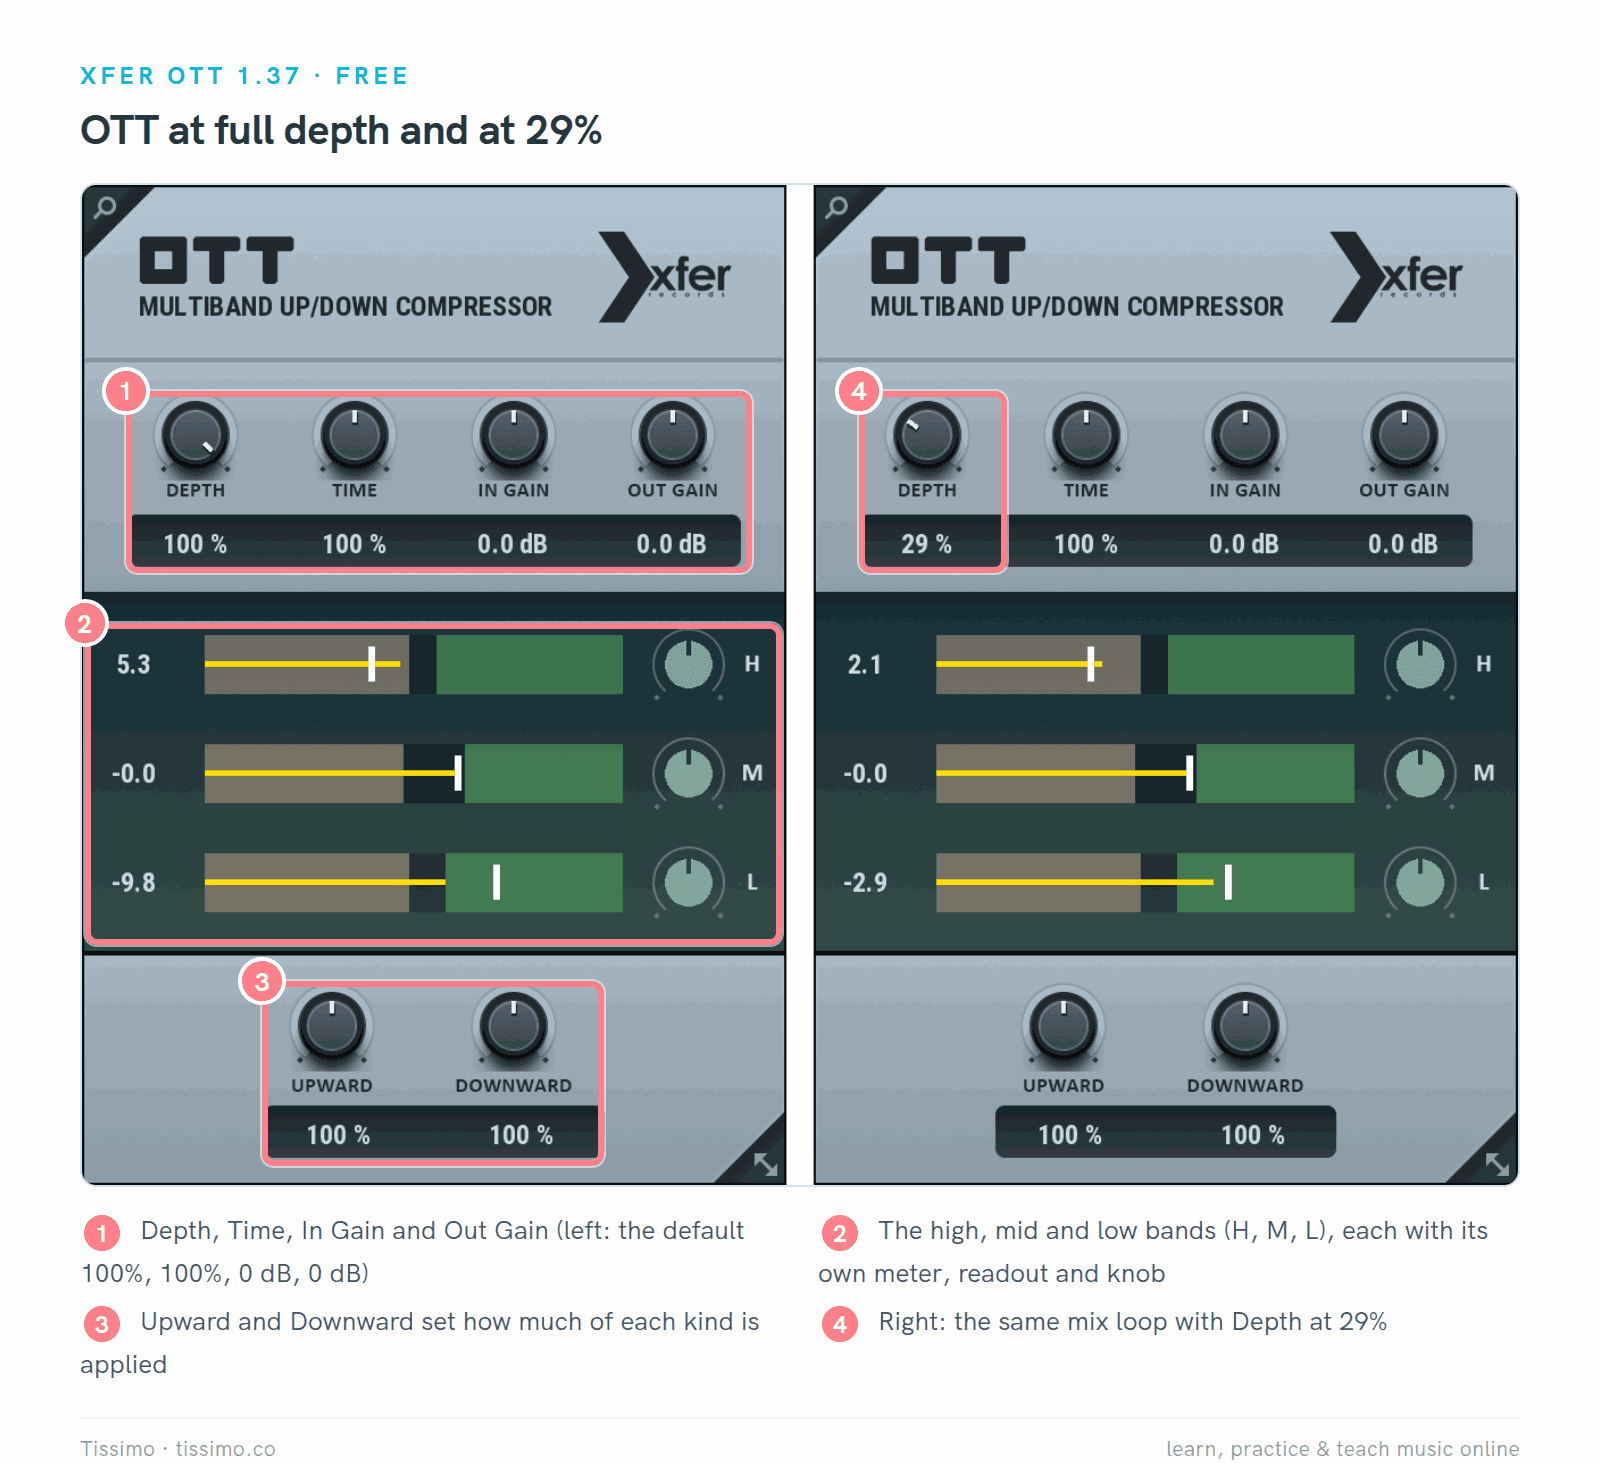
OTT on the mix loop at its default Depth of 100% (left) and at 29% (right). The readouts next to the bands, 5.3, −0.0 and −9.8 at full depth, drop to 2.1, −0.0 and −2.9.
Pros:
- Free, in VST, VST3 and AAX, plus AU on macOS.
- Depth gives you one knob for "how much," which makes it easy to dial back.
- Separate Upward and Downward controls set how much of each kind you get.
Cons:
- The default Depth of 100% applies that aggressive setting in full, so try lower settings first.
- Upward compression lifts everything quiet, including reverb tails, breaths and noise.
- Xfer's download page carries version notes but no manual, so you learn it by ear.
LSP Compressor Stereo: every value on a graph
LSP Compressor Stereo 1.2.37 comes from the open-source Linux Studio Plugins project. It can compress downward, upward or in a boosting mode, offers peak and RMS detection, a hold time and a release threshold that gives it two release times, and draws everything: a time graph of the signal and gain, a compression curve with a dot for the current level, and meters for each stage.
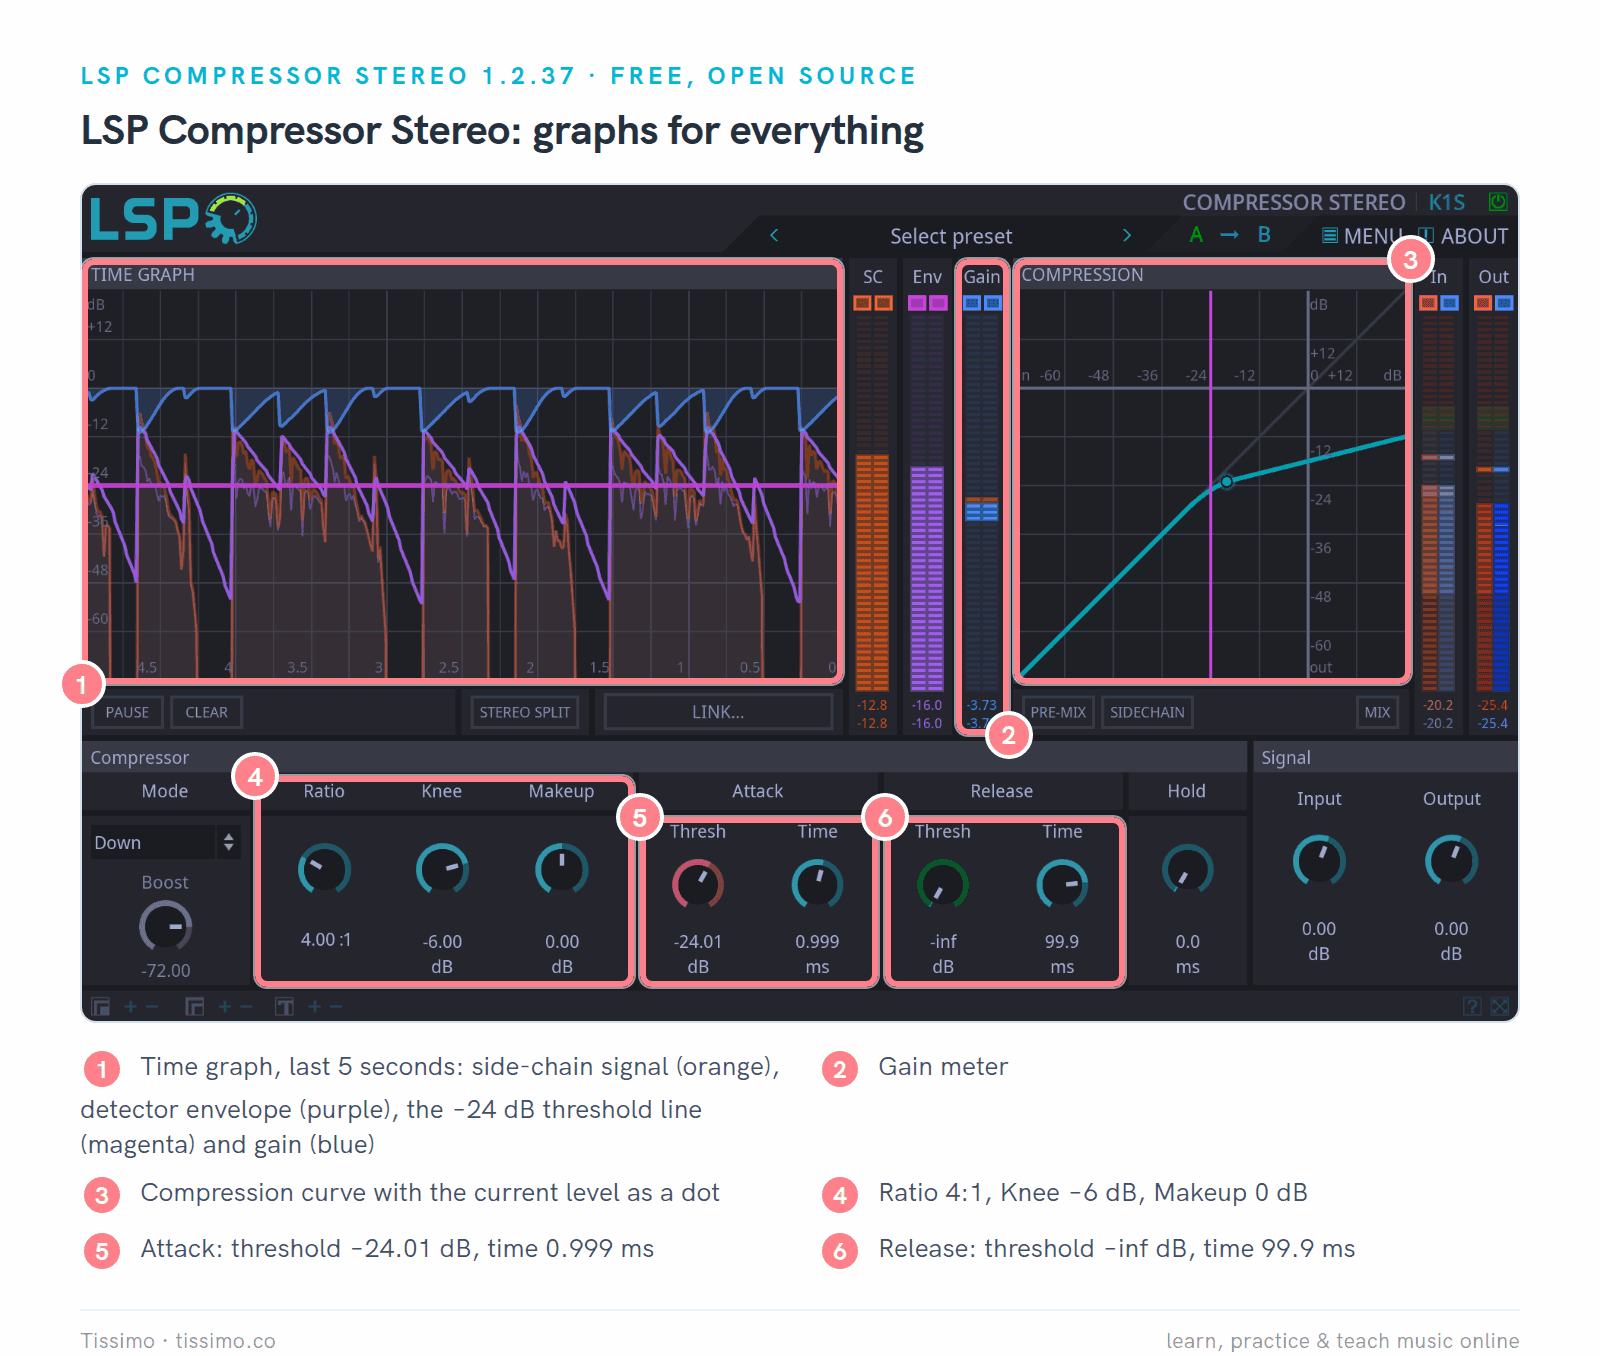
LSP Compressor Stereo on the drum loop with peak detection: ratio 4:1, attack threshold −24.01 dB, attack time 0.999 ms, release time 99.9 ms. Here the threshold sits in the middle of the knee.
Pros:
- Free and open source (LGPL-3.0), in VST2, VST3, CLAP, LV2 and LADSPA.
- It graphs every stage over time (side-chain, envelope, gain, input and output), so you can watch attack and release shape the gain line.
- Downward, upward and boosting modes, and a Stereo Split mode for left and right.
Cons:
- Free builds are for Linux and FreeBSD; Windows builds come from a paid build service. There is no ready-made macOS build and no Audio Units version, so it can't run in Logic Pro.
- Its window is dense, with eleven knobs, two graphs and five meters on one screen, so it takes longer to learn.
Four compression moves in real screenshots
These are starting points, not rules. Each move begins with a goal; stop as soon as the sound gets there. The threshold numbers in the screenshots fit our test loops. Your tracks will sit at different levels, so set the threshold by the amount of gain reduction you see and hear, not by copying the number. Several screenshots also use more reduction than you would normally want, so that the meters are easy to read.
Move 1: gentle leveling
For a sung or played line that jumps between soft and loud notes, aim for a few decibels of reduction on the loudest notes rather than big dips. Start with the threshold high, then lower it until the gain-reduction meter moves on the louder notes only; if the quiet notes are turned down too, the threshold is too low. Match the level against the bypassed sound and listen for whether the soft notes are now easier to hear. Pro-C 3's Vocal style is built for this: FabFilter says its ratio and knee are automatic, so the threshold is the one setting to choose. The notes in our test melody are nearly equally loud, so the line stays almost level; on a real performance it dips further on the loud notes.
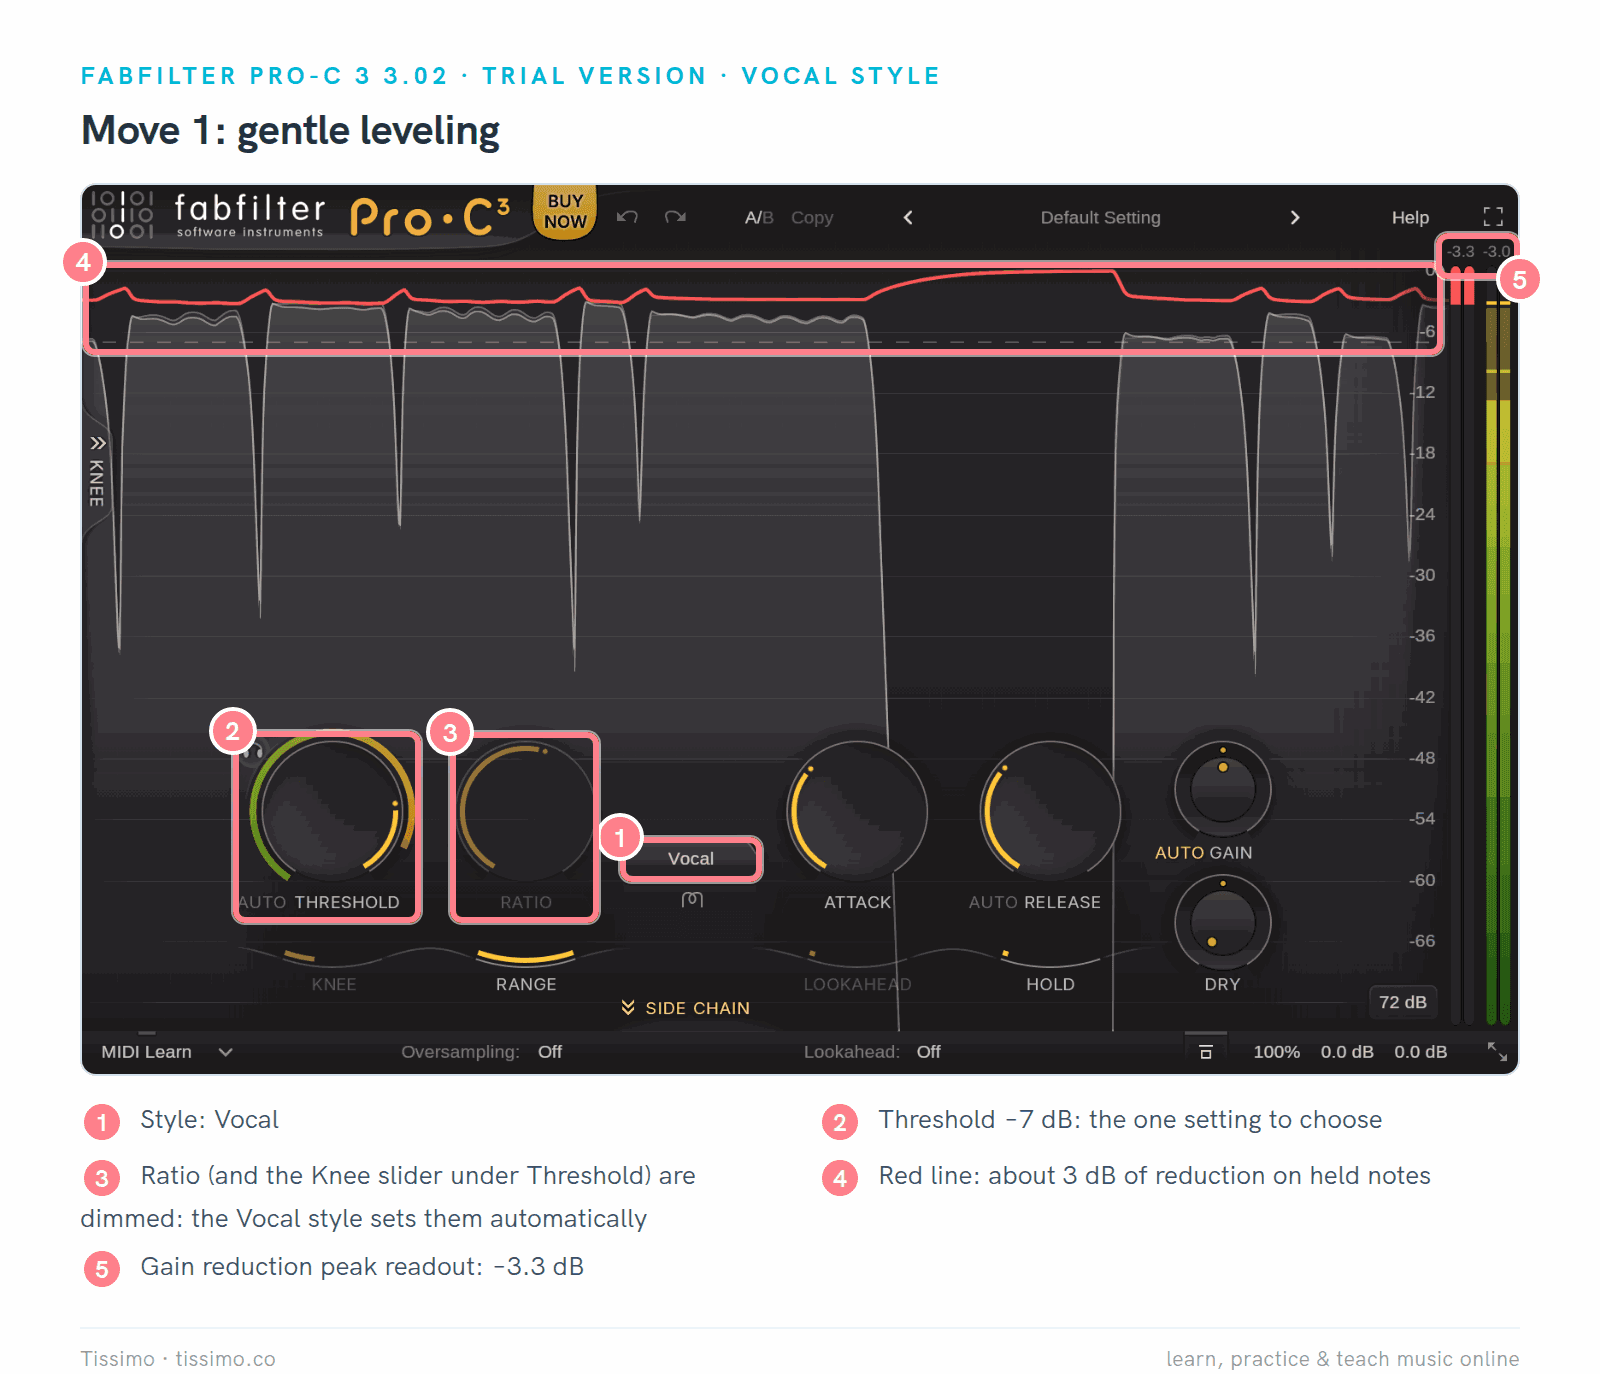
Move 1 in Pro-C 3: Vocal style, threshold −7 dB, attack 10 ms, release 150 ms. The red line sits about 3 dB down on the held notes and returns to 0 in the gap between phrases; Ratio and Knee are dimmed because the style sets them.
Move 2: punchier drums with a slower attack
If compression makes your drums sound flat, lengthen the attack. The pair below changes only the attack time in LSP Compressor Stereo. At 0.999 ms the gain line drops about 11 dB on the loudest hits; at 30.0 ms it dips more slowly and only about 6 dB, so the start of each hit gets through.
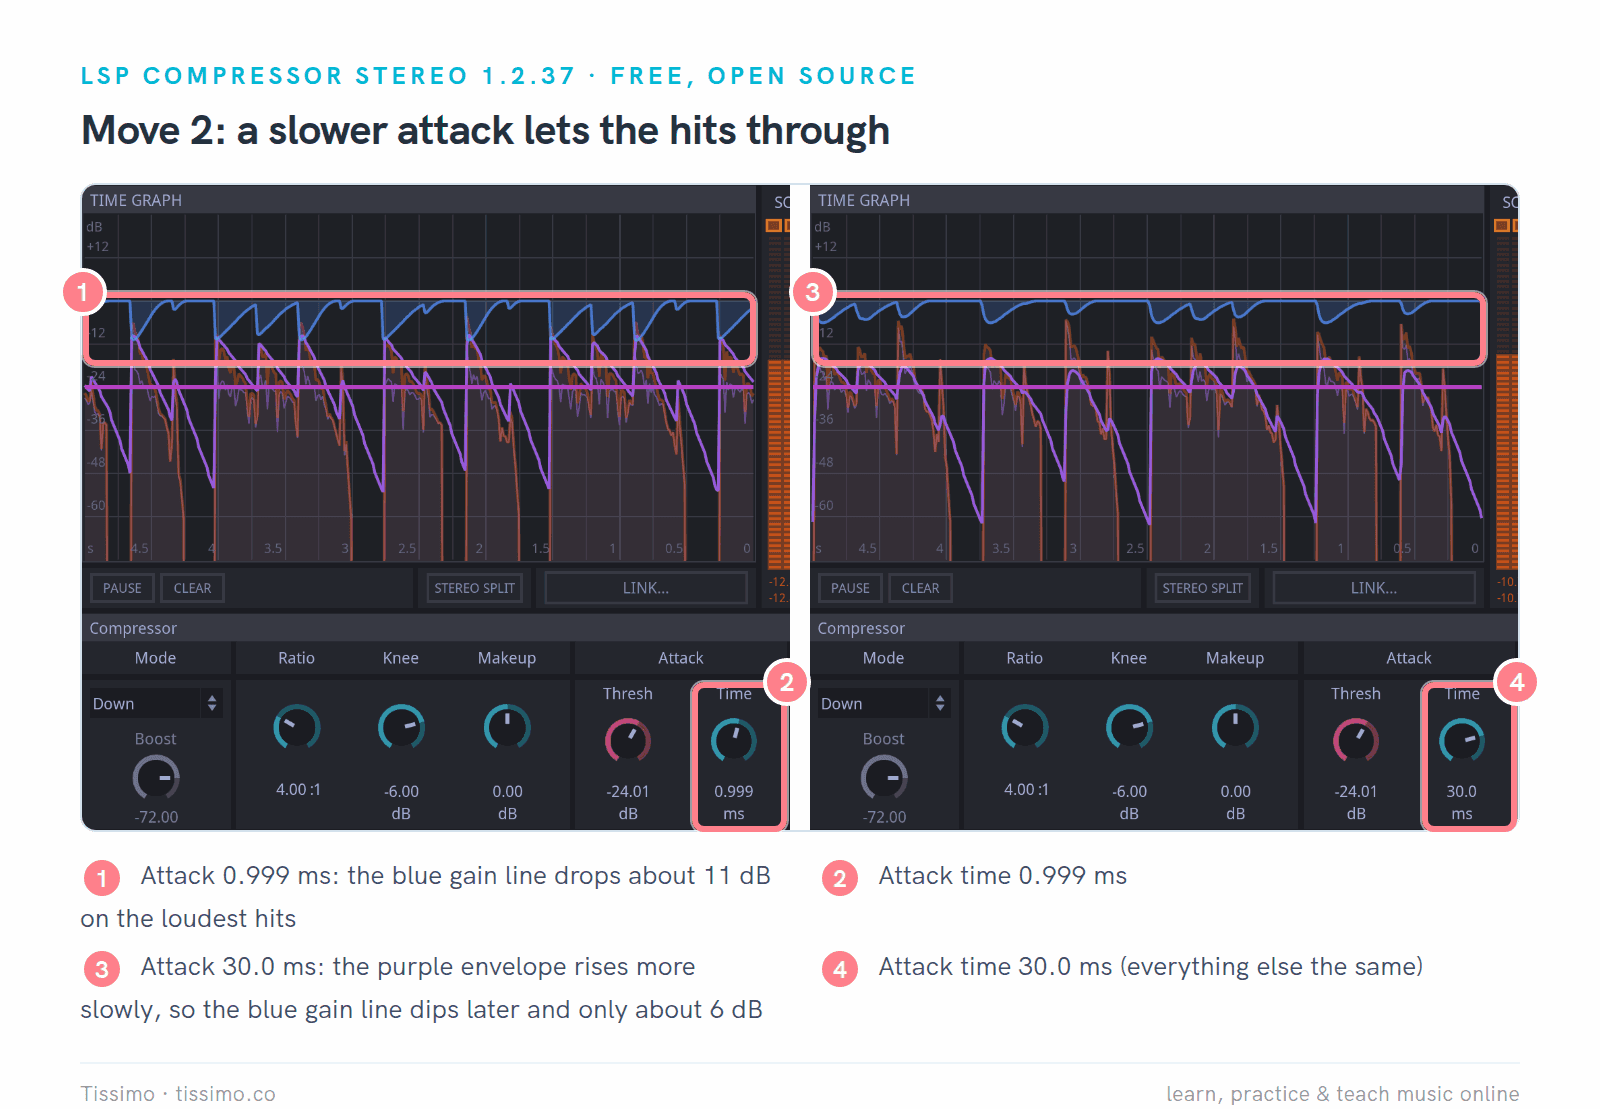
Move 2 in LSP Compressor Stereo: attack 0.999 ms (left) against 30.0 ms (right), with ratio 4:1, threshold −24.01 dB and release 99.9 ms in both. Compare the blue gain lines.
Move 3: bus glue
On a drum group or the whole mix, try a low ratio and only a decibel or two of reduction. The aim is what Ableton's manual calls gluing "multiple sources together," not more loudness. Kotelnikov's two release knobs help: Tokyo Dawn's manual explains that single drum peaks can recover quickly while sustained sounds such as bass lines and pads recover more slowly, which reduces pumping. For full mixes it suggests a Release Peak between 25 and 100 ms and a Release RMS above 150 ms. Set Makeup so the level matches the bypassed mix before you judge.

Move 3 in Kotelnikov on the full mix loop: threshold −24 dB, ratio 2:1, Release Peak 50 ms, Release RMS 399 ms, Makeup 1 dB. The meter shows a little over 1 dB of gain reduction.
Move 4: parallel compression
Parallel compression mixes a heavily compressed copy with the untouched signal. Sound On Sound's explanation: below the threshold the two copies are identical, so the blend is 6 dB louder, while on the loudest peaks the compressed copy is so far down that the dry signal's transients pass almost unchanged. The quiet parts come up and the hits keep their edge.
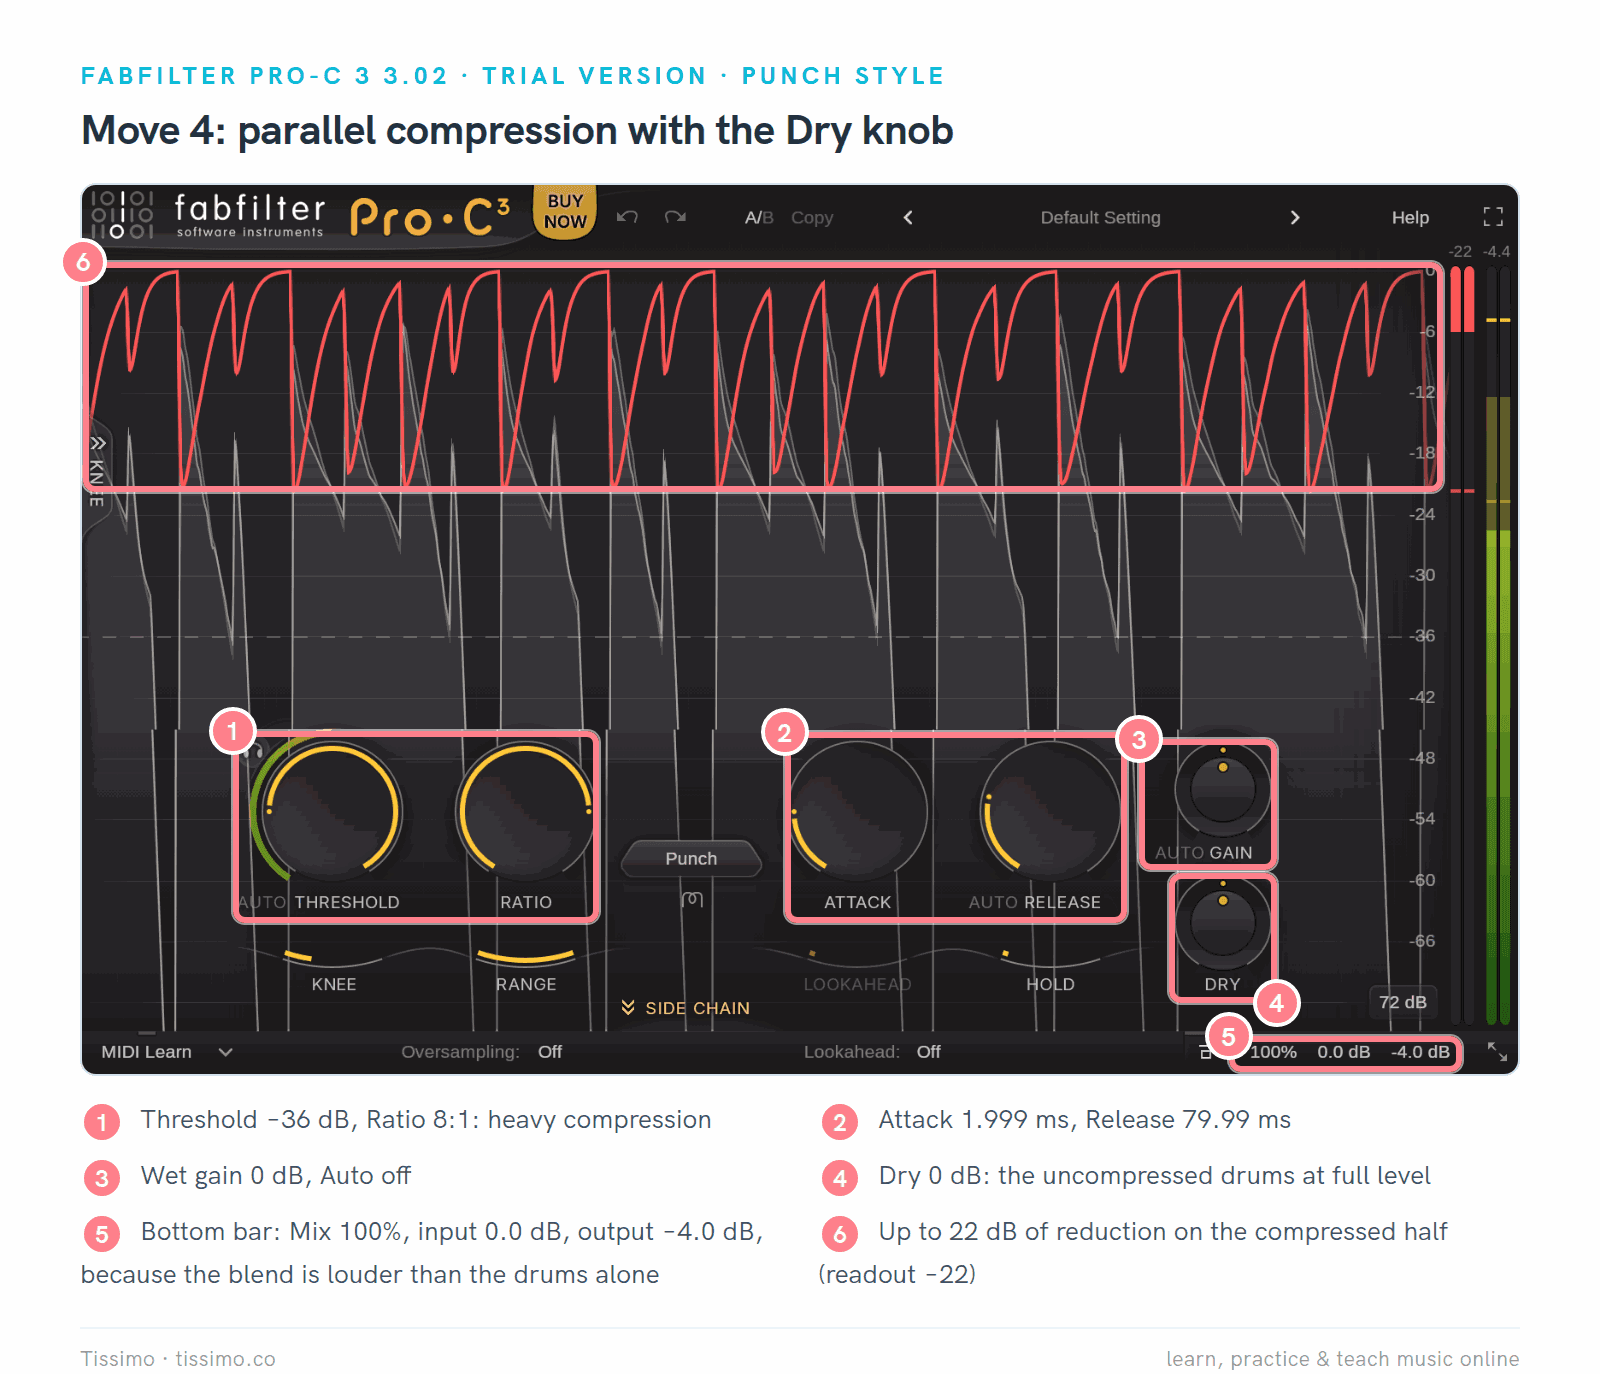
Move 4 in Pro-C 3: threshold −36 dB, ratio 8:1, attack 1.999 ms, release 79.99 ms, with the Dry knob at 0 dB so the uncompressed drums are mixed back in. The compressed half shows up to 22 dB of reduction; the output is set to −4 dB.
The output is turned down because the blend is louder than the drums alone, and you should compare it with the bypassed drums at equal loudness. The curve below shows where that extra level comes from.
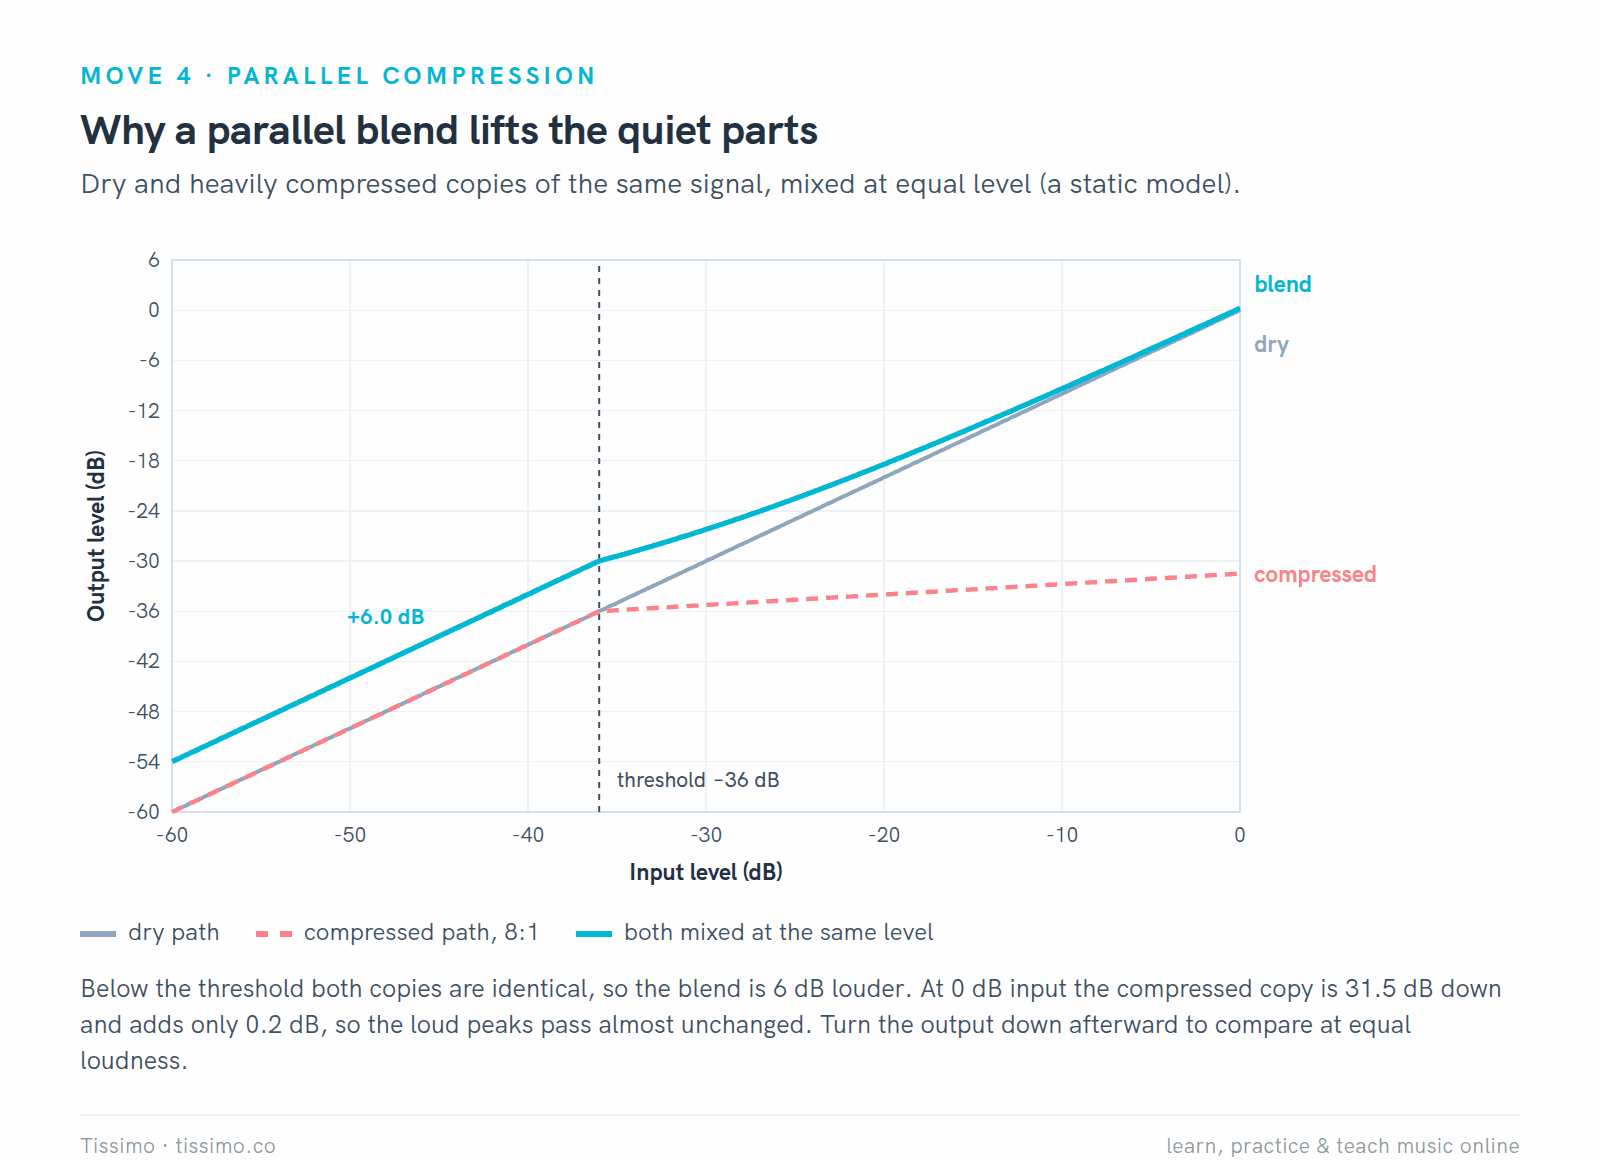
The same idea as a static model with the settings above: the blend (cyan) is 6 dB louder below the threshold and only 0.2 dB louder at 0 dB input.
In DC1A, the MIX control does the same job (the right-hand screenshot earlier, at 50%). Kotelnikov has Dry Mix, and LSP has a Dry/Wet overlay.
Hearing compression: tips
- Match the level before you judge. Compression plus makeup gain usually makes things louder, and louder tends to sound better at first. Use the bypass, then set the output so the two versions are equally loud. FabFilter's Auto Gain is a starting point, not a measurement.
- Listen more than you look. The meters show how much the compressor works, not whether it sounds good. Ableton's manual warns that more than about 6 dB of reduction "significantly alters the sound."
- Listen to what is removed. Kotelnikov's Delta button plays only the difference between the input and the output.
- Change one control at a time, and loop a short section while you do it.
- Check the transients. If drums lose their snap, lengthen the attack before you add EQ.
- Leave the limiting to the limiter. A compressor shapes dynamics; for the final peak control on the mix, see our limiter and loudness meter comparison.
Using them in Ableton Live, FL Studio and Logic Pro
Formats decide where a plugin will load. Ableton Live loads VST2 and VST3, plus Audio Units on macOS. FL Studio loads VST 1/2, VST3 and CLAP, plus AU on macOS. Logic Pro uses Audio Units for third-party plugins, so on a Mac choose the AU version of Pro-C 3, Kotelnikov, DC1A or OTT; LSP has no AU version.
Every DAW also has its own compressor, and for leveling a part or taming a few peaks it is often all you need:
- Ableton Live: Compressor, with a transfer-curve view and a Dry/Wet knob; and, in Standard and Suite, Glue Compressor, designed mainly for groups and the main track, and Multiband Dynamics, with upward and downward compression on up to three bands.
- FL Studio: Image-Line recommends Fruity Limiter, whose COMP tab is a full compressor with side-chain; Maximus and Fruity Multiband Compressor handle multiband jobs (Maximus comes with Producer Edition and up).
- Logic Pro: Compressor emulates several circuit types (Platinum Digital, VCA, FET and Opto), and Multipressor splits the sound into up to four bands.
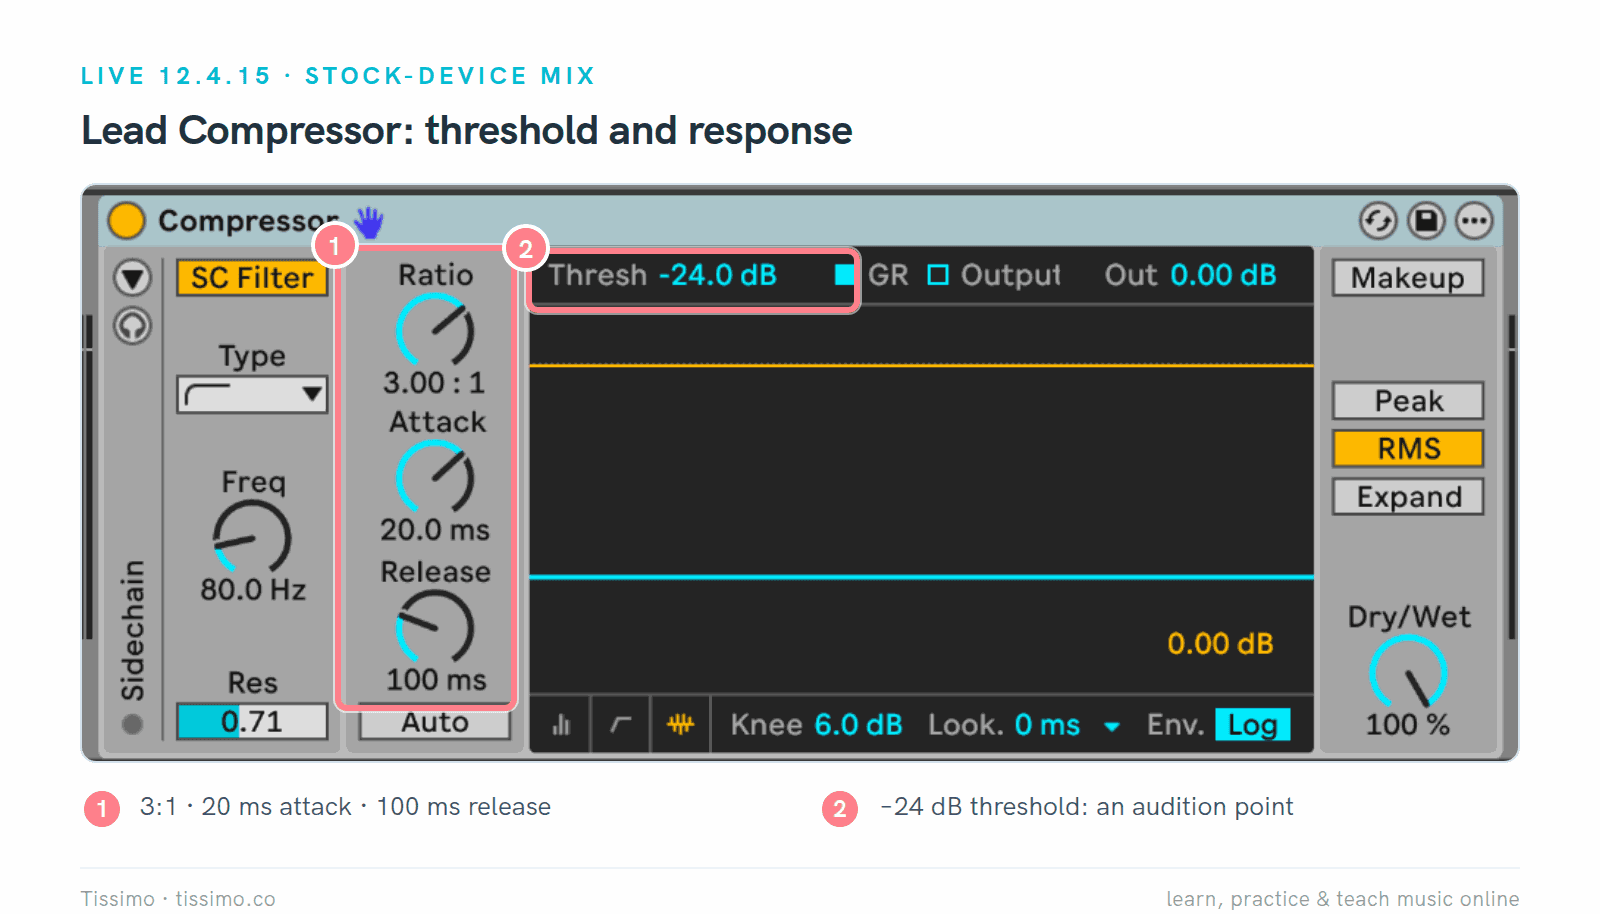
Live's own Compressor in Live 12.4.15, as set on the lead part in our Ableton mixing walkthrough: ratio 3:1, attack 20 ms, release 100 ms and a threshold of −24 dB to start from. Playback was stopped in this screenshot, so the display shows no reduction.
Reach for a plugin when you want something the built-in one lacks: Kotelnikov's two release paths, Pro-C 3's styles and displays, OTT's multiband effect, or the same compressor in every DAW you use. The sibling guides for Ableton Live, FL Studio and Logic Pro list more plugins that work in each one.
Which compressor should you use?
Start from the job you need done. If you have never used a compressor, begin with your DAW's own and DC1A, then try Kotelnikov on a drum group or your mix bus. Install LSP if you are on Linux and want to see every stage. Try Pro-C 3 during its trial when you want one compressor with styles, side-chain EQ and detailed displays. Keep OTT for when you want the effect, and start with Depth well below 100%.
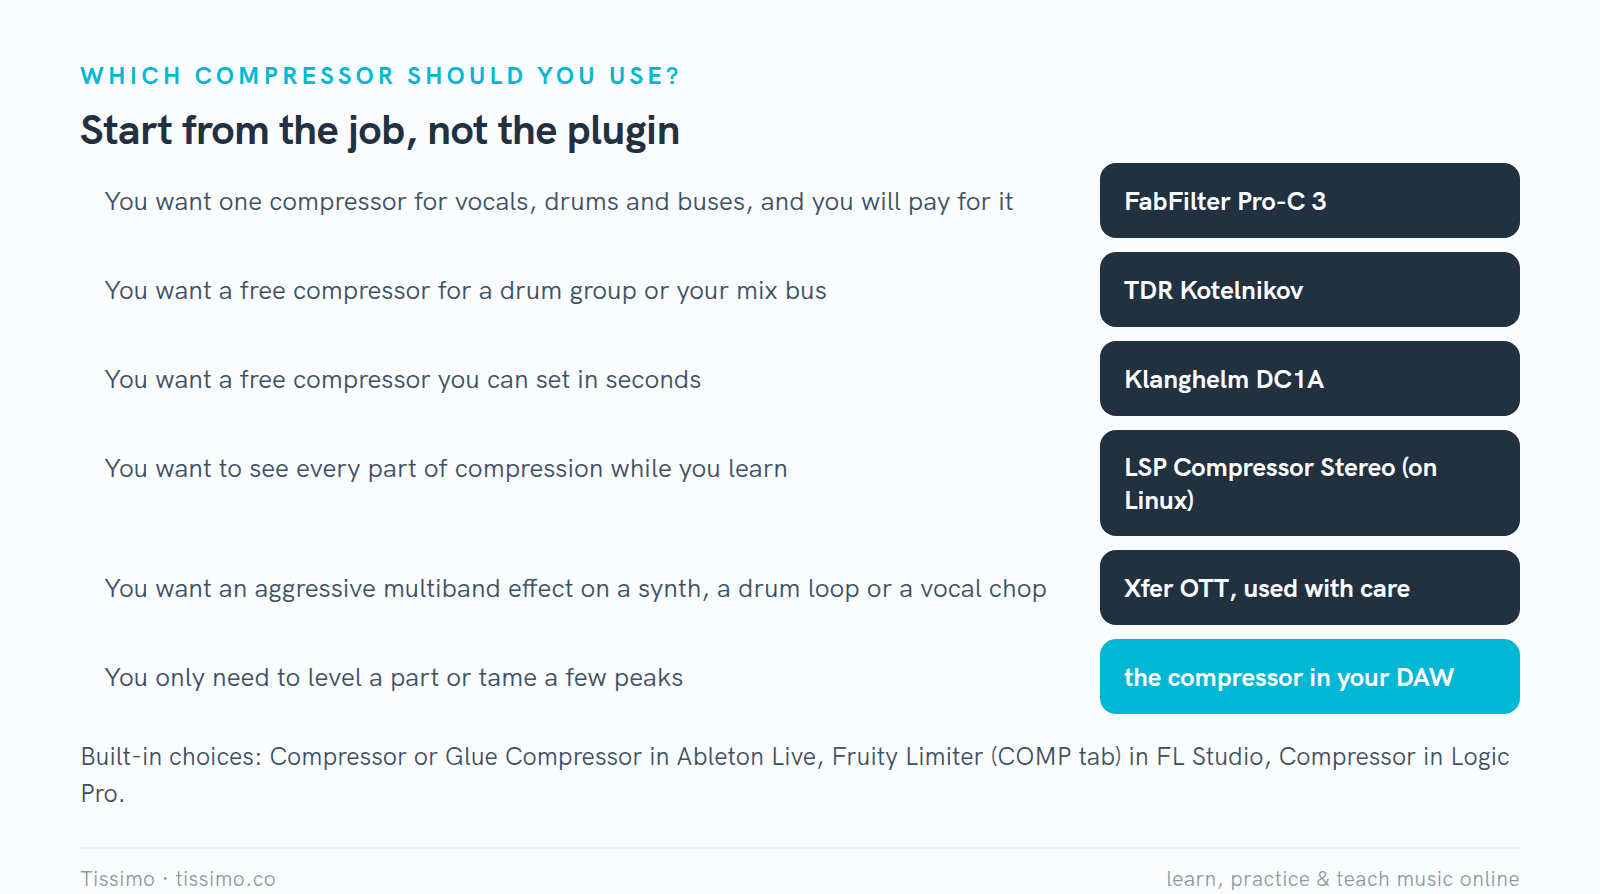
Pick by the job. The built-in choices are Compressor or Glue Compressor in Live, Fruity Limiter in FL Studio and Compressor in Logic Pro.
Compression is easier to judge on a mix that is already roughly balanced, so it helps to set your faders and any corrective EQ first: our EQ plugin comparison covers that step, and the saturation guide covers the color that many compressors add. If you're just starting out, our guide to producing music at home puts all of this in order. A Tissimo teacher can also listen to your mix with you in a live lesson and help you hear what each setting changes.
Sources
- FabFilter Pro-C 3 product page — FabFilter
- Pro-C 3 Help: Style and character — FabFilter
- Pro-C 3 Help: Time controls — FabFilter
- Downloads and trial terms — FabFilter
- Shop — FabFilter
- TDR Kotelnikov — Tokyo Dawn Labs
- Kotelnikov user manual — Tokyo Dawn Labs
- DC1A — Klanghelm
- DC1A3 user guide (PDF) — Klanghelm
- DC8C — Klanghelm
- Xfer freeware (OTT) — Xfer Records
- Xfer Records releases OTT multiband compressor — KVR Audio
- Compressor Stereo manual — LSP Project
- Downloads — LSP Project
- Parallel Compression, Hugh Robjohns — Sound On Sound
- Live Audio Effect Reference — Ableton Reference Manual 12
- Fruity Limiter — FL Studio Manual, Image-Line
- Fruity Compressor — FL Studio Manual, Image-Line
- Compressor main parameters — Logic Pro User Guide, Apple
- Work with Audio Units — Logic Pro User Guide, Apple
- Using Plug-Ins — Ableton Reference Manual 12
- Plugin standards — FL Studio Manual, Image-Line
Read this article online: https://tissimo.co/articles/compressor-plugins-compared-pro-c-3-kotelnikov-dc1a-and-more



Comments