 Back
Rhythm Changes Explained: Jazz's Most-Used Form After the Blues
Ask which jazz forms have lasted longest and you keep hearing the same two: the blues and rhythm changes. Bassist John Goldsby, writing in The Strad, calls them the most durable and frequently played jazz forms, and Peter Spitzer, writing on JazzStandards.com, calls the chords a "must-know" for any aspiring jazz player. Piano With Jonny puts it plainly: aside from the 12-bar blues, it is the most commonly used song form in jazz. The shape is simple: thirty-two bars, four sections of eight, and a chain of chords in the middle that turns a corner every two bars. This guide takes the form apart in B♭, the key it is almost always played in. You will see where it came from, play through the A section and the bridge, meet the usual simplifications, and leave with a practice plan and two short original lines to improvise from.
Where rhythm changes comes from
The name points at a song. "I Got Rhythm", with music by George Gershwin and words by his brother Ira, reached Broadway in 1930 in the musical Girl Crazy (George had first sketched the tune as a slow number for an earlier show, Treasure Girl, in 1928). The show opened at New York's Alvin Theatre on October 14, 1930, and Ethel Merman introduced the song. "Rhythm changes" means only the chords underneath it, and in this article we will look at those, not the tune or the lyric.
Gershwin's chorus ran 34 bars, because the last A ends with a two-bar tag. Jazz musicians dropped the tag and kept the eight-bar sections, which is how the form became a 32-bar standard. Where the borrowing began is not settled. JazzStandards.com notes that the changes are "usually attributed" to the Gershwin song but that their exact origin is not known. What the sources agree on is that within a few years jazz players were writing new melodies over the same chords, and that the majority of the best-known tunes written on them date from the bebop years, the 1940s to the early 1950s.
Those tunes are called contrafacts: new melodies on old changes. Duke Ellington's "Cotton Tail" (1940), Charlie Parker and Dizzy Gillespie's "Anthropology" (1946), Sonny Rollins's "Oleo" (1954) and Thelonious Monk's "Rhythm-a-ning" (1957) are all listed as rhythm-changes tunes. Learn the form once and you have the basic chords to all of them. If you are new to the style as a whole, our guide to what jazz is, its main styles and how to start playing gives the background.
The 32-bar map
Rhythm changes is an AABA form: an eight-bar A section, the same A again, an eight-bar contrasting B section (the bridge), and a final A. If AABA is new to you, Song Structure for Beginners shows how the same pattern works in songwriting. Then the chorus starts over, and a performance is mostly chorus after chorus, the head (the written melody) first and last with solos in between.
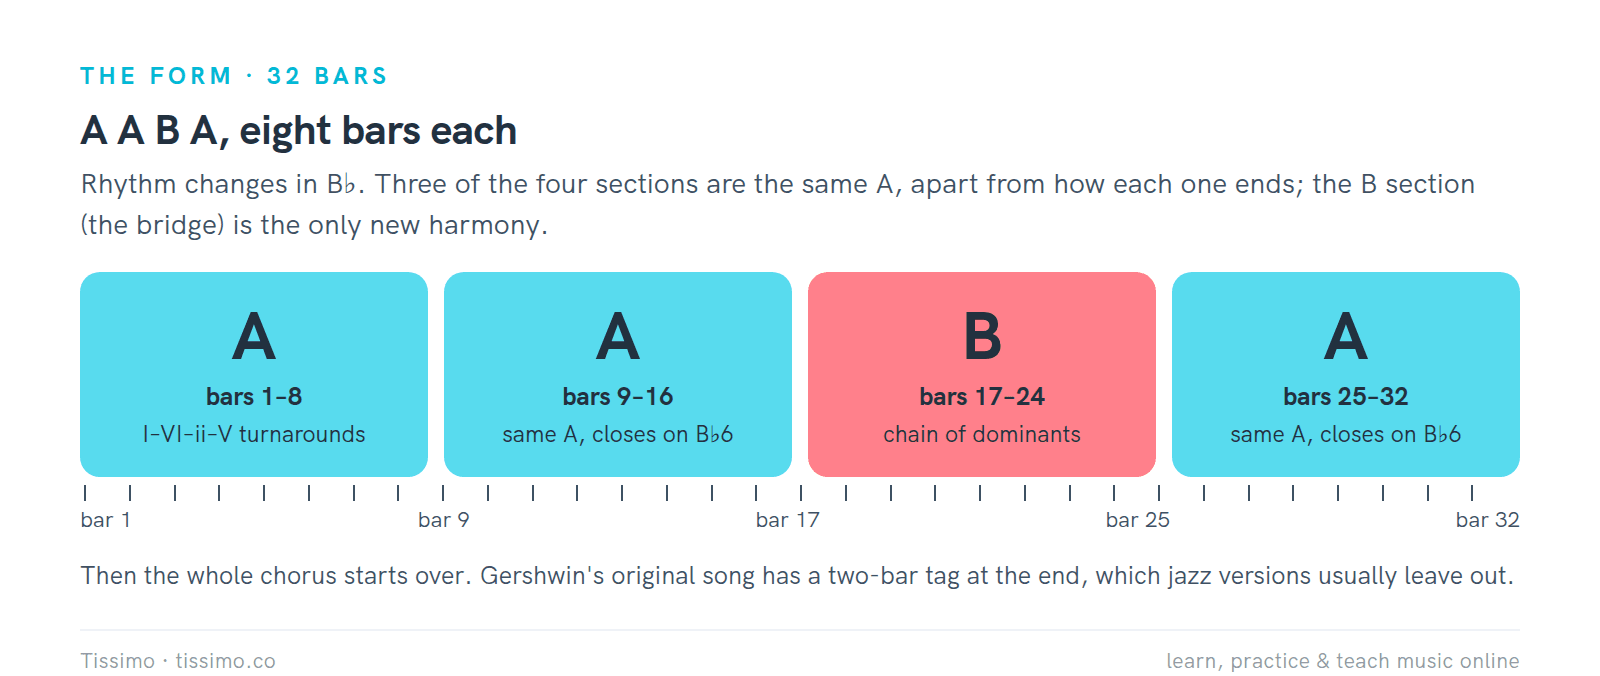
The form in four blocks. Three sections are the same A, apart from how each one ends; only the bridge brings new harmony.
Here is the whole chorus on one page, so you do not have to assemble it from three figures. The second A closes on B♭6 in bar 16 and the last A closes on B♭6 in bar 32; bars 7–8 of the first A loop back through the turnaround (the mistakes list below says more).
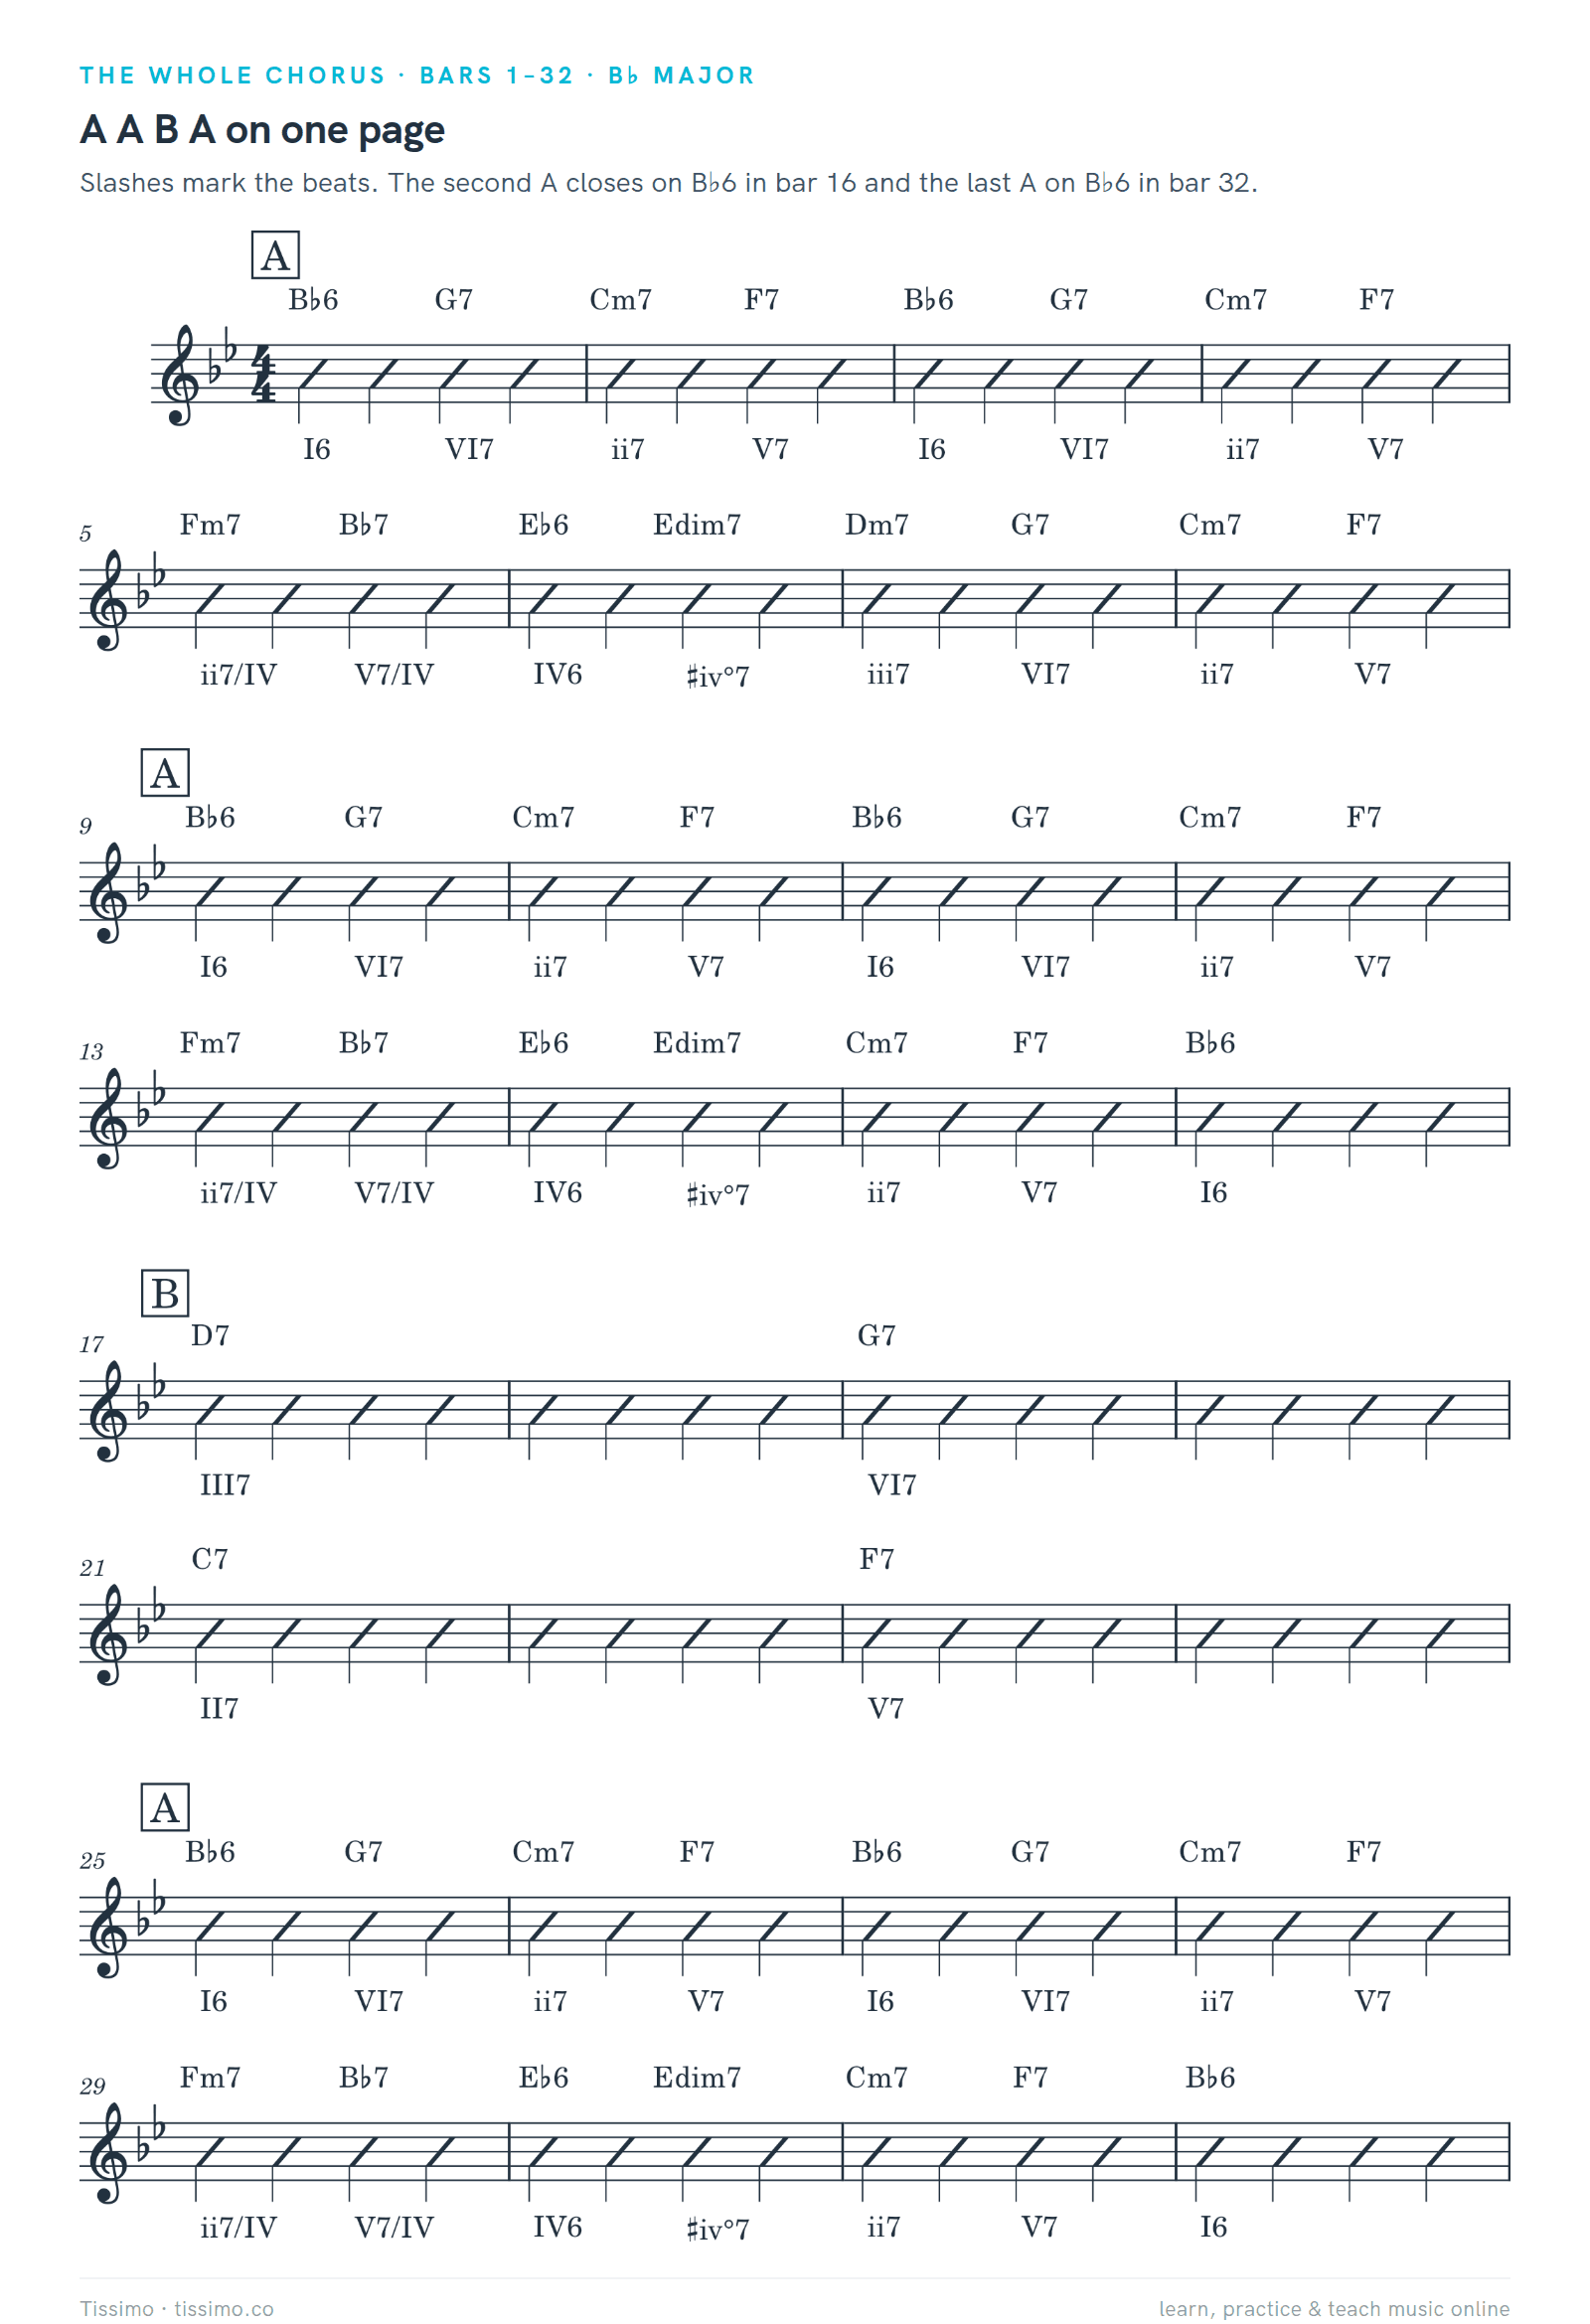
The full chorus, bars 1–32, A A B A, in our basic version. Charts differ on how the A's end.
That repetition is the first piece of good news. You are learning two eight-bar pieces of harmony, not thirty-two bars. The second piece of good news is that the first one is built from a chord pattern you may already know.
The A section: turnarounds in B♭
A turnaround is a short chord pattern that leads back to where it started. The A section opens with a classic: I, VI, ii, V. In B♭ that is B♭6, G7, Cm7, F7, two chords to the bar. Notice the bass roots: G to C to F to B♭ each drop a fifth, so the whole pattern is one chain of pushes. G7 is the dominant of Cm7, Cm7 and F7 are a ii–V, and F7 pulls back to B♭. Some charts print the second chord as the minor Gm7 (vi) instead of G7; either way, you are walking the same chain.
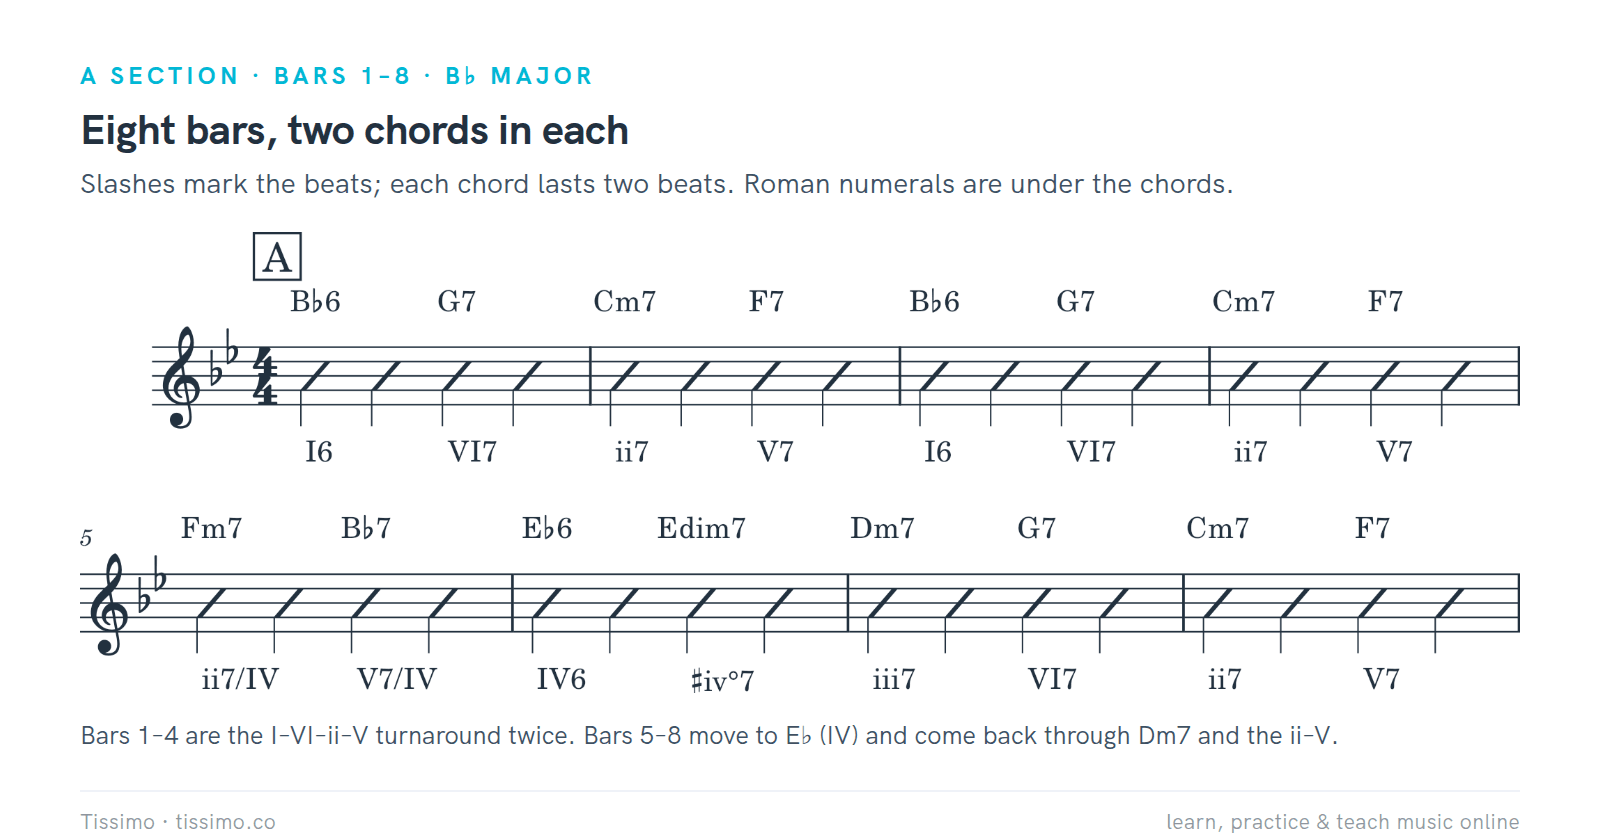
Bars 1–4 play the turnaround twice. Bar 5 is a ii–V (Fm7, B♭7) aimed at E♭, the IV chord. Bar 6 lands on E♭6 and passes through Edim7, and bars 7–8 return through Dm7 and the ii–V.
If you can read chord symbols, you can play this now. The worksheet Reading a lead sheet decodes symbols like Dm7 and G7 from left to right: root first, then the suffix. The dominant 7th explains why G7, F7 and the other dominant 7ths here have a restless pull.
Bars 5–6 tell a small story. Fm7 and B♭7 are a ii–V that points at E♭, so for a bar the music leans away from home toward the IV chord. In bar 6 the Edim7 is a passing chord: each of its notes (E, G, B♭, D♭) steps down into the Dm7 that follows (D, F, A, C), so it slides the harmony back toward the turnaround. Bars 7–8 finish with Dm7, G7, Cm7, F7, which is the chain again.
Your ear picks all this up as a loop of tension and release. The ii–V–I in Every Key shows the engine behind it: strip each chord to its 3rd and 7th and the 7th of one chord steps down to the 3rd of the next. The minor 7th shows how minor 7th chords like the Cm7, Dm7 and Fm7 in the chart are built.
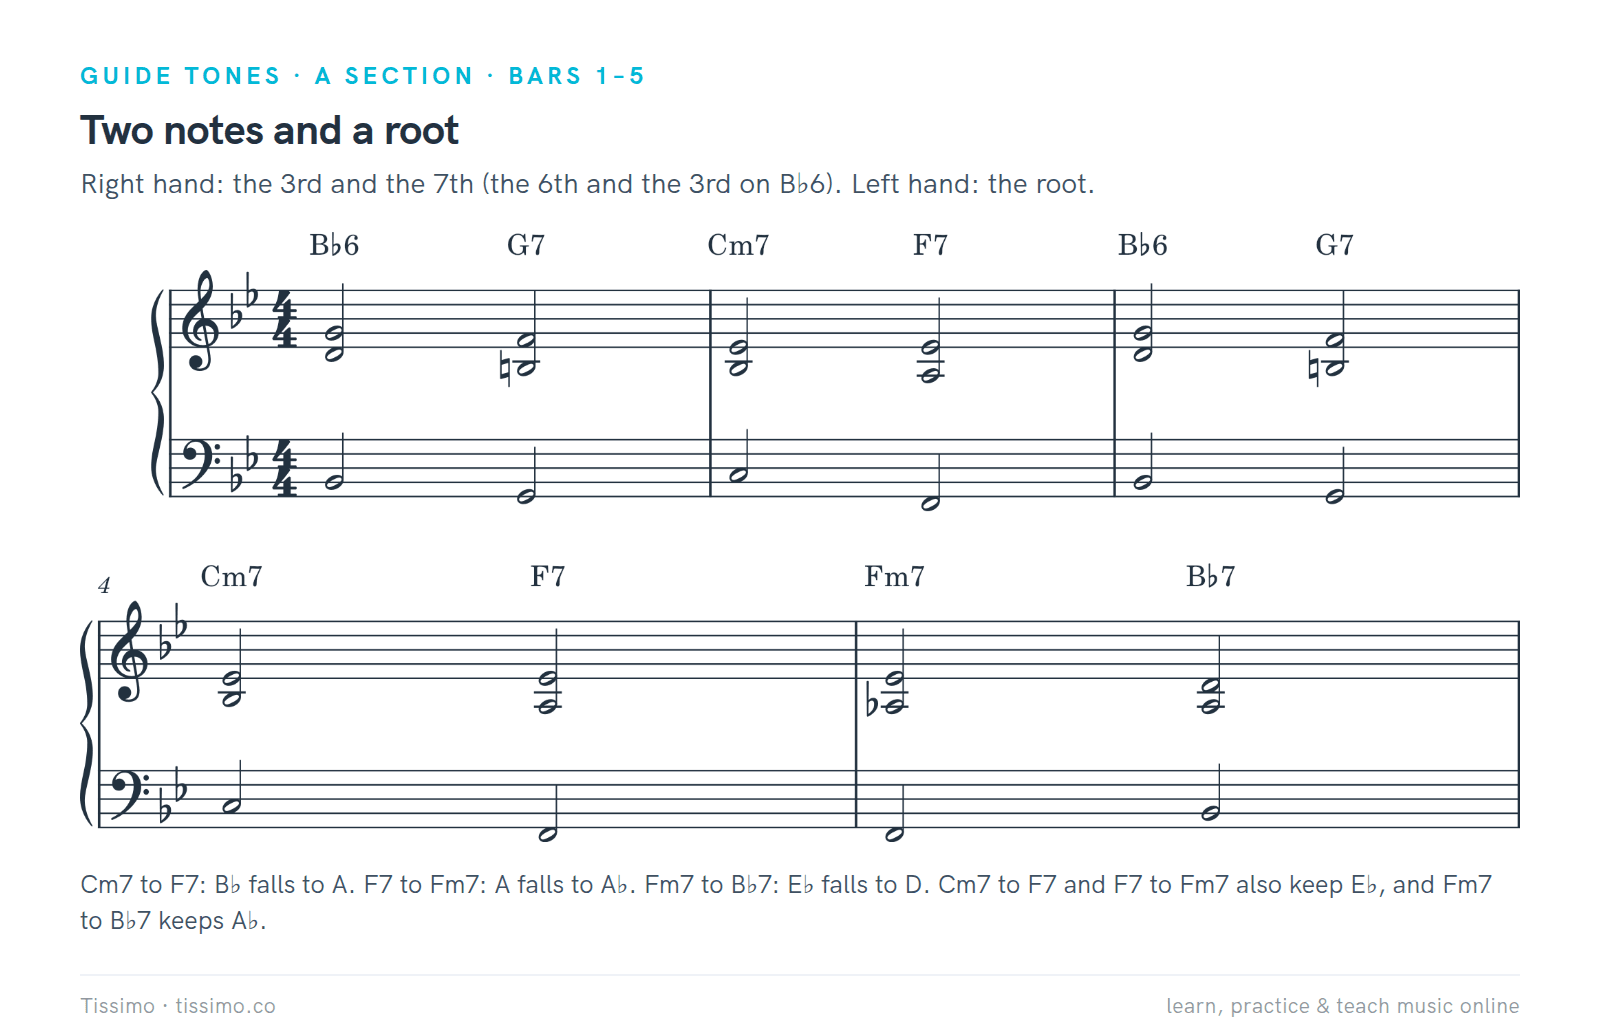
Guide tones for bars 1–5: the 3rd and 7th of each chord in the right hand (the 6th and 3rd on B♭6), roots in the left. These voicings are our own example, not a transcription.
Look at the voice leading in bars 2 and 4–5. Cm7 to F7: the B♭ falls to A and the E♭ stays. F7 to Fm7: the A falls to A♭ and the E♭ stays. Fm7 to B♭7: the E♭ falls to D and the A♭ stays. That is the reason a ii–V–I sounds smooth, and the reason you can play it with two notes and a bass.
The bridge: a chain of dominants
The bridge is where rhythm changes becomes its own form. It is a string of dominant seventh chords that follows the circle of fifths: D7, G7, C7, F7, each lasting two bars. Each chord is the V7 of the next, and the last one, F7, is the V7 that finally leads home to B♭ for the last A.

Each dominant points at the next. Read as secondary dominants: D7 is V7 of G (vi), G7 is V7 of C (ii), C7 is V7 of F (V), and F7 is the plain V7.
Because each chord holds for two bars, the harmony slows down compared with the A sections. That slowdown is the contrast the form wants. If the term "secondary dominant" is new, our article on secondary dominants lays out the idea, and the worksheet Secondary dominants shows the simplest case, D7 borrowed to point at G. For practice in spotting them in writing, there is Spot the secondary dominants, an exercise in which you write a Roman numeral under each chord.
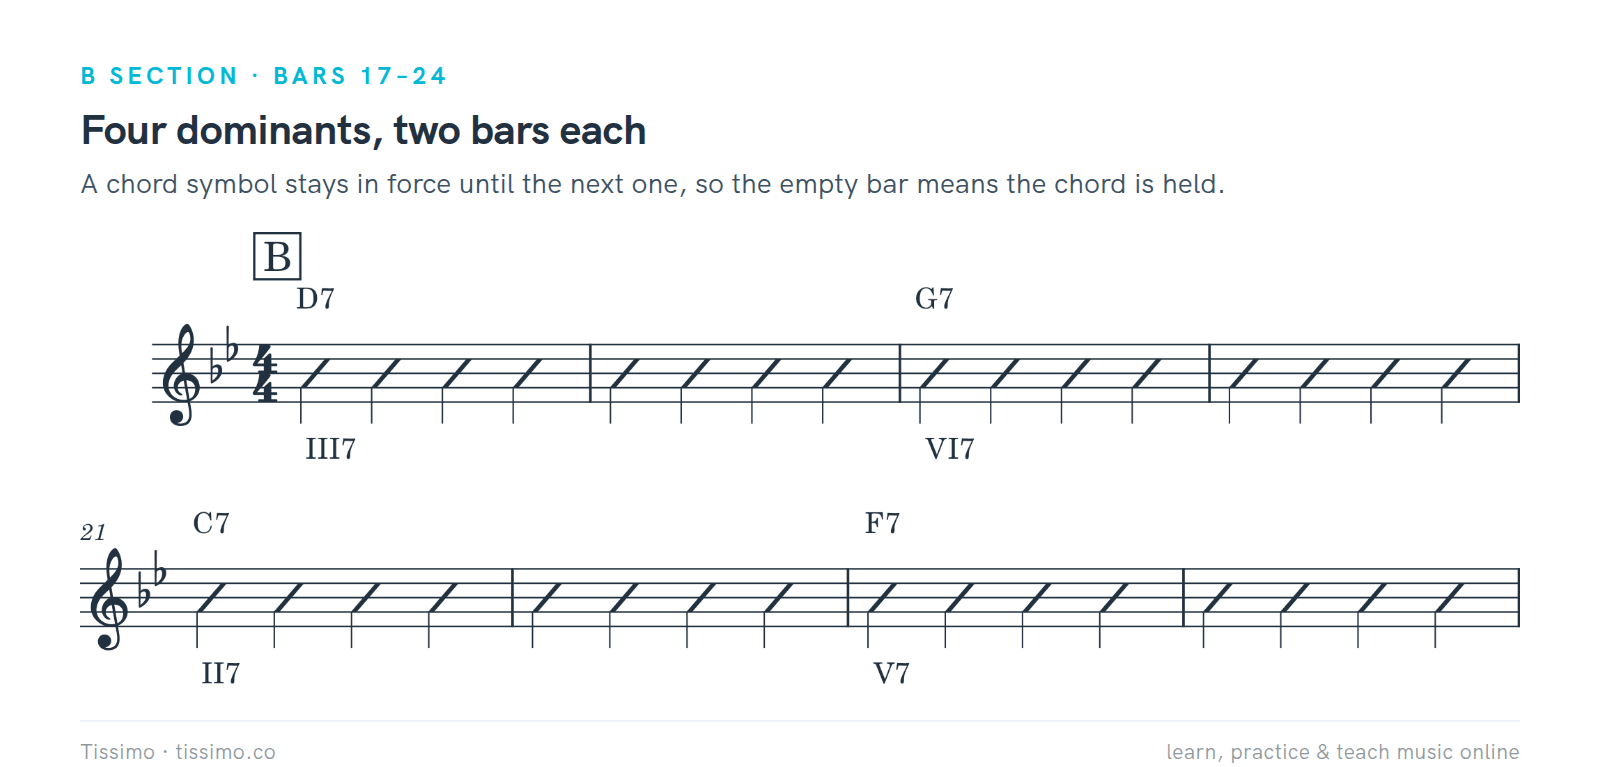
The bridge in bars 17–24. A chord symbol stays in force until the next one appears, so an empty bar means the chord is held.
The bridge has a neat voice-leading trick too. Take the 3rd and 7th of each dominant and the 7th falls a half step onto the next chord's 3rd every time.
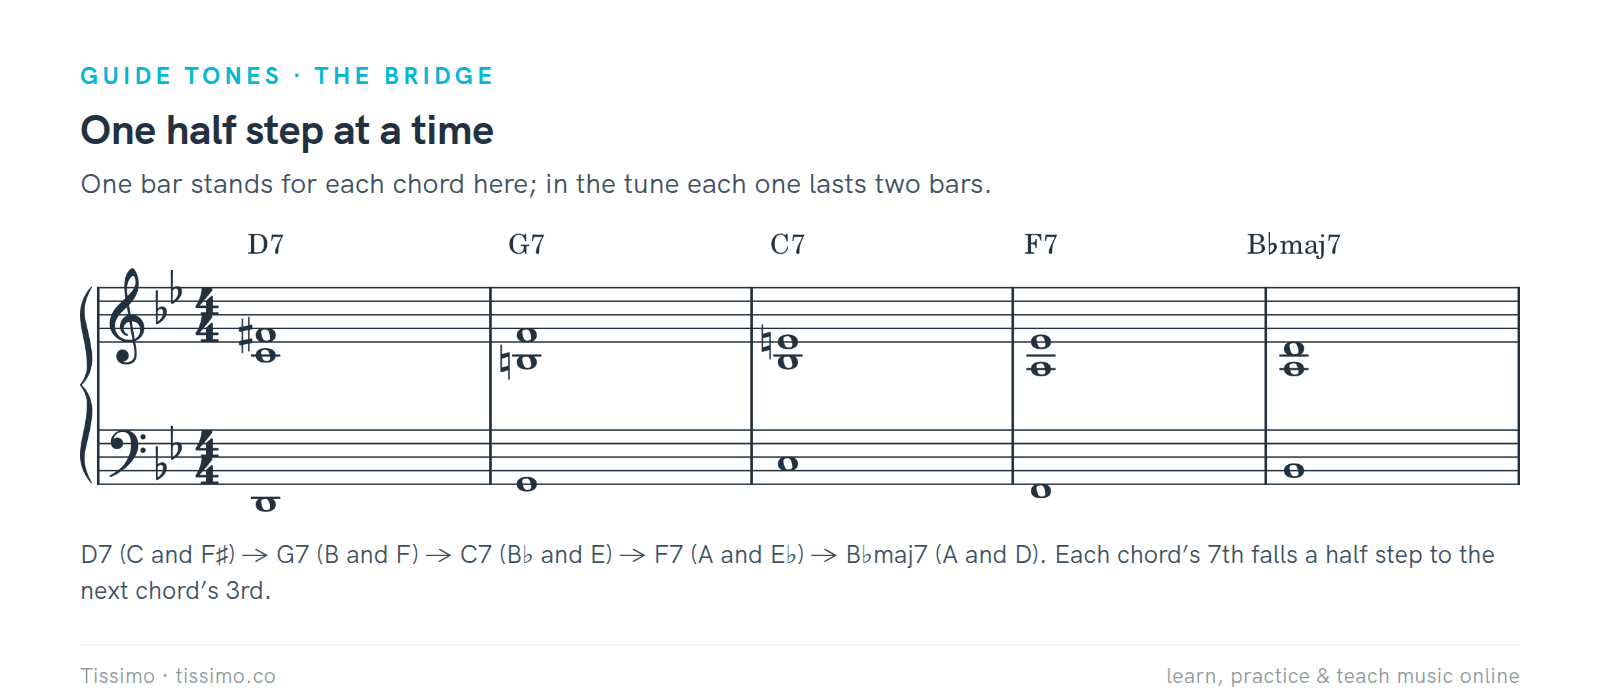
One bar stands for each chord here. D7 (C and F♯) to G7 (B and F) to C7 (B♭ and E) to F7 (A and E♭) to B♭maj7 (A and D). Each chord's 7th falls a half step to the next chord's 3rd.
Common simplifications and substitutions
No two charts of rhythm changes agree completely, and players change the chords as they go. Goldsby says as much, noting that jazz players often alter the progression spontaneously while improvising. The following are the variations you will meet most.
- Play the plain version. The chart above is a working basic version. If a chord symbol looks busy, play its root, 3rd and 7th and ignore the rest.
- A ii chord before each dominant in the bridge. Boppers added a minor 7th chord a fifth above each dominant: Am7, D7, Dm7, G7, Gm7, C7, Cm7, F7, one chord per bar.
- Tritone substitutions. A dominant can be swapped for the dominant a tritone away. A common bridge version puts D♭7 for G7 and B7 for F7: D7, D7, D♭7, D♭7, C7, C7, B7, B7.
- Richer A sections. Bebop charts add extensions and altered chords such as G7♭9 and a C♯dim passing chord, and later versions put tritone substitutes in bars 3–4 and 7–8.

Two bridges, one destination. The second version keeps every dominant and puts a minor 7th a fifth above each.

The A section at three levels. The basic row is this article's chart; the bebop and tritone-substitution rows are as printed on Robert Russell's rhythm-changes page (UNC Wilmington), and charts differ from source to source.
Start with the basic version. Add one change at a time, and only once the basic chart is automatic.
Other keys, and what each instrument plays
B♭ is where you will meet rhythm changes on bandstands; Spitzer notes that it is almost always played in that key. But the pattern is in the Roman numerals, so you can move it. In C the A section opens C6, A7, Dm7, G7, and the bridge is E7, A7, D7, G7 (III7, VI7, II7, V7). Try that once you know the B♭ version; it tests whether you know the pattern or only the notes.
In a group, the roles divide naturally. A bassist plays the roots and walks between them. A pianist or guitarist plays the guide tones from the figures above, with the roots left to the bass. A horn player plays the melody or improvises from the lines in this article. Here is the bridge as a bassist might walk it: roots on the first beat of each chord, chord tones in between, and a half-step approach into the next root.

An original walking line for bars 17–24. Bars 18, 20 and 22 end a half step from the next root (A♭ to G, D♭ to C, E to F), and bar 24 ends on A, a half step under the B♭ that opens the last A.
Alone at the piano, you can do the first two jobs at once: roots in the left hand, guide tones in the right.
Swing feel and tempo
Rhythm changes is a swing form. Eighth notes are written even and played long–short, the way Swing Eighths explains it. The article Swing and Shuffle Feel Explained goes into the triplet feel in depth. Start at a tempo where you can play the roots through the whole chorus without stopping, for example a metronome at 60 with each click counted as beat 2 or beat 4 (quarter note = 120), and keep the swing feel even when you slow down.
How to practice it
Work on the form in layers, as the plan below shows. First you want the form in your ear and hands, then the notes.
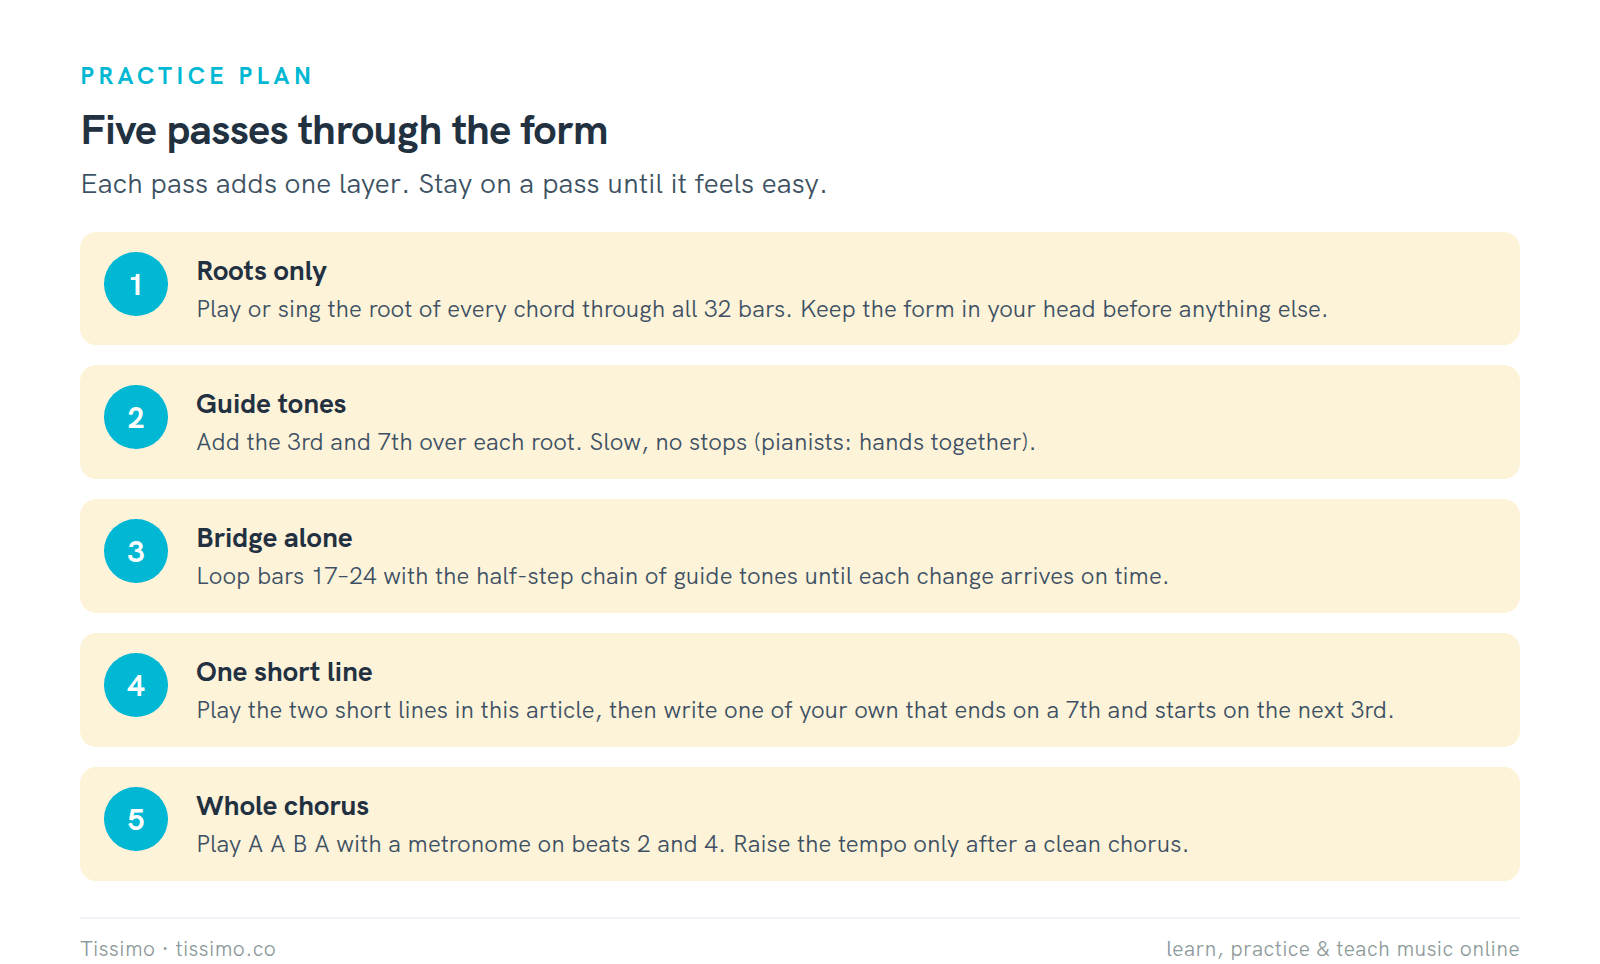
Five passes. Stay on one until it feels easy.
- Roots only. Play or sing the root of each chord through all 32 bars, counting the sections aloud: A, A, B, A.
- Guide tones. Add the 3rd and 7th above the roots, as in the A-section figure.
- The bridge alone. Loop bars 17–24 until the half-step chain feels natural. The bridge deserves its own pass, because its chords point at a new chord every two bars.
- One short line. Play the two lines in the next section, then write one of your own.
- The whole chorus. Play A A B A at a tempo where you do not stop. Raise it only after a clean chorus. Record one chorus on your phone and listen back for the spots where you rushed the bridge.
Improvising over rhythm changes
Improvising on rhythm changes gives you two jobs: land on the changes, and keep the line moving. The beginner's guide to improvising covers the basics. For the A section, the B♭ major pentatonic scale (B♭, C, D, F, G) is a friendly start; Goldsby notes that a musician can improvise successfully over the form with it. Here is a line of our own that begins there and then switches to chord tones where the harmony changes.
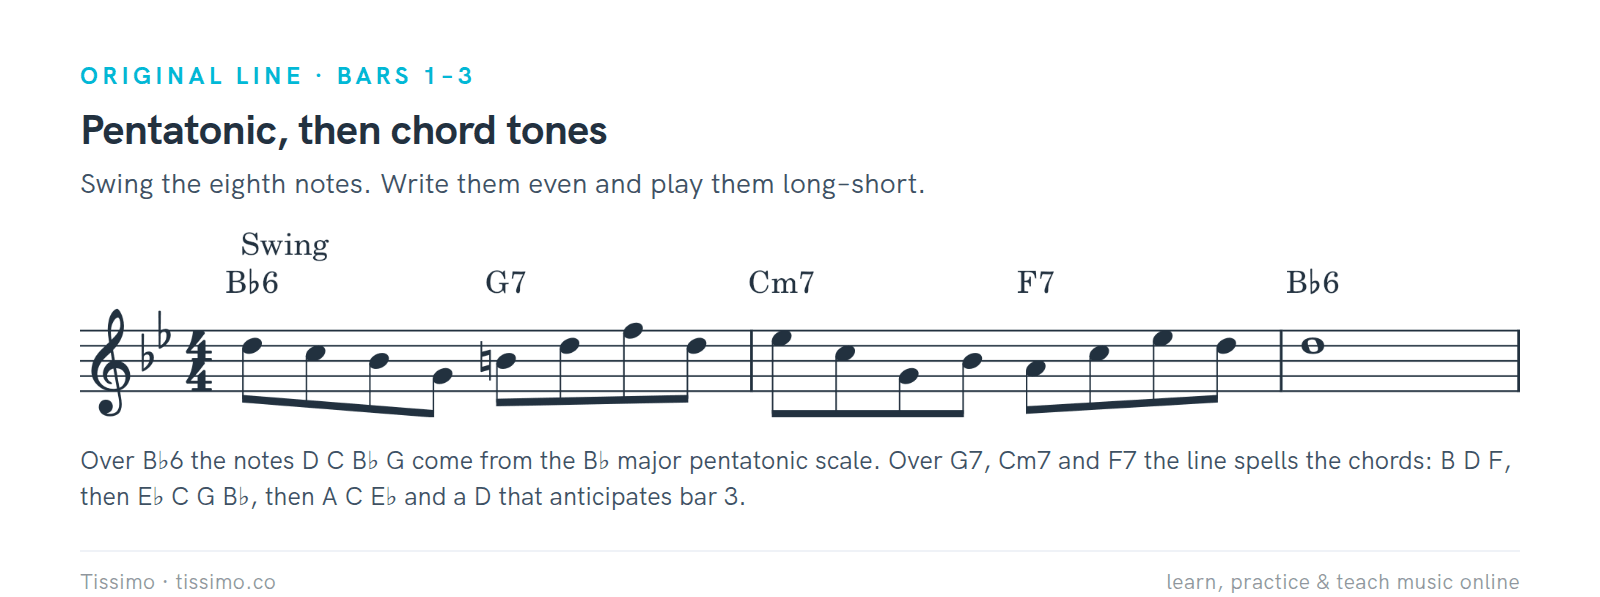
An original line for bars 1–3. Over B♭6 the notes D, C, B♭, G are all from the B♭ pentatonic scale. Over G7, Cm7 and F7 the line spells the chords: B, D, F, then E♭, C, G, B♭, then A, C, E♭ and a D that anticipates the B♭6 in bar 3.
The bridge needs a different approach, because the scale changes every two bars. Aim for the guide tones. Here is a line that ends each bar on the 7th and starts the next on the 3rd of the next chord.
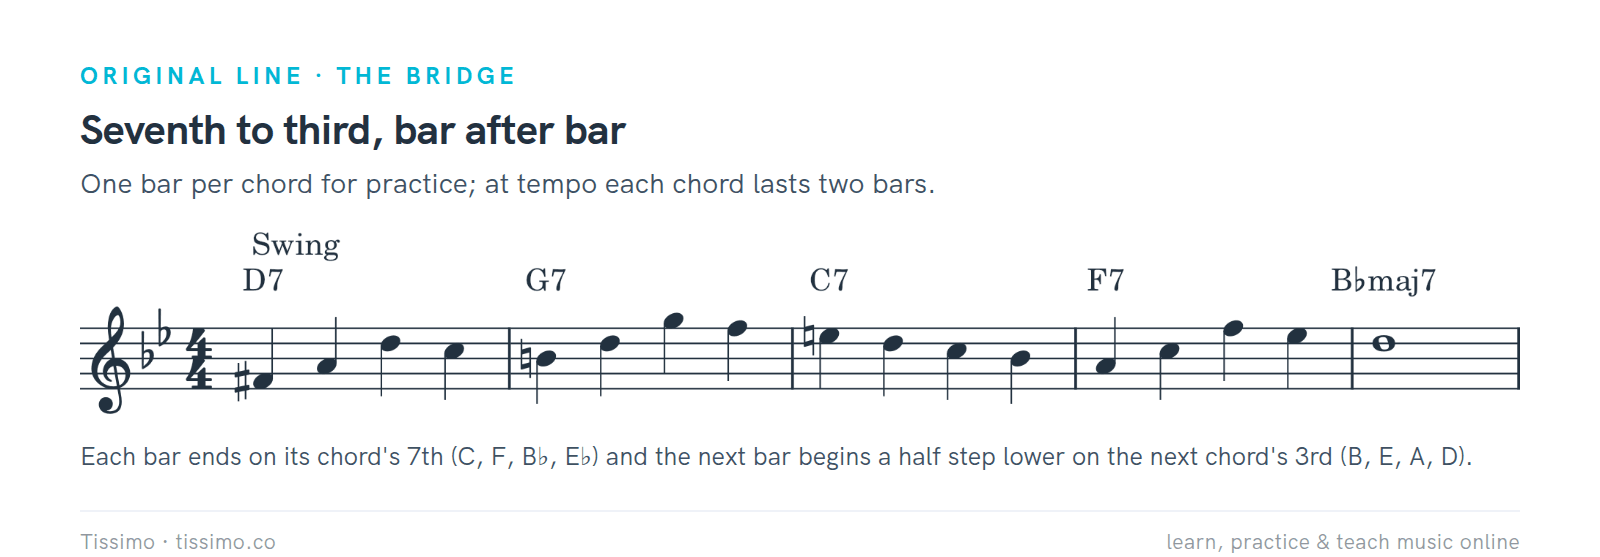
An original line for the bridge, one bar per chord. Each bar ends on its chord's 7th (C, F, B♭, E♭) and the next bar begins a half step lower on the next chord's 3rd (B, E, A, D).
Leave space, too. A line of nonstop eighth notes tires the listener and tires you. Try a short phrase, a bar of rest, then an answer. The form repeats often enough to practice that many times.
Once you can play both lines, you can write your own versions with the same trick: end on a 7th, start on the next 3rd. If you know the 12-bar blues, you already improvise over a form with three chords and a repeating shape. The 12-Bar Blues sheet shows the shape. Rhythm changes asks the same question with more chords, and the guide tones answer it.
Three mistakes to avoid
- Losing the bar count in the bridge. Each bridge chord lasts two bars, so it is easy to change after one. Count the bars aloud, "one, two" over each chord, and stay put for both.
- Forgetting where each A ends. Our full chorus loops the first A back through the turnaround in bars 7–8 (Dm7, G7, Cm7, F7), then closes the second A on B♭6 in bar 16 before the bridge's D7 and the last A on B♭6 in bar 32. Some charts keep the turnaround at the end of every A instead, so check which version your band or lead sheet uses.
- Learning the notes without the numbers. If you only memorize the letter names, a different key means starting over. Say the Roman numerals as you play: I–VI–ii–V is the same movement in every key.
Tunes to learn the form on
Goldsby advises listening to many recordings of rhythm changes. Start with the tune whose melody you can already hum: a head you know makes it easy to hear where each section begins. Count the bars and follow the AABA form, play along with the chart, then try a tune from another decade, such as "Lester Leaps In" (1939) or "Oleo" (1954), one tune at a time.

The Gershwin song and five contrafacts. Years are as listed on Wikipedia's "Rhythm changes" page.
Free worksheets for this lesson
- Reading a lead sheet — how to read symbols such as Dm7, G7 and C/E, and build a left hand from them
- The dominant 7th — why a dominant 7th pulls, and the tritone at its center
- The minor 7th — Dm7 and the other minor 7th chords in a key
- The ii–V–I in Every Key — guide tones and a two-hand loop for the ii–V–I
- Secondary dominants — borrowing a dominant to point at another chord
- Spot the secondary dominants — an exercise in naming chords with Roman numerals
- Swing Eighths — how written even eighths are played long–short
- The 12-Bar Blues — the blues form to compare with rhythm changes
Next step
Rhythm changes is a form you learn by playing it with other people. A Tissimo teacher can check your guide tones, listen to a chorus and show you how to loosen up the bridge in a live lesson. You can book a lesson whenever you are ready.
Sources
- Gershwin timeline, October 14, 1930 (Girl Crazy opens at the Alvin Theatre) — Gershwin Enterprises
- "I Got Rhythm" (1930) — JazzStandards.com
- Rhythm Changes, by Peter Spitzer — JazzStandards.com
- Rhythm Changes, by Robert Russell — University of North Carolina Wilmington
- Rhythm changes — Wikipedia
- I Got Rhythm — Wikipedia
- Interpreting "I Got Rhythm," by John Goldsby — The Strad
- Rhythm Changes: A Complete Guide — Piano With Jonny
Read this article online: https://tissimo.co/articles/rhythm-changes-explained-the-jazz-form-after-the-blues



Comments