 Back

Place Before You Pluck: Your First Two-Finger Harp Move
Rest your index finger on one harp string and your thumb on the string next to it, so both are touching before you play a single note. Now pluck the lower string, then the upper one. You never had to go looking for the second note, because your thumb was already waiting there. That small habit, placing before you pluck, is the first real technique a harpist learns, and it decides how clean everything you play after it will sound.
This guide is for a beginner on a lever or pedal harp, and for the parent or teacher sitting beside one. It covers which finger plays which string, why you set both fingers down first, how to pluck the pair, and what the rest in the music is actually for. You will build a short two-string drill, learn to check it, and finish with a five-minute routine. Most sections link a free worksheet that goes with them.
Two fingers, two strings
Start with the smallest possible shape: two strings right next to each other, and two fingers — C4 (middle C) and the D just above it, D4. They are one whole step apart — two neighboring strings, two neighboring letters.
The fingers have numbers, the same way piano fingers do. The thumb is finger 1, the index is finger 2, the middle is finger 3, the ring is finger 4. There is no finger 5 on the harp: the little finger is almost never used to pluck, because it cannot reach the strings without pulling the rest of the hand out of shape. You will only ever use four fingers, and today only two of them.

Finger 2 (the index) waits on the lower string, C4; finger 1 (the thumb) waits on the upper string, D4. The thumb plays the higher of the pair because it points up while the fingers point down.
That last point surprises people, especially anyone coming from the piano, where the thumb usually plays the lowest note of a right-hand shape. On the harp it is the opposite. Your thumb sticks up and your fingers hang down, so the thumb naturally covers a string above the one your index is on. Keep that picture in your head from the start: thumb up on D4, index down on C4. If you ever feel yourself crossing the thumb under or reaching awkwardly, the hand has turned the wrong way around; reset it so the thumb points toward the ceiling.
We are using just two fingers today, but the reason the harp numbers them the way it does is worth knowing. Every finger is assigned to a string, and in a longer passage each one stays close to its own string rather than jumping around. That is why a harpist can play smooth, connected lines without the hand lurching: the fingers are spread across neighboring strings like a small net, each ready to drop onto the string it owns. Two fingers on two strings is the first, smallest version of that net.
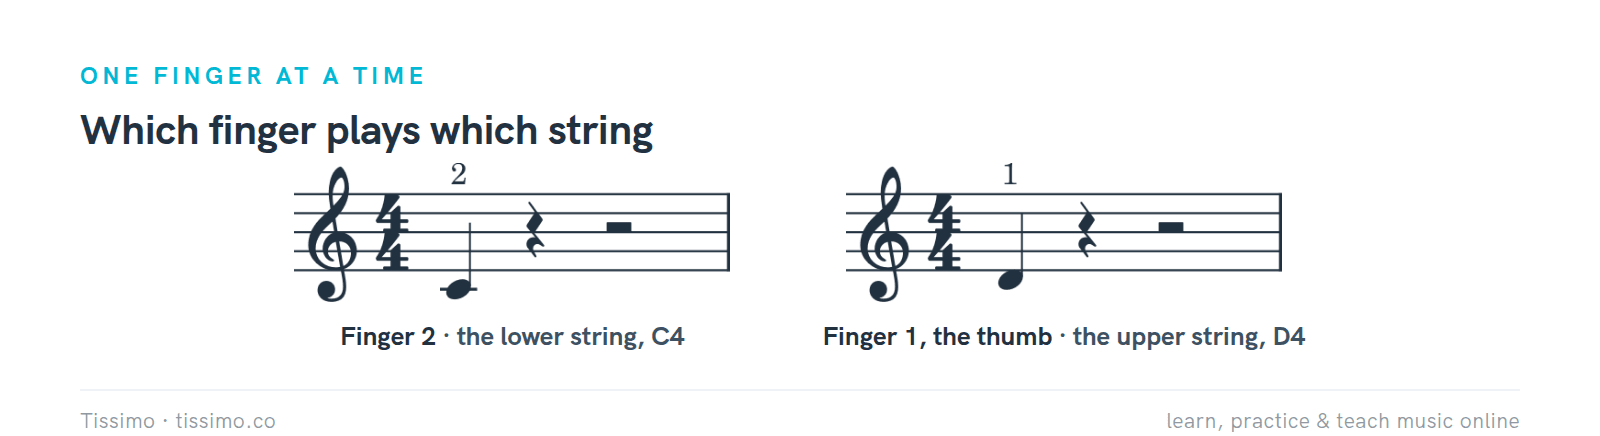
Which finger plays which string. Finger 2 takes C4, the lower string; finger 1, the thumb, takes D4, the upper string.
The two notes sit close together on the staff, too. If reading them is new, the Treble Clef worksheet shows where middle C lives. C4 is one short ledger line below the five-line staff; D4 is the note just under the bottom line.

Where C4 and D4 sit in the treble clef. Middle C hangs one ledger line below the staff; D4 is the space just below the bottom line.
If you have the instrument in front of you, you do not even have to count strings to find C. Harp strings are colored: every C string is red, and every F string is black or blue. The plain strings in between are the other letters. Put your index on a red string and your thumb on the next string up, and you are already on C and D.

Harp strings are color-coded so you can find your place without looking. Red is always C; black or blue is always F. Our two strings are the red C and the gray D just above it.
Why you place first
Here is the whole idea in one sentence: put the fingers on the strings before you need them. Good harp playing is built on being prepared in advance, and beginners are taught the skill of placing from the very first lessons, because it is what gives the tone its smooth, even quality as you go on. A finger that is already resting on its string can play a calm, controlled note. A finger that has to fly through the air and land on a moving string plays a scratchy, uncertain one.
So before you pluck anything, set finger 2 on C4 and finger 1 on D4 at the same time, and let them sit there. Feel the two strings against your fingertips. Only then do you play.

Thumb up, fingers down. The thumb reaches the upper string from above; the index reaches the lower string from below. The harp uses the thumb and the first three fingers only.
Keep the hand open and relaxed, with a comfortable gap between the thumb and the fingers, and the thumb standing up rather than lying flat. Let the wrist stay level and loose, and let the elbow hang away from your side so the whole arm can move the hand to the strings instead of the fingers stretching to reach them. Short fingernails help: you want to pluck with the pad of the fingertip, not catch the string on a nail. None of this is about strength. It is about having the fingers in the right place, ahead of time, so that playing becomes a small release rather than a grab.
Placing is also the fastest way to a good tone, which is the real reason teachers insist on it so early. A string that is plucked by a finger already resting on it starts cleanly and rings fully. A string that is struck by a finger arriving out of the air gets a little slap of attack noise, and the note sounds thin. When you set the finger first and feel the string against the pad before you play, you are choosing the sound before it happens. Beginners who build the placing habit now spend far less time later trying to fix a scratchy tone, because the scratch never develops.

The two-string pair: finger 2 on C4, then finger 1 on D4, then a half rest. Both fingers are placed before the C is played.
Play the lower string, then the upper
With both fingers resting, you play them one at a time. Finger 2 goes first: draw the index fingertip in toward your palm so it releases the C string, then let it follow through and close gently into the hand. A moment later the thumb does the same on D, closing down toward the hand. The motion is a small, brisk squeeze-and-release, not a pull or a scrape. Think of each finger as giving its string a quick squeeze and then letting go, with the finger finishing its travel inside the hand rather than flicking outward. Each finger plays its own string and then relaxes.
Because both fingers are already down, the two notes can be as close together or as far apart in time as the music asks, and you stay in control of both. You are never surprised by the second note, because your thumb has been resting on D the whole time. This is the quiet advantage that placing buys you: every note you play is a note you were ready for.

The order: finger 2 plucks C4 on beat 1, then finger 1, the thumb, plucks D4 on beat 2. Lower string first, upper string second.
Try it as slowly as you like at first. Give each note a long value and leave all the time in the world between them. There is no prize for speed here, only for a clean, ringing note from each string.

Slow practice: the same pair as two half notes. Place both, play C4 with finger 2, play D4 with the thumb. No rush between them.
The payoff of placing both fingers first shows up right here. Because your thumb was already resting on D while your index played C, the D is ready the instant you want it. Compare that with the beginner's reflex of playing C, then starting to hunt for D: the hand lurches, the thumb lands late, and the note arrives rough and behind the beat. The notes on the page are identical. What differs is whether the fingers were ready.

Same notes, two ways to arrive at them. Prepared: both fingers wait before beat 1. Hunting: the thumb is still searching for D after C has already sounded, and the second note arrives late and uneven.
The rest is for resetting
Music is not only notes; it is also the silences between them, and on the harp a rest is a gift. It is the time you use to put your fingers back. After you play the pair, there is a half rest, two full beats of silence, and that is exactly when you re-place finger 2 on C4 and the thumb on D4 for the next time.

A half rest fills beats 3 and 4 with silence, so each bar is two plucked notes and two resting beats. Those two beats are not empty time; they are placing time.
A half rest is worth two beats, the same length as a half note. If the half rest or its counting is new, the Half Note worksheet lays out how a half note and half rest each fill two beats. The habit of using rests to prepare is the heart of harp technique: you lift only the finger that is plucking, and the moment it has played, you return it to its string. Before the thumb plays, the index is already back on its string; before the index plays again, the thumb is back on its string. The fingers are almost always touching strings, waiting.

One bar, finger by finger. Both fingers are already on their strings before beat 1; you hear C4, then D4, then silence; and the half rest on beats 3 and 4 is when you place both fingers again for the next bar.
Put a few of these bars in a row and you have a real drill. Here are four identical bars: two plucked notes, then a half rest, four times. Set the tempo to a slow quarter equals 60, one beat per second, so you have a beat for each note, then two full seconds to reset. The Tempo and Metronome worksheet shows how to read that marking and set a metronome to it.

The drill: four bars of place, play two, reset, at a slow quarter equals 60. Each bar is C4 (finger 2), D4 (finger 1), and a half rest for the placing.
Begin the very first bar only once both fingers are already on their strings, not a beat before. The whole exercise is really about those placing moments, so make them count. This two-string line is the free Place Two, Play Two, Reset worksheet, with the drill, a schematic, and recordings of the line and the two reference pitches.

Play the pair, rest, play it again. During each half rest, place finger 2 on C4 and the thumb on D4 for the next bar, so the second bar starts just as ready as the first.
Here is the cycle as three plain steps you can say out loud while you play.

The whole move in three steps. Place both fingers, play the lower string then the upper, then replace both during the rest.
Check yourself: was your placement ready?
The trouble with placing is that nobody can hear it. A recording tells you which notes sounded and in what order, but it cannot show whether both fingers were resting on their strings before you played. That is something a person has to watch. So the best check is a teacher's eye, and the next best is your own, in a mirror or on a phone camera.
When you check, look for three things. First, the right pairing: finger 2 on the lower string C4, the thumb on the upper string D4, not the other way around. Second, that both fingers were placed in advance, touching their strings before the first pluck. Third, a real, counted pause during the rest, long enough to reset calmly, followed by a comfortable return to the strings rather than a scramble.

What a ready placement looks like, next to the common misses. If the thumb is hunting, the strings are reversed, or there is no reset in the rest, the placement was not ready yet.
The companion Were Both Fingers Ready? worksheet turns that into three quick rounds. The first gives you four cards, each listing the same four steps in a different order, and asks you to circle the one correct order: place both fingers, play finger 2, play finger 1, then rest and place both again. Only one order works, because you cannot pluck a string your finger has not reached yet. The second round shows four string diagrams and asks which finger plays each marked string. The third round draws two short routes and asks you to mark the beats where you reset, the preparation interval, which is always the half rest.
Say the order out loud before you commit to an answer: place, play 2, play 1, rest. If a card has you playing a string before both fingers are down, it is wrong, no matter how reasonable it looks. The sheet also carries two check recordings and the isolated C4 and D4 pitches, so you can match your tuning by ear. Just remember that the recordings prove the pitches, not the placement. Your teacher sees the placement.
One more reason to film yourself: the single most common mistake at this stage is not a wrong note but a late thumb. You play C cleanly, and then, because the thumb was lifted away, you have to bring it back to D in a hurry, and the D arrives a fraction late and slightly rough. On a recording it can slip past you, because both notes are there and in the right order. On video you can watch the thumb and catch it the moment it leaves its string. If it ever wanders off D, that is the habit to fix: leave it resting there until the instant it plays.
A five-minute daily routine
You do not need a long practice to build this habit. Five minutes a day, every day, will do more than an hour once a week, because placing is a reflex you are training, and reflexes come from repetition.

A four-step daily routine. Each step is about a minute: place, play the pair, reset in the rest, then string four clean bars together.
Spend about a minute on each of these.
- Place and feel. Rest finger 2 on the red C string and the thumb on the D above it. Do not play. Just feel both strings and settle the hand: thumb up, fingers curved, a relaxed gap between them.
- Pluck the pair. Play C4 with finger 2, then D4 with the thumb, as slowly as you like. Listen for two clean, ringing notes. If reading the two pitches is still new, keep the Treble Clef sheet open beside you.
- Rest and reset. Add the half rest. Play the pair, then use two full beats to put both fingers back before you play again. Count the rest out loud: one, two.
- Four clean bars. Put it together as the Place Two, Play Two, Reset drill, four bars at quarter equals 60, and ask one question at the end: did any note arrive by hunting? When all four are prepared, you are done for the day.
Once the two-string pair is automatic, the same habit scales up. Three fingers placed together become a small chord shape; a whole hand placed on a run means every note is waiting before you play it. The move never changes. You place, you play, and you use the rests to get ready again.
Free worksheets for this lesson
- Place Two, Play Two, Reset — the two-string drill, a finger-and-string schematic, and recordings of the line at quarter equals 60
- Were Both Fingers Ready? — three rounds that check the order, the finger-to-string match, and the preparation interval
- Treble Clef — find middle C and read the two notes of the drill
- Half Note — how a half note and half rest each fill two beats
- Tempo and Metronome — read quarter equals 60 and set your metronome to it
Place before you play
Everything a harpist does well starts with the fingers already on the strings. Place both fingers before you pluck, play the lower string then the upper, and use every rest to put them back. Practice it slowly, two notes at a time, until the hand does it without being told. A Tissimo music teacher can watch your hand and tell you whether that second note was prepared or hunted, which is the one thing a recording can never show you; you can book a lesson whenever you are ready to have your placement checked.
Sources
Read this article online: https://tissimo.co/articles/place-before-you-pluck-first-two-finger-harp-move



Comments