 Back
Violin: Play Two Open Strings Together with One Bow
D and A can sound one after the other, or they can sound together under one bow. The notes are the same; the contact is different. Your first goal is a short, comfortable sound in which you can keep hearing both open strings from the beginning to the end.
This lesson is for you if your teacher has already established comfortable bowing on individual open strings. You will read two notes aligned vertically, find a neighboring string pair, hear its two pitches separately, and sustain them together. Begin with D and A if your teacher agrees. Leave the left-hand fingers off the strings for every example here.
You may hear this called an open-string double stop. The term double stop includes two open strings in teaching usage, even though no left-hand finger stops either string. Violinspiration explicitly includes this combination in its double-stop introduction. Here the task belongs to the bow: make two neighboring strings speak concurrently.
Read vertically aligned notes
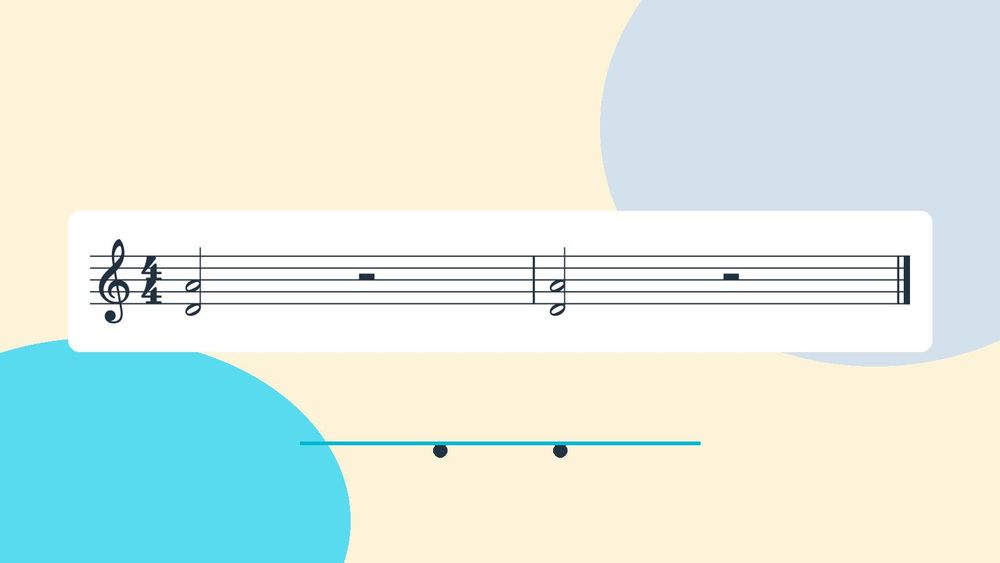
Look at the first bar below. D4 and A4 are stacked at the same horizontal position and share a stem: begin them together. Each hollow notehead is attached to the shared stem: these are half notes, and both last two quarter-note beats. There are two pitches, but only one starting time. “D plus A” is a useful way to say the instruction before you play.
Now read the second bar from left to right. D starts first, lasts two quarter-note beats, and then A starts. There are still two pitches, but two starting times. Counting noteheads alone cannot distinguish the bars. Find out which notes share a start, then check how long each is meant to continue.

D and A share one start in bar 1, followed by a half rest; in bar 2 they begin separately on counts 1 and 3. The count labels sit beneath the events they describe. Count 2 continues the first sound rather than asking for another attack.
In this lesson all bars are in 4/4, and a quarter note receives one count. A half note lasts two counts. Two simultaneous half notes occupy two counts together, not four counts added end to end. The Half Note worksheet shows the hollow notehead and stem and a tapping comparison with quarter notes.
Count “1, 2, 3, 4” aloud. Tap on 1 when the pair begins; do not tap on 2, 3 or 4. For the successive bar, tap on 1 and 3. This establishes starting times; the tapping does not imitate sustained bow sound.
Point to the pair and say “two pitches, one start”; then point to the half rest on count 3.
Locate the three neighboring open-string pairs
The standard open strings are G3, D4, A4 and E5, from lowest to highest. Vienna Symphonic Library’s violin reference confirms these pitches and that violin notation uses treble clef at sounding pitch. The numbers identify octaves: D4 is the D just above middle C. They are not finger numbers.
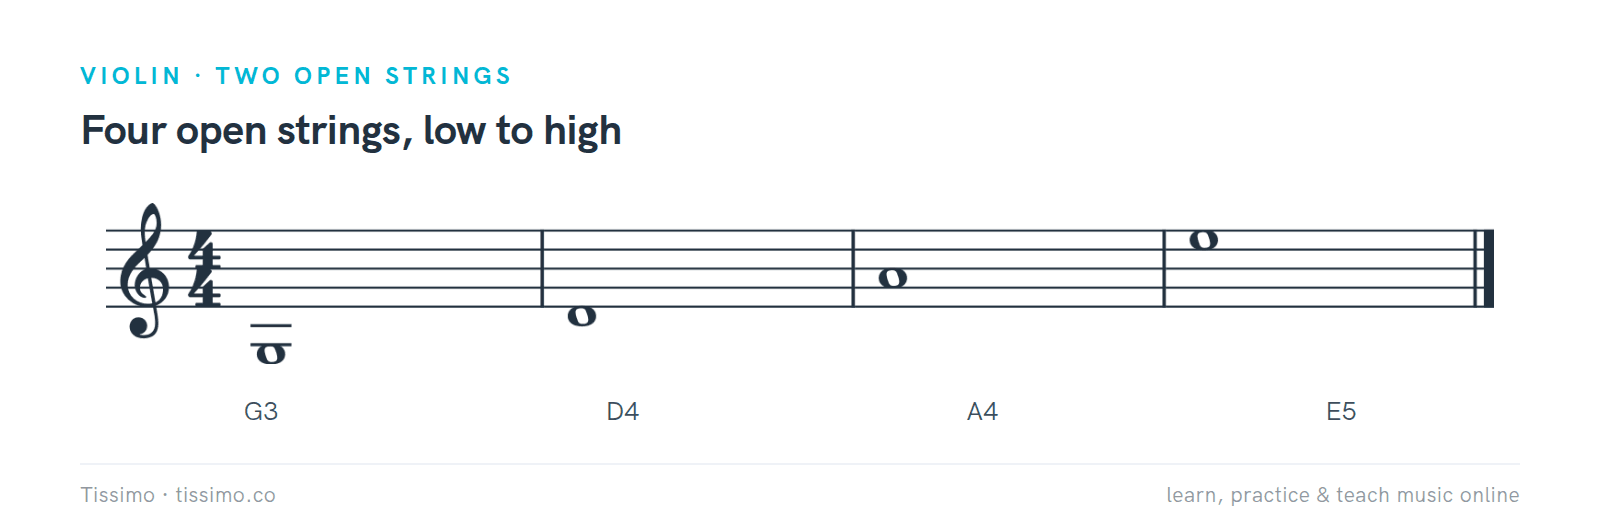
Four whole-note bars identify G3, D4, A4 and E5. G3 sits below the second ledger line beneath the staff. Octave numbers identify pitches, not left-hand fingers.
From E4 on the bottom staff line, step downward through D4 below the staff, C4 on the first ledger line, B3 below that line, A3 on the second ledger line, and G3 below it. The Staff & the Treble Clef worksheet explains line and space names and introduces ledger lines. Locate D just below the staff and A in the second space, counting spaces upward from the bottom.
On your instrument, ask your teacher to identify the strings in that low-to-high order. Immediate neighbors make G–D, D–A and A–E. Open G and open A have the D string between them. Do not try to reach those two open strings together while avoiding D: that is outside this adjacent-pair task.

The brackets connect G–D, D–A and A–E without skipping a string. G–A has D between its members. This is a string-order map, not a view of playing posture.
The Timbre and Orchestration Resource identifies adjacent strings as a condition for double stops. Read that as a physical string relationship. Two notes looking close together on a page does not establish which strings will produce them; our examples remove that ambiguity by naming the open strings. The staff names pitches; the string map specifies which open strings produce them here.
Every neighboring open pair here forms a perfect fifth. Count letters inclusively: D–E–F–G–A gives a fifth. In the equal-tempered pitch reference, D4–A4 also spans seven semitones, which makes it a perfect fifth. G3–D4 and A4–E5 have the same interval. The Intervals: the 5th worksheet practices inclusive counting. You are naming the relationship between two pitches, not measuring a distance for your bow hand.

Each neighboring open pair forms a perfect fifth. Both notes start on count 1 and last through count 2; the half rest occupies counts 3–4.
Hear each pitch before you combine them
Play an easy D alone and listen. Stop, then play an easy A alone. Have your teacher demonstrate the pair while you listen for those same two pitches within the combined sound. You need not sing both at once; simply recognize the lower D and the higher A as two continuing parts of what you hear.

Recognize D4 alone, then A4 alone, then both together. Prepare the requested contact before each sounding event; this sequence does not ask you to add the second string midway through a note.
In Two Strings at Once, choose “Hear each open pitch”: its order is G, D, A, E. Listen for D and A, then choose “Hear the three adjacent pairs” and listen to its second pair, D+A. Its neutral piano references supply individual pitches and combined pitches. They clarify what starts together and which pitches belong to a pair. The recordings release slightly early; follow the printed durations for violin sustains. They do not demonstrate violin tone or show how a bow contacted the strings.
Give yourself a specific listening question: “Can I still pick out D when A joins it?” Then listen with attention on A. If you cannot distinguish the two yet, ask for another separate-pitch demonstration before attempting a longer combined sound. Recognizing the members makes the later continuity check more informative than judging only whether the sound is bigger.
A piano reference and your violin will have different tone colors. Match the written pitch relationship and starting times; ask your teacher to check the violin’s tuning. This lesson does not ask you to adjust the instrument to a recording or correct tuning by pressing harder with the bow.
If you are helping a child practice, ask the teacher to demonstrate the target pair during the lesson and name each pitch aloud. At home, you can count the agreed rhythm and ask whether both sounds continued. Leave physical corrections to the teacher. A useful observation is “I could hear the lower sound at first, but only the higher sound at the end.” You do not need to identify the cause to report that accurately.
Let your teacher establish two-string contact
Set up as you do for the comfortable single-string bowing you already know. With the bow quiet, let your teacher guide it into contact with D and A together. The bow hair must touch both strings at the same time. The D–A level lies between the levels you use for D alone and A alone. With the bow still, watch your teacher make that small change of level, then help you find it. Once both strings are in contact, draw the stroke while retaining that level; rocking toward either single-string level can leave only one pitch sounding. Simon Fischer’s seven-level explanation distinguishes these single-string and two-string levels. The important preparation is that both intended strings are available when motion begins. Your left-hand fingers remain clear of them.

The bow hair touches D alone, D and A together, or A alone at different levels. For the middle panel, retain contact with both strings throughout the stroke. These schematic end views explain contact, not a measured angle or a prescribed arm position; find the level with your teacher.
Ask the teacher to choose a comfortable starting place and stroke direction. Watch the demonstration, then copy it with guidance. There is no universal numerical angle to reproduce from this page: the useful check is the contact and sound on your instrument. Keep your familiar bow hold rather than tightening your grip because a second string is involved.
Violin teacher Heather Kaye emphasizes balance rather than pushing, and listening for both strings throughout the stroke. That is the principle to carry into this first attempt. If only one string speaks, stop and let the teacher recheck contact. Extra pressure is not the default correction.

Name the pair, hear each pitch, prepare contact with your teacher, then sustain both through count 2.
Start with a brief comfortable sound before adding counted duration. If your shoulder rises, your hand begins squeezing or the sound becomes forced, pause and reset with your teacher. A successful preparation should let you begin the pair without hunting for the second string after the sound is already underway. You do not need a louder sound to prove that the second string is present.
Sustain both pitches in one bow
Once the teacher has established contact, try the D–A half-note pair. Count “1, 2, 3, 4.” Begin both on 1 and keep the same stroke moving through 2. Stop the intended sound for the half rest on 3–4, following your teacher’s demonstration. Keep counting during the rest even though you are no longer bowing the notes.

Both bars use the same counts: 1 begins the pair, 2 continues it, and 3–4 are rest. The labels attach to the dyad and rest in each bar; their spacing is not a proportional time graph.
Listen in three places: just after the beginning, near the middle, and just before the rest. Can you identify both pitches at each point? A clear two-pitch beginning followed by A alone is useful information: both pitches were audible at the beginning, but they did not remain audible together. Ask your teacher to watch the portion where D disappears.
During the rest, name the result quietly: “both stayed,” “D dropped out,” or “A came late.” These are observations, not grades. If you forget the count while listening, have your teacher or a practice partner count aloud for this attempt. On another attempt you can take back the counting. Preserve the short duration while you learn to divide your attention; lengthening the note adds a task before you have settled the present one.
Use a comfortable pulse chosen with your teacher. The reference has no count-in, so listen once before counting along. For your own attempt, count one preparatory bar at the agreed pulse before beginning on the next 1. The companion’s reference tempo is quarter note = 60; at that tempo, the printed half-note value spans two seconds. That is not a required endurance goal. The teacher can shorten an exploratory sound, add pauses, or postpone counted playing while you learn the contact.
When D–A is comfortable, prepare G–D with the same listening aim. First recognize the separate G and D; then ask for both together. The fifth worksheet helps you keep the note relationship in mind, but your teacher must establish the new pair’s contact.
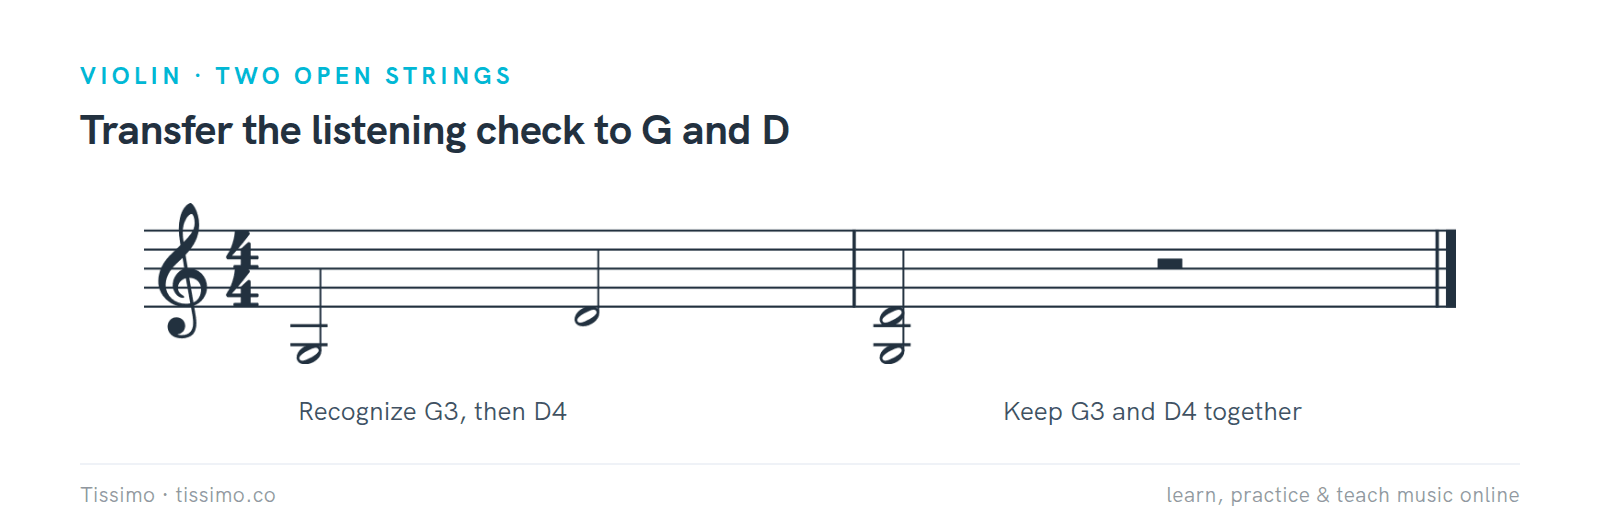
G3 then D4 in bar 1 becomes G3+D4 together in bar 2. The second bar has one shared start and a half rest; the first has two starts and four beats of notes.
A–E is the other adjacent pair. Identify A before combining it with E, so the higher pitch does not distract you from checking the lower one. Work on the pair your teacher chooses; playing all three today is unnecessary. The objective stays small: both named pitches continue through the agreed duration.
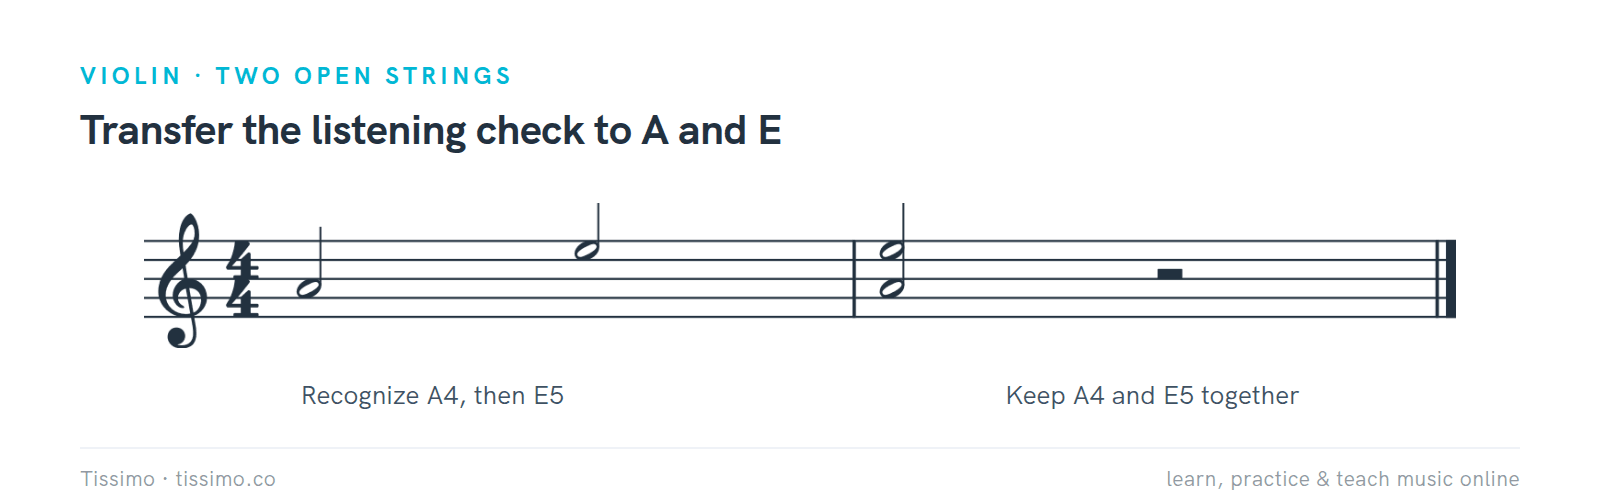
A4 then E5 becomes A4+E5. Listen for the lower A as well as E throughout the combined sound, using the same two-count duration as before.
Compare together with one after another
The same two pitches can make two different time relationships. Open Music Theory calls the together relationship a harmonic interval and the back-to-back relationship a melodic interval. For this lesson, “together” and “successive” are the practical reading words. Listen for overlap, not simply for the presence of both pitch names somewhere in the bar.

In the upper lanes, D and A start together on count 1 and continue until count 3, followed by two counts of rest. Below, D occupies counts 1–2 and A occupies counts 3–4. The final guide marks the next bar. These are written durations, not a sound waveform or bow-travel map.
In a successive D–A bar, the bow contacts D for the first written note and A for the next. In a simultaneous bar it must retain contact with both throughout their shared duration. Even a quick crossing remains a crossing if the notes are intentionally sounded in sequence. A brief accidental overlap during a crossing does not fulfill a sustained pair.
A teacher might demonstrate successive notes in one bow, or use separate strokes for clarity. Either demonstration can show one pitch followed by another. Therefore “one bow” alone does not tell you whether two notes are simultaneous. For this lesson, combine the two instructions: one continuous stroke and two pitches audible together throughout their printed duration. Read the alignment and listen to the overlap instead of treating bow count as the whole answer.
The four-bar model in Two Strings at Once makes you read the relationship afresh: D+A together, D then A, G+D together, A+E together. The three pair bars have a half rest after the sound; the successive bar fills all four beats with notes. Count through both kinds.
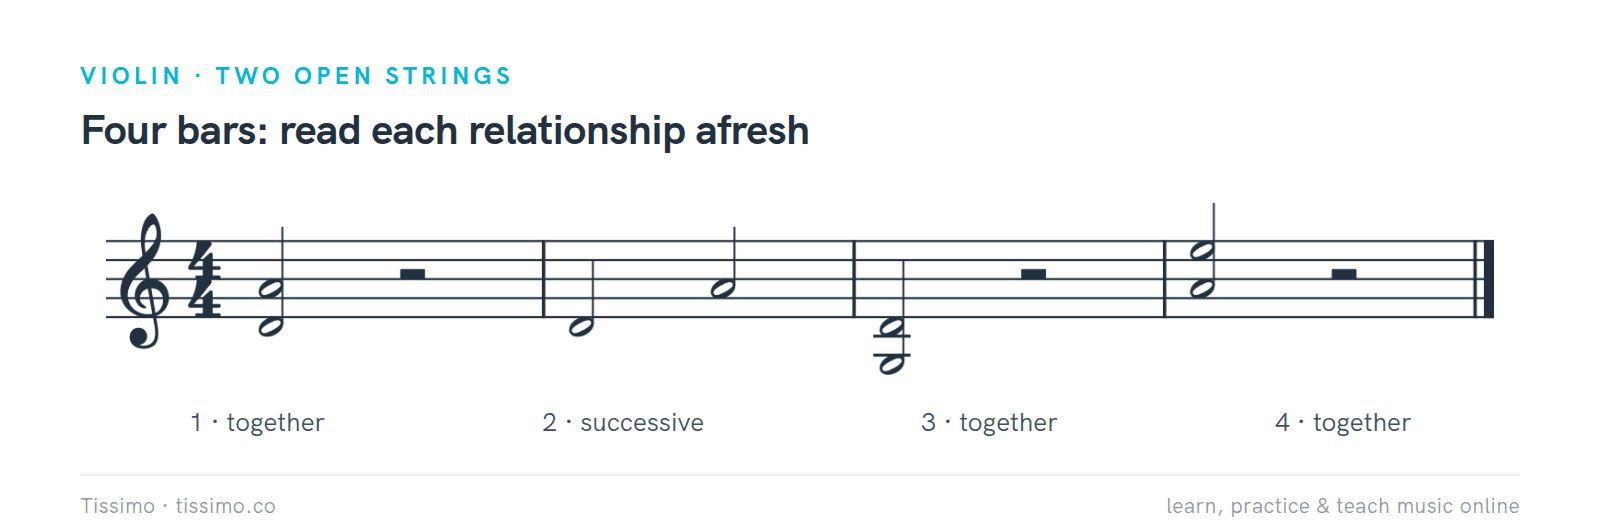
D+A together; D then A; G+D together; A+E together. The start counts are 1, 2, 1 and 1. Only bar 2 has four beats of notes; the other bars end with a half rest.
For bars 1–4, name the pitches and count the starts: one, two, one, one.
Reverse the successive notes as a reading check: A then D is still successive. It changes which pitch comes first, but the two pitches still do not sound together. In the final bar below, neither pitch comes first in the written instruction: both begin at the shared start.
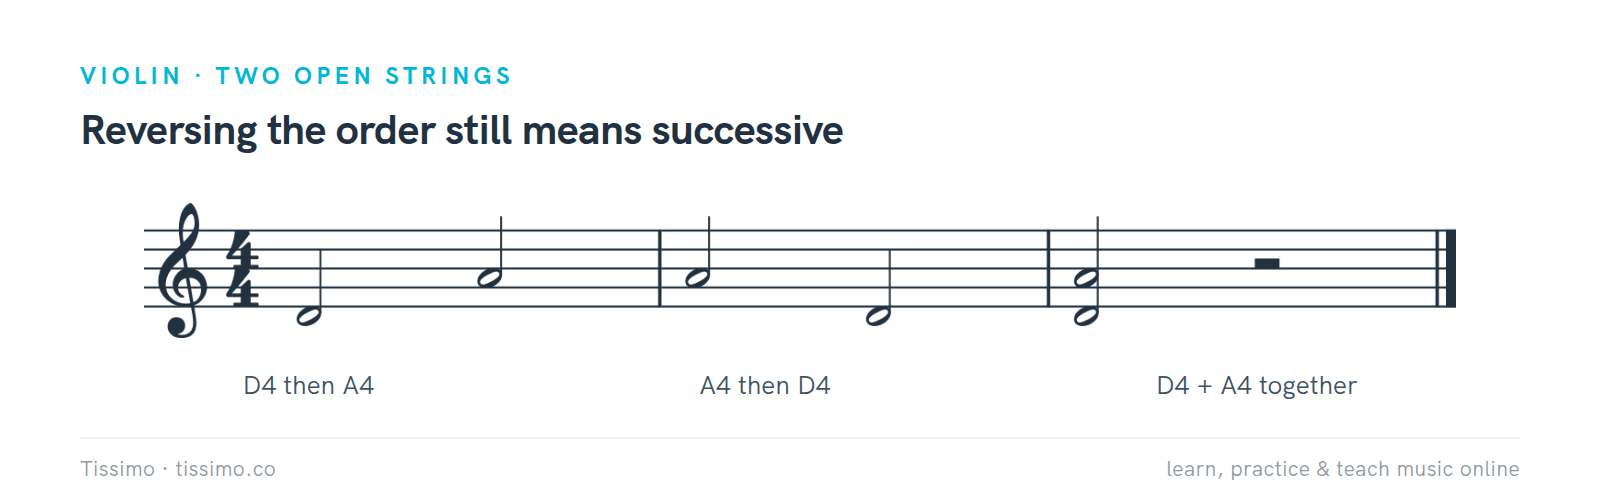
Bar 1 rises from D to A and bar 2 descends from A to D. Both remain successive: the second note begins on count 3, as the first note's written duration ends. Only bar 3 asks for both pitches together.
Judge continuity, pulse and comfort separately
Listen to a short attempt and describe the result before repeating it. “Both began, then D disappeared” is more useful than “bad tone.” “A entered late” identifies a different problem. Share the observation with your teacher, who can connect it to what the bow actually did.

Name the observation, then investigate it: missing pitch, rough sound or late entry. For a recurring dropout, compare short strokes with your teacher around the bow region where it happens.
If the sound gets rough, return to a comfortable single string and ask for a reset. If a pitch disappears repeatedly at the same part of the stroke, show your teacher where it happens. Compare a short stroke in a comfortable region with a short stroke through that region, using the same pair. Ask the teacher to watch whether the bow keeps its two-string level and travels straight. Work on that small section before returning to the full counted note. This follows Heather Kaye’s practice steps 1–4, which isolate the bow region where a string drops out. Do not make extra pressure, a longer stroke or repeated attempts your automatic solution. If both pitches remain audible but the rest loses its count, keep the physical task unchanged and review the rhythm away from the violin. Change one thing at a time.
Before restarting, choose the observation you want to improve. For example, keep D audible just before the rest, while retaining the same pair and duration. Afterward, compare that specific moment with the previous attempt. If you cannot tell what changed, ask for the teacher’s demonstration again. There is no required repetition count: a clear observation and a comfortable stopping point are more useful than continuing after attention or ease has gone.
Use Together or One After Another? for a paper check before the playing check. It asks you to classify notation and identify which named open-string pairs are adjacent, then compare paired and separate sounds in short play/check lines. G–D, D–A and A–E are adjacent; G–A is not. Naming a feasible pair and sustaining it are separate achievements.
For each bar, name the pitches in their written order, say “together” or “successive,” and count the distinct starting times.
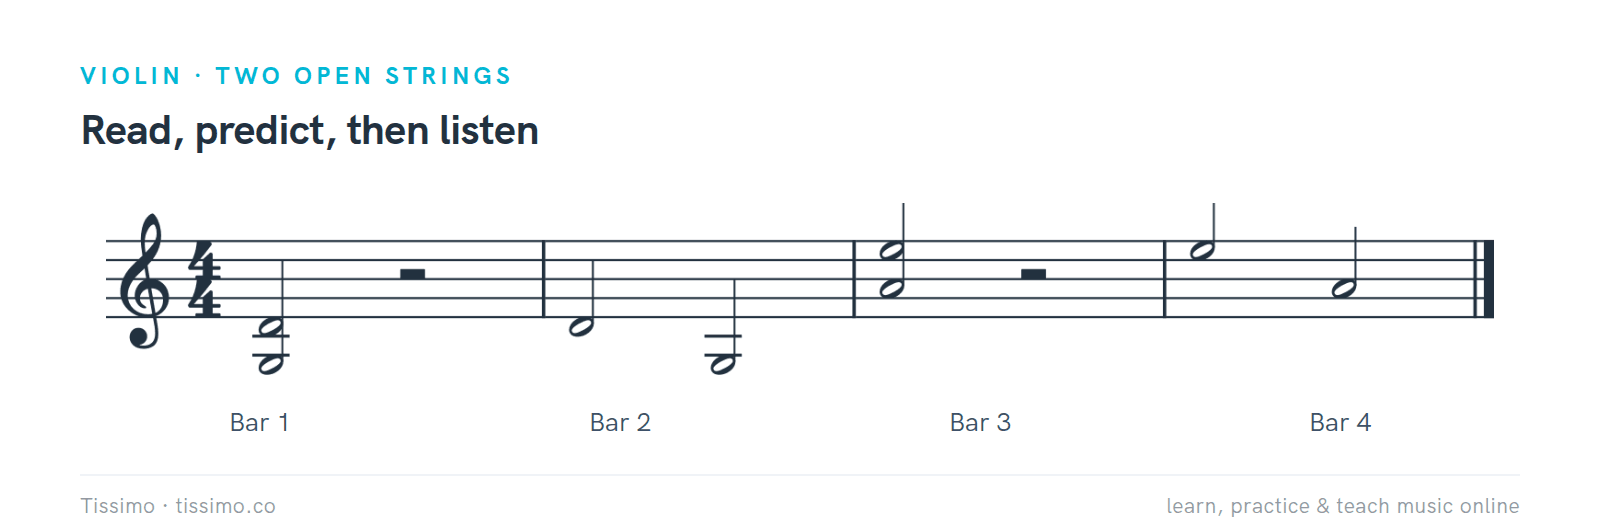
Four bars to read before playing. Which pitches share a start, and which begin separately?
Write your four answers before looking at the key. Explain one from the note positions and alignment. Then check your reading before playing only the pair and comparison your teacher has prepared with you.
Reading answers: 1. G+D together, one start. 2. D then G, two starts. 3. A+E together, one start. 4. E then A, two starts.
Keep the exercise’s printed answer key covered until you have labeled the starts. Explain one answer aloud before checking it: “These two heads align, so they share a start,” or “This note comes later, so there are two starts.” Then use the adjacency question to check the physical string choice. A pair can be written together on paper while still failing the instruction to use exactly two named neighboring open strings.
Finish with one observation you can bring to your next lesson. Write the pair, the bar number and the moment that needs help: “D–A, bar 1, lower pitch disappears near count 2.” If the pair stayed clear, record that too, together with whether you kept the rest in time. This gives your teacher a concrete place to resume without turning the practice into a speed or loudness test.

Keep continuity, pulse and comfort as separate observations. A clear pair can still lose its count, and a steady pulse can accompany a disappearing pitch.
Record whether both pitches stayed audible, whether the pulse continued through the rest, and whether your teacher confirmed comfortable contact. If you record an attempt, use it to discuss those observations; a recording cannot establish how the bow was held. A Tissimo violin teacher can listen to the pair and watch the contact in a live lesson. Bring the exact bar where one pitch drops out.
Free worksheets for this lesson
- Two Strings at Once — neighboring open pairs, together-versus-successive reading, and the four-bar practice model.
- Together or One After Another? — notation and adjacency checks followed by short teacher-observed playing comparisons.
- Intervals: the 5th — count five letter names, including both endpoints, to name the open-pair interval.
- The Half Note — recognize the hollow notehead and stem, and count a half note as two quarter-note beats in these 4/4 examples.
- The Staff & the Treble Clef — find line and space names before reading both pitches of a pair.
Sources
- Violin: tuning, notation and sound production — Vienna Symphonic Library
- How to Play Double Stops on Violin — Violinspiration
- How to Play Two Strings at Once with Good Tone — Heather Kaye
- Bowed Strings: Left Hand Techniques — Don Freund and David Cutler, Timbre and Orchestration Resource
- Intervals and Dyads — Open Music Theory
- Rhythmic Values — Open Music Theory
- String crossing: Seven levels of the bow — Simon Fischer
Read this article online: https://tissimo.co/articles/violin-two-open-strings-simultaneous-bow



Comments