 Back

How to Start Learning Trumpet: Buzzing, First Notes and a Daily Plan
A trumpet has three valves and one way to make a sound: your lips buzzing in the mouthpiece. Your first month is about a steady buzz and the right valves for each note, without pushing the mouthpiece into your face. This guide covers buzzing, embouchure, written C to G (each fingering checked against two published charts), concert pitch, care and a 20-minute daily plan.
Everything here is for the B♭ trumpet, the standard beginner instrument. All note names are written pitch, the note on your page.
How a trumpet makes its notes
Your lips are the vibrating part. You blow through lightly closed lips, they buzz, and the buzz sets the column of air inside the tubing vibrating. The UNSW brass acoustics pages explain that this air column resonates readily at certain frequencies, and that for any one valve setting the player chooses which of those resonances sounds. Slower lip vibration gives a lower note, faster vibration a higher one.
The valves change the length of the tube. Yamaha's guide to how the trumpet makes sound gives the scheme: valve 1 lowers the pitch a whole step, valve 2 a half step, valve 3 a step and a half. They are numbered 1, 2, 3 starting from the one nearest the mouthpiece.
Brian Weidner's open textbook Brass Techniques and Pedagogy describes the hold: both hands in a relaxed C shape, the left hand around the valve casings carrying the weight, the right thumb loosely under the leadpipe between the first and second valves, and the right fingertips on the valve tops. The little finger rests on top of the finger hook or floats free. Weidner warns that hooking it and pulling is the most common source of extra mouthpiece pressure.

The left hand holds the trumpet; the right hand only plays the valves. Not to scale.
Used alone and together, the three valves give seven tube lengths, each about a half step lower than the last. That is enough to fill the gap between two notes you can play with no valves at all.

Seven tube lengths, about a half step apart. This lesson uses the shaded rows: open, 1, 1–2 and 1–3.
One tube, many notes
With no valve pressed, the trumpet can sound written C4, G4, C5, E5, G5 and higher: the harmonics of the open tube, at two, three, four, five and six times one base frequency. Our article on the harmonic series explains the physics. For a trumpeter it means the fingers choose the tube length and the lips choose the rung.

The open harmonics, computed from the series. The rungs crowd together as they rise; C4 and G4 are your first two.
UNSW calls written C4 the lowest note with no valves pressed. The pedal note an octave below is a special case for advanced players; leave it alone for now. Weidner gives the typical beginner range as about C4 to C5, and adds that many brass students take a month or more to move comfortably between these rungs.
Buzz first: the mouthpiece before the trumpet
Sit or stand tall first, with relaxed shoulders and your head up. Weidner starts every session with timed breathing, done seated: breathe in through your mouth for four counts and out for four, with no pause in between and without lifting your shoulders.
Before the trumpet, make the buzz. Weidner's first-sound steps on the mouthpiece:
- Say "hmmmmpf," closing the lips only until they touch.
- Hold the mouthpiece by its shank between your thumb and index finger and set it gently on the center of your lips.
- Breathe in fully through relaxed mouth corners.
- Blow a steady, full stream of air, as if saying "pffff."
If you get air but no buzz, Weidner's usual suspects are too little air, a mouthpiece pushed into the lips, or a pinched center. If air leaks at the sides, firm the corners. Change one thing at a time.
Teachers disagree about how much mouthpiece buzzing to do. Weidner acknowledges this, then argues that mouthpiece work is essential: it is simple, shows tone problems clearly and is portable. Many teachers use it for the first sounds; how much stays in your routine is a question for your teacher.
Set the mouthpiece on your lips; don't push it into them.
The exercise to start with is Weidner's "4 on, 4 off": buzz a comfortable pitch on the mouthpiece for four counts, take it off your lips for four counts, and repeat. He compares mouthpiece work to weight training, where too much too fast brings fatigue and bad habits.

Weidner's "4 on, 4 off": buzz on the mouthpiece for four counts, then take it off your lips for four.
Your embouchure: firm corners, soft center, light contact
Embouchure means the setting of your lips, jaw and mouth. Here is Weidner's description, with points from the checklist of Jeff Conner, a Yamaha performing artist and Boston Brass trumpeter:
- Corners firm, center soft. The corners do the controlling; the lips inside the mouthpiece stay relaxed. Conner suggests imagining anchors at the corners.
- Flat, not smiling. Weidner calls for a flat line, neither smile nor frown. In Conner's list, a "smile" embouchure thins the lips and the sound.
- Teeth slightly apart, jaw relaxed. No clenching, even for higher notes.
- Cheeks firm, not puffed. Conner lists puffed cheeks among the common beginner problems.
- Mouthpiece centered. Roughly half on the top lip and half on the bottom for trumpet, as Weidner describes.
Then pressure. Yamaha's playing guide tells you not to press the mouthpiece firmly to your lips. Weidner explains why beginners do it anyway: they quickly discover that pressing harder can push the note up a rung. He names the warning signs: thin tone, and pressure rings that stay on your lips after you play. If you see them, go back to light mouthpiece buzzing and let air, not force, change the note. A mirror on the music stand, which Conner recommends, lets you check your corners, cheeks and mouthpiece placement while you play, and look for pressure rings when you stop.
Your first five notes: C, D, E, F and G
Now put the mouthpiece in the trumpet with a gentle quarter twist, which Weidner recommends so that it comes out easily later. Hold the trumpet as in the diagram above, press no valves and blow the same steady "pffff." Any open note is a good first note: hold it for four counts, then rest for four. The two lowest open notes are C4 and G4, and a piano or tuner tells you which one you have, because written C4 sounds B♭ and written G4 sounds F.
The five notes below sit at the bottom of the beginner range and need only four valve settings. The Yamaha trumpet fingering chart and the fingering chart in Weidner's textbook agree on every one, and UNSW's chromatic fingering sequence gives the same combinations.
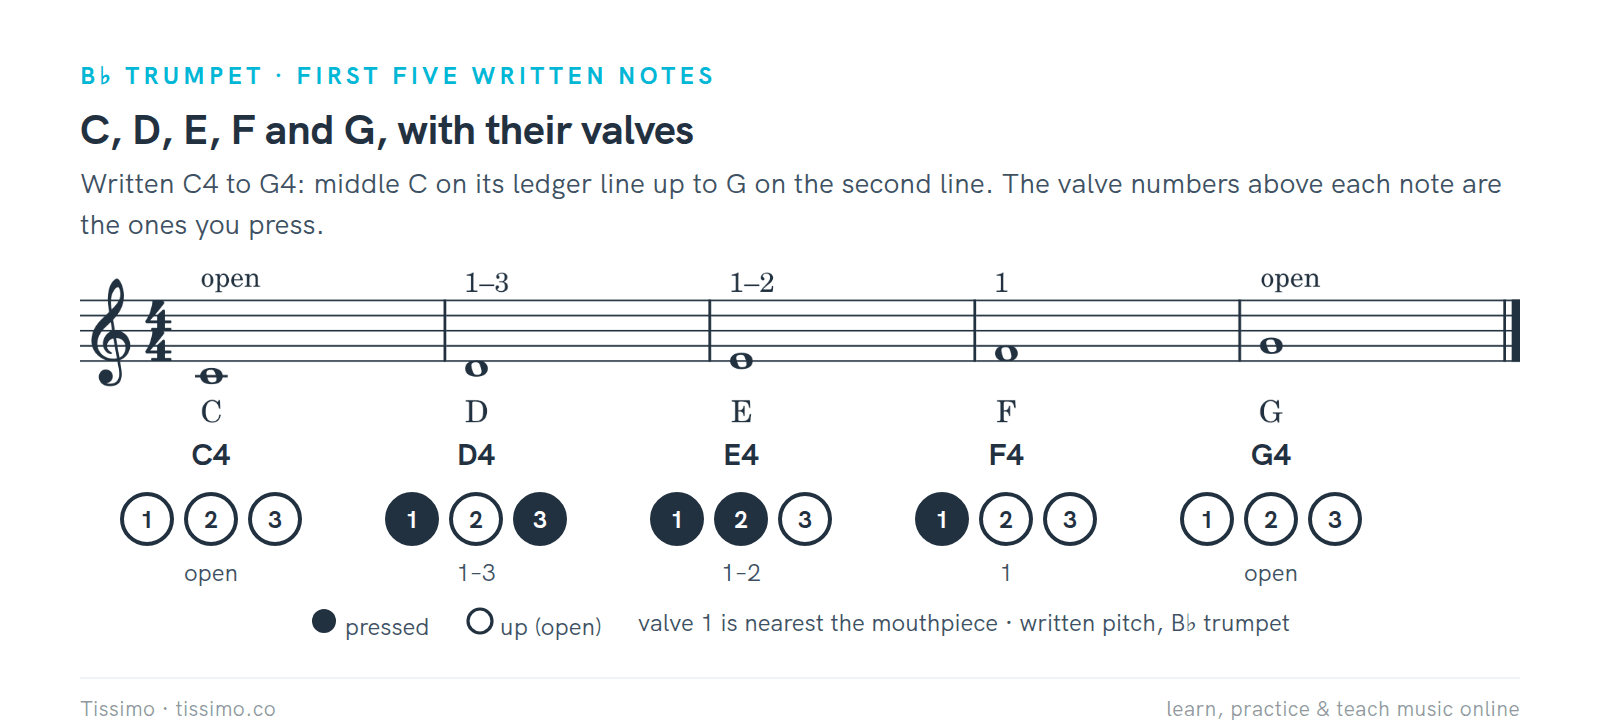
Written C4 open, D4 1–3, E4 1–2, F4 1, G4 open. Filled circles are pressed valves.
- C4, middle C on its ledger line below the staff: open, no valves.
- D4, just below the bottom line: valves 1 and 3. Weidner notes D4 tends to sound sharp, and teaches extending the third-valve slide a little with the left hand.
- E4, on the bottom line: valves 1 and 2.
- F4, in the first space: valve 1.
- G4, on the second line: open again.
If D, E or F comes out much lower than you expect, your lips have slipped to the rung below. The right-hand column of the valve table shows the note you are getting: 1–3 gives G3 instead of D4.
If the staff is new to you, The Staff & the Treble Clef maps every line and space, and Name the notes: treble clef gives you 25 notes to name. Our guide to reading sheet music goes further.
C and G: same valves, your lips choose
C4 and G4 are both open: the second and third harmonics of the same tube. Nothing in your right hand changes; your air and lips pick the note.

Two notes, no valves. The bar of rest after each note is for resetting, not hurrying.
Weidner lists cues for moving up a rung: a vowel change (from "oh" toward "ah" or "ee") and faster, more focused air, with the center of the lips soft and pressure low. Yamaha's guide uses "toh," "tay" and "tee," low to high.
Moving from C4 to G4 on one breath, valves unchanged and without tonguing the second note, is a lip slur. Once both notes come easily with your teacher, our article on your first trumpet lip slurs and its worksheet, Two Notes, Same Valves, take you through it, with three checks your teacher marks Yes or Not yet. The curve joining C and G there is a slur, not a tie; Ties vs Slurs shows how to tell them apart.

Two Notes, Same Valves: the four-bar slurred model, with a full bar of rest after each pair.
Long tones and tonguing
A long tone is one note held at a steady, soft volume for a set number of counts. Weidner starts on a comfortable open note, holds it for eight counts and moves down a half step at a time, with as much time off the face as on. Here is a shorter original version on your five notes. Set a metronome to 60 (Tempo & the Metronome explains the marking) and give each note four counts, then four counts of rest. When four counts feel easy, hold each note for two bars and rest for two.

One bar on, one bar off, from open G down to open C. On D, extend the third-valve slide slightly if your teacher shows you how.
Each long tone is a whole note, four counts held. Listen for a sound that starts on time, stays the same and stops cleanly.
Tonguing starts notes cleanly. Weidner describes brass players touching the tongue where the top teeth meet the roof of the mouth, using the syllable "tu" or "du," and dropping the tongue straight back to a relaxed "ah" or "oh." The tongue only interrupts the air; it doesn't stop it. His "speak and play" exercise is a good first step: say "tah, tah, tah, tah" with the metronome, then play the same thing.

Say it, then play it. Four tongued quarter notes on C, rest, four on G, rest.
The quarter note counts out the one-beat note if the rhythm is new to you.
Put the notes together
Now change valves. Play the five notes up and down in half notes, tongued. Weidner warns that beginners let their fingers move slowly when the music is slow, which smears the notes: press or lift each valve all the way, quickly, on the beat.

Up and down the five notes. Every new note means a new valve combination, so keep the changes quick and exact.
Then the tune. It uses only C to G and three note values: quarter, half and whole. The half note counts out the two-beat value.

An original eight-bar tune on the five notes. Breathe at the comma after bar 4.
Play it tongued at quarter note = 72. When one bar trips you, use the fix-it loop from How to practice, a piano handout that works on any instrument: stop, find the exact notes, play them slowly, and get three clean in a row before you put the bar back.
Written pitch and concert pitch
The B♭ trumpet is a transposing instrument: it sounds a whole step, a major 2nd, lower than written, so a pianist would call your written C a B♭. UNSW gives the example directly: written C4 sounds B♭3.
So your written C, D, E, F and G sound B♭, C, D, E♭ and F.

The first two bars of the tune as written (top) and as they sound (bottom), a major 2nd lower.
You need this with a piano, a backing track or a tuner. Our guide to transposing instruments explains why the system exists. Written & concert pitch drills the conversion with B♭ clarinet, which transposes exactly as your trumpet does, and Transposition shows how to move a whole tune to a new key.
Twenty minutes a day, with rest built in
Conner observes that students told to practice "20 minutes a day" often watch the clock instead of the goal, so give each block a job.

The same five blocks every day. The minutes are a suggestion; the rest rule is the part to keep.
Start with 3 minutes of breathing and mouthpiece buzzing, then 5 of long tones with the metronome at 60 (Tempo & the Metronome explains the slow ramp), 3 of tonguing and 6 on the five notes and the tune, with the fix-it loop from How to practice on any bar that trips you. End with 3 minutes of soft low notes and care. Once C and G are both secure, add the slur from Two Notes, Same Valves to the fourth block, with your teacher.
Endurance builds slowly. When your lips feel tired or the buzz goes fuzzy, stop for the day; pushing on with more pressure is how bad habits take hold. Our articles on building a practice routine and practicing with a metronome go deeper.
Care: oil, grease, water and a bath
A trumpet needs little care, but it needs it regularly.

A simple schedule. Sources differ on how often to oil the valves and to bathe the trumpet; ask your teacher which rhythm suits your instrument.
- After playing. Blow the water out through the water key. Yamaha's care page also has you drain the valve slides, holding the matching valve down as you pull each one. Wipe the trumpet and case it.
- Valves. Sources differ on how often. Yamaha's after-playing routine includes two or three drops of oil on each piston; Weidner's rule of thumb is once a week, and sooner if a valve drags. Yamaha's educator hub gives the method: unscrew the top cap, lift the piston until you see its wide part, put several drops of oil there, slide it back lined up as it came out, and screw the cap down. Never drip oil down the stem or through the bottom caps. The Howard County schools care sheet adds: only oil made for valve instruments.
- Mouthpiece. Weidner suggests a rinse every day and a wash with dish soap at least once a week; Yamaha's weekly routine uses a mouthpiece brush for it.
- Slides. Yamaha's weekly routine greases the main and second slides and puts tuning-slide oil on the first and third, the ones you move while playing.
- A bath. Yamaha's monthly routine washes the inside of the tubing with a flexible brush and brass soap; Weidner suggests a full bath every other month, in warm, never boiling, water. Ask your teacher to show you the first time.
If the mouthpiece gets stuck, never use pliers. A band director or music store has a mouthpiece puller.
Where a teacher helps most
Three things are hard to judge on your own: mouthpiece placement, how much pressure you use, and whether air or mouthpiece pressure is getting you up to G. A Tissimo trumpet teacher can watch your buzz and long tones in a live lesson and fix your setup before habits form.
Free worksheets for this lesson
- The Staff & the Treble Clef — five lines, four spaces, the G clef and middle C
- Name the notes: treble clef — 25 notes to name on and near the treble staff
- The quarter note — one beat, the bar and 4/4
- The half note — two beats, held through
- The whole note — four counts of steady sound
- Tempo & the Metronome — tempo words, metronome marks and the slow ramp
- Ties vs Slurs — two questions that tell the curves apart
- Two Notes, Same Valves — your first lip slur, open C4 to G4, with a teacher
- How to practice — the fix-it loop and a weekly log
- Written & concert pitch — written and concert pitch in both directions for B♭ clarinet, horn and alto sax (intermediate)
- Transposition — move a tune to a new key two ways
Sources
- Brass instrument (lip reed) acoustics: an introduction — UNSW Music Acoustics
- Trumpet fingering chart — Yamaha Musical Instrument Guide
- How does the trumpet generate sound? — Yamaha Musical Instrument Guide
- Techniques for playing the trumpet — Yamaha Musical Instrument Guide
- Care and maintenance after playing — Yamaha Musical Instrument Guide
- Fix It: Trumpet Teaching Tips — Jeff Conner, Yamaha
- Teach Your Students the Best Way to Oil Valves — Matt Kerns, Yamaha
- Brass Techniques and Pedagogy, 2nd edition — Brian Weidner, Butler University (PALNI Open Press)
- Weekly care and maintenance — Yamaha Musical Instrument Guide
- Monthly care and maintenance — Yamaha Musical Instrument Guide
- Trumpet — Wikipedia
- Care of Trumpets — Howard County Public School System
Read this article online: https://tissimo.co/articles/how-to-start-learning-trumpet-buzzing-first-notes



Comments