 Back

How to Start Learning Saxophone: Setup, First Notes and a 20-Minute Daily Plan
Your first weeks on the saxophone come down to four jobs: put the horn together without bending anything, make a steady sound, play your first notes, and understand why the note on your page has a different name at the piano. This guide takes them in order and ends with a 20-minute daily plan for your first month. It works for alto or tenor: the fingerings are the same.
Alto or tenor: what changes and what stays the same
The alto is the smaller and higher of the two, pitched in E♭. The tenor is larger and lower, pitched in B♭, and you can spot it by the extra dip (the crook) in its neck near the mouthpiece; the alto's neck bends once and then goes straight to the mouthpiece. Comparing the alto with the soprano, Yamaha's instrument guide calls the alto a good first choice and notes that the strap carries most of its weight while you play.
Every saxophone reads treble clef and uses the same key arrangement and fingerings, so a written G is the same three fingers on alto, tenor or baritone.

Alto and tenor side by side. The sound and the size differ; the fingering chart and the clef do not.
Put the saxophone together
Yamaha's saxophone owner's manual gives this order. The body's walls are thin, so while you put it together, hold it where your grip does not squeeze keys or rods, and never force a joint.
- Push the mouthpiece about three quarters of the way onto the neck cork with a slow twist. If it sticks, rub in a little cork grease.
- Loosen the neck screw and twist the neck gently into the body. Hold the neck by its tube, not by the long octave key that runs along the top of it: Yamaha's guide warns against putting pressure on the neck or keys during assembly.
- Line the neck up with the body, then tighten the neck screw.
- Wet the tip of the reed in your mouth or in a little water.
- Fit the reed and ligature (next section).
- Put the strap around your neck and hook it onto the strap ring.
- Adjust the strap length and the mouthpiece angle so the horn comes to your mouth.

The assembly order from Yamaha's owner's manual. If the body feels awkward to hold while you work, hook it onto the strap earlier.
Reed and ligature
The reed's flat side lies against the flat underside of the mouthpiece, called the table, with its thin tip at the mouthpiece tip. Line the two tips up: the manual says you should just see the mouthpiece tip above the end of the reed. Yamaha's guide adds that the ligature usually goes below the point where the reed's slope (the vamp) ends, and that players vary in both placements. Hold the reed in place, then tighten the ligature screws just enough to keep it from moving.

Reed tip to mouthpiece tip, ligature on the bark below the end of the vamp, mouthpiece about three quarters of the way onto the cork. Not to scale.
Reed numbers rate strength, which means stiffness: the lower the number, the more easily the reed bends. Yamaha's guide suggests a beginner start with a standard mouthpiece and a 2½ reed, since lower-numbered reeds vibrate more easily. A higher number is not a thicker reed: D'Addario says a 5 is no thicker than a 2½, just cut from stiffer cane. The numbers are not universal: D'Addario publishes a cross-brand comparison chart because strength varies by manufacturer. Vandoren suggests wetting reeds in water rather than saliva, but not for too long, and playing new reeds a few minutes a day before you rely on them.
Your first sound: embouchure, mouthpiece first
Yamaha describes three points of support: your right thumb under the thumb hook, your upper teeth on the mouthpiece, and the strap. Your lower lip covers your lower teeth. The late Kenneth Fischer, who taught saxophone at the University of Georgia from 1979 until his death in 2009, described the same shape in a clinic handout: say "oooh," roll the lower lip over the lower teeth, set the top teeth on the mouthpiece, and close the lips all the way around to seal it.
Teachers agree that the lips, not the jaw, should hold the mouthpiece. They differ on how to get there. Woodwind teacher Bret Pimentel, for one, warns against the lip-over-teeth version and teaches a lower jaw that hangs slightly open so the lower teeth stay clear of the reed, with the lips doing the closing. Yamaha's embouchure page puts the shared point plainly: the teeth should just touch the mouthpiece while the muscles around the mouth close on it, and if you bite down hard, the embouchure may need work.
How much mouthpiece goes in matters too. Yamaha's beginner's guide puts the seal at about the point where the reed starts to touch the mouthpiece; John Cipolla's Western Kentucky University handout finds that spot by slipping a piece of paper between reed and mouthpiece until it stops. Where the lip sits along the reed changes how stiff the reed acts, UNSW explains. Your teacher will fine-tune the depth.
Fischer's handout starts with the mouthpiece alone, reed and ligature on, before it goes onto the neck. Breathe in deeply and blow a big stream of warm air, loudly. The handout gives target pitches for this test (concert A on alto, concert G on tenor); your teacher may use another check. Then put it back on the neck and keep the same feeling in your mouth.
A squeak is the reed sounding on its own. Check that your teeth are not pressing the reed before you blow harder.
UNSW's acoustics pages explain why: the lower lip normally damps the reed's own resonance, and teeth on the reed make it squeak. On breathing, Yamaha's guide asks for a full breath and a steady outflow, with the abdomen slowly firming to support it, not the mouth controlling the sound. Our singing basics article explains carefully what the diaphragm does and does not do.
The left hand: written B, A and G
Find the six large keys on the front. The top three belong to the left hand: index (the B key), middle (A) and ring finger (G). The bottom three belong to the right hand. Your left thumb rests on the back by the octave key, which stays off for now. Fischer's handout asks for the fleshy pads of naturally curved fingers on the keys, with the fingers kept close to the keys and never flattened.

The six main keys in bold, plus the octave key. The palm keys, side keys and pinky keys wait until later. Not to scale; names follow the Woodwind Fingering Guide.
Now the first three notes. Written B4 sits on the middle line of the treble staff: press the left index finger only. Add the middle finger and you have A4, in the space below. Add the ring finger and you have G4 on the second line.
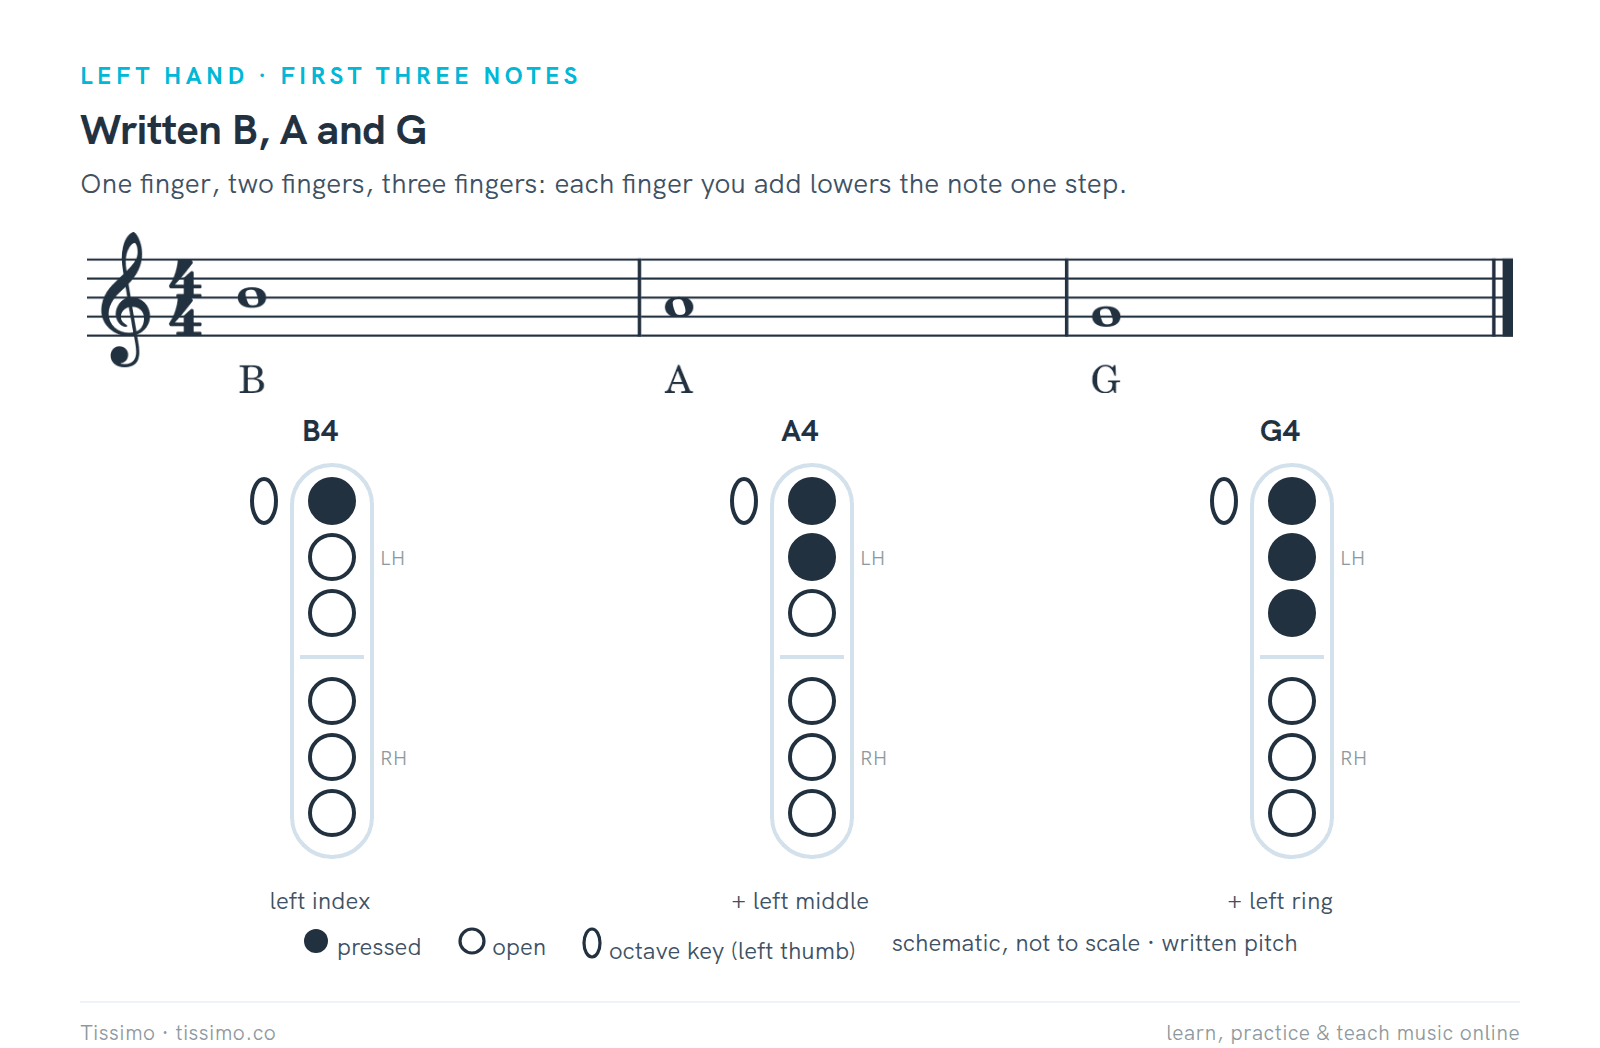
Written B, A and G. Each finger you add lowers the note one step. Filled circles are pressed keys; the oval is the octave key, open here.
If the staff is new to you, The Staff & the Treble Clef maps every line and space, Name the notes: treble clef drills them, and our guide to reading sheet music goes further. These sheets were written with the piano in mind; the staff and the counting are the same on your horn.
Long tones and your first tonguing
A long tone is one note held at an even volume and pitch for a set count. It trains air and embouchure together, and Yamaha's reed and mouthpiece page tells beginners to practice long tones while they get the embouchure right. Set a metronome to 60 (Tempo & the Metronome explains the marking) and hold each note for four counts, then rest four counts to breathe.
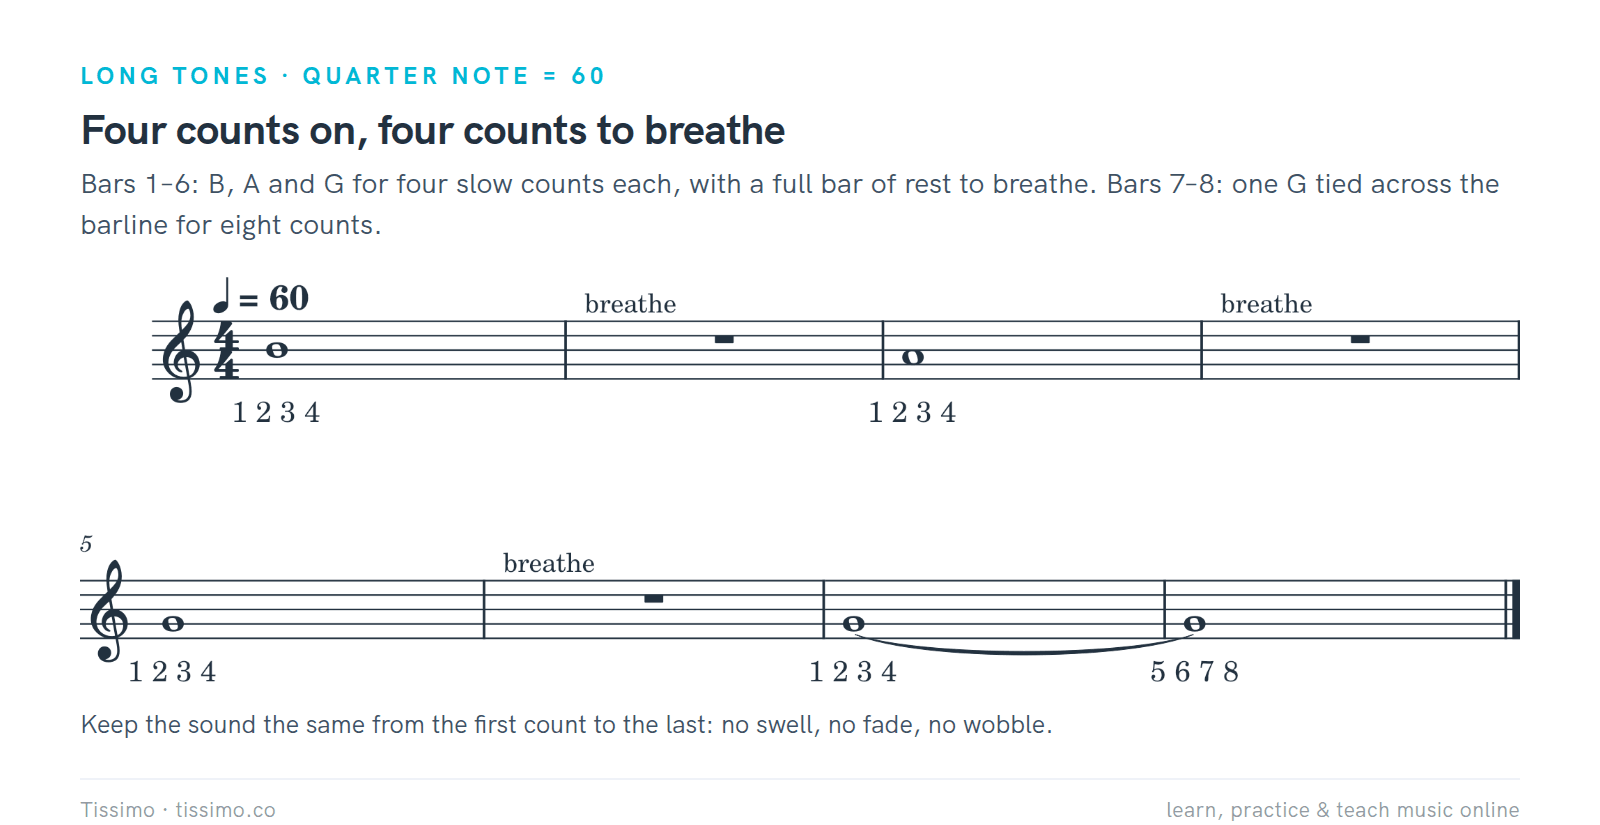
Long tones on B, A and G, four counts each with a bar of rest between. Bars 7 and 8 hold one G for eight counts: the curve is a tie.
Ties vs Slurs tells a tie (same pitch) from a slur (different pitches), and The whole note counts out the four-beat note.
Tonguing starts each note cleanly. Rest your tongue lightly against the reed, build the air behind it, then let go: as UNSW describes it, the tongue releases the reed and the vibration builds from there. Fischer's handout uses the syllable "tAH" with a very small "t": more air, less tongue. Between notes the air keeps flowing; the tongue only touches the reed for an instant.

Bars 1 to 3: one light "tah" per quarter note. Bar 4: tongue the B only and let the slur carry A and G on the same breath.
Check your pitch with a tuner now and then. A tuner shows concert pitch, not the note you are reading: written B reads as D on alto and as A on tenor (the section on written and concert pitch below explains why). Yamaha's manual tunes at the mouthpiece: once the horn is warm, pull the mouthpiece out a little if you are sharp, push it in if you are flat. Our beginner's guide to tuning covers tuners and reference pitches.

What a tuner shows for written D4 to D5: alto a major 6th below the page, tenor a major 9th below.
The first tune, and C
Add one more note: written C5, in the third space. Lift the index finger and press the middle finger alone. B to C moves two fingers at once, so practice B, C, B slowly first.

An original eight-bar tune on G, A, B and C. Breathe at the comma after bar 4. B and C use different single fingers.
The tune uses three note values. The quarter note and the half note each have a short rhythm to tap first. Play the tune tongued at quarter note = 72, and when bar 3 trips you, loop it slowly; the How to practice handout calls this the fix-it loop and asks for three clean repetitions in a row.
Add the right hand: F, E and D
Keep all three left-hand fingers down for G. Now add right-hand fingers one at a time: index for F4, index and middle for E4, all three for D4. Keep the throat relaxed and don't drop the jaw to reach the low notes; Fischer's handout warns that it distorts the tone and the tuning.

Left hand stays down; each right-hand finger lowers the note one step, from written G down to D.
Long-tone these four the same way you did B, A and G, then play G-F-E-D-E-F-G slowly with "tah" on each note.
Why your music is written in a different key
Saxophones are transposing instruments. Your part is written so that the same fingering always has the same written name, whichever saxophone you hold. The sound is lower than the written note:
- Alto in E♭ sounds a major 6th lower, nine half steps. Written C sounds E♭.
- Tenor in B♭ sounds a major 9th lower, an octave plus a whole step, fourteen half steps. Written C sounds B♭.
So when you play your written B, A and G on alto, a piano player would call those sounds D, C and B♭. On tenor they are A, G and F, each an octave and a whole step below the written note.

Alto: bars 1 and 2 of the first tune as written (top) and as they sound (bottom), a major 6th lower. Concert names: B♭, C, D.
The tenor reads exactly the same part. Its sound lands an octave and a whole step below the page, low enough that concert pitch is easier to read in bass clef.

Tenor: the same written part, sounding a major 9th lower. The concert staff uses bass clef: F, G, A.
You need this when you play with a piano or a backing track. Written & concert pitch drills the conversion for clarinet, horn and alto saxophone, and our guide to transposing instruments explains why the system exists. To move a melody into a new key on paper, Transposition shows the interval and scale-degree methods.
The octave key: D to G again, an octave higher
Press the octave key with your left thumb and the same fingers play an octave higher: written D4 to G4 become D5 to G5, as Yamaha's chart and the Woodwind Fingering Guide both show. UNSW's acoustics pages explain why: the saxophone's conical tube overblows at the octave, while the clarinet's roughly cylindrical tube overblows a twelfth, which makes the clarinet's fingering more awkward around its register break. You have one octave key but the horn has two small vent holes; the mechanism opens the right one for each note by itself.

Same fingers, one octave higher. Only the left thumb moves, onto the octave key.
Tongue each pair slowly first, then slur low to high on one breath, aiming for the same tone in both notes. Don't bite for the upper note: the same handout warns that tightening for high notes hurts tone and tuning.
When you are ready for B♭, our article on choosing between bis and side B♭ and its two worksheets, One B-flat, Two Fingerings and Plan the B-flat Before You Play, are the next step. Both sheets are labeled for alto or baritone saxophone and keep the octave key off.
Twenty minutes a day for the first month
The same five blocks every day, 20 minutes in all. Move on when the current week feels easy, not when the calendar says so.

Your first month at 20 minutes a day. The last three minutes always end with care.
Weeks 1 to 3 follow the order of this guide. Week 4 brings the octave key and a first look at the written-and-concert-pitch sheet (it is an intermediate sheet with no tenor row: do the alto items, 5 and 6, and leave the clarinet part for later). Our articles on building a practice routine and practicing with a metronome go further.
Care after every session
Yamaha's manual and guide describe the same routine after playing:
- Take off the reed and swab the mouthpiece, without pulling the swab all the way through it.
- Swab the neck and the body. For alto and tenor, the guide says to pass the swab in at the bell and pull it out at the neck joint.
- Press cleaning paper lightly between any wet pad and its tone hole.
- Wipe the outside with a polishing cloth, and case the horn with nothing pressing on its keys.
Reeds wear out. Yamaha's guide expects one to last about one to two weeks, and Vandoren advises against getting used to a single reed, because as a reed softens every new one starts to feel too hard. Keep a few reeds in rotation.
Where a teacher helps most
Three things are hard to judge on your own: your embouchure (how much lip, how much bite), your air (supported or pinched) and your posture with the strap. A Tissimo alto saxophone teacher or tenor saxophone teacher can watch your first long tones in a live lesson and tell you how to adjust the reed, the strap and your lip before habits set.
Free worksheets for this lesson
- The Staff & the Treble Clef — lines, spaces and the G clef
- Name the notes: treble clef — 25 notes to name on and near the staff
- The quarter note — one beat, the bar and 4/4
- The half note — two beats, the step-and-hold
- The whole note — four beats of ringing sound
- Ties vs Slurs — two questions that tell the curves apart
- Tempo & the Metronome — tempo words and metronome marks
- How to practice — the fix-it loop and a weekly log
- Written & concert pitch — written to concert for clarinet, horn and alto sax
- Transposition — move a tune to a new key two ways
- One B-flat, Two Fingerings — bis and side B♭
- Plan the B-flat Before You Play — mark and check a B♭ route
Sources
- Saxophone Owner's Manual (fingering chart pp. 10–11) — Yamaha
- The saxophone is a transposing instrument — Yamaha Musical Instrument Guide
- How to choose a reed and mouthpiece — Yamaha Musical Instrument Guide
- Care and maintenance after playing — Yamaha Musical Instrument Guide
- Basic Fingering Chart for Saxophone — The Woodwind Fingering Guide
- Saxophone acoustics: an introduction — UNSW Music Acoustics
- The Three T's of Saxophone Performance — Kenneth Fischer, Midwest Clinic 2000
- Stop teaching clarinet and saxophone embouchures like this — Bret Pimentel
- FAQ & Tips — Vandoren
- Clarinet & Saxophone Reed Comparison — D'Addario
- Alto saxophone — Wikipedia
- Tenor saxophone — Wikipedia
Read this article online: https://tissimo.co/articles/how-to-start-learning-saxophone-first-notes-and-setup



Comments