 Back

How to Start Learning Oboe: Reeds, Difficulty, Cost and the First Year
The oboe has a reputation, and some of it is earned. Yamaha's instrument guide calls it "one of the more difficult woodwind instruments to play," and oboist and reed maker Aaron Lakota names the main reason: the reed, two thin blades of cane that you will soak, protect and replace for as long as you play. When you're ready to start, our teacher-led first oboe lesson is the next step. Note names carry octave numbers: C4 is middle C.
What is actually hard about the oboe
Yamaha's guide is frank: it takes time before a beginner can produce a sound at all, and even then control comes slowly. A note may not start when you mean it to, a soft note may not come, or a high note may not speak. Jean Oelrich, a former professional oboist, in a 1982 Instrumentalist article that the magazine reprinted in 2026, names four problems that beginners face: breath control, embouchure, tonguing and hand position. Tonguing is lesson work for your teacher; the rest, with the reed and the upper-octave keys added, looks like this:
- The reed. Cane reacts to humidity and wear; as William T. Robinson's teaching handout for band directors puts it, "reed cane is always alive." Oboist Terri Armfield warns that a poorly made reed can make a fine oboist on an excellent instrument "sound abysmal." Much of a beginner's struggle is really reed trouble.
- The embouchure. Your lips cushion the reed with an airtight seal without smothering its vibration. Oelrich calls biting the most common beginner fault: it gives a tight, thin sound.
- The air. The reed's opening is tiny, so only a little air gets in. Yamaha points out that oboists tend to have too much air rather than too little, so in long phrases you learn to breathe out the used air before you breathe in again. Your teacher will show you where in a phrase to do it.
- The upper octave. From C♯5 up, the oboe needs helpers to reach its next octave: the half-hole and two octave keys, shown below.
- The hands. The keys are irregularly spaced, and the right thumb carries the whole instrument, Oelrich notes.
Some things are easier than people expect. Because the oboe takes so little air, Yamaha's guide says a small body is no handicap, and its compact keys suit small hands. Robinson adds a director's view: a student who has done well on another instrument, and has patience for reeds and a delicate instrument, may make a stronger beginner.

The four parts you assemble. The half-hole and both octave keys sit on the top joint, under the left hand.
The helpers follow one pattern. For C♯5, D5 and E♭5, the left index finger rolls to uncover a small hole in its key: the half-hole. From E5 up to G♯5, the left thumb presses the first octave key on the back of the instrument, and from A5 up to C6 the second octave key on the side takes over, according to Robinson's handout and the Woodwind Fingering Guide. For each of these notes, your fingers make the same pattern as the note an octave lower. The skill is the timing of the handoff, especially between D5 and E5, where one helper replaces the other.

In each pair, both notes use the same finger pattern. The half-hole serves C♯5 to E♭5, the thumb octave key E5 to G♯5, and the side octave key A5 to C6.
The reed: where the sound starts
An oboe reed is two blades of cane, from the plant Arundo donax, tied with thread onto a small metal tube called the staple. Cork around the lower end lets the reed fit snugly into the top of the oboe. When you blow, the two blades vibrate against each other, opening and closing very quickly and sending bursts of energy into the air inside the oboe's narrow, cone-shaped tube, as the Vienna Symphonic Library describes it.

The parts of the reed teachers will name in lessons. The tip vibrates most; Yamaha's guide says never to touch it with your hands.
The scrape, the pattern of cane removed from the blades, varies by region. Wikipedia's double-reed article names the two main schools: the American "long scrape" leaves two visible windows separated by a central spine; European "short scrape" reeds have a more even taper. Oelrich, writing for American band directors in 1982, wanted a long-scrape reed for beginners and called short-scrape reeds "entirely unsuitable." That is an American view; the short scrape is the European school's reed. Use the style your teacher plays.
Buy now, make later
Professional oboists almost always make their own reeds, Yamaha says, because commercial reeds aren't necessarily the thickness or shape a player prefers. Beginners rarely do. In the Eastman Community Music School's oboe curriculum, Level I students buy reeds from their teacher, learn how reeds work and how to care for them, and discuss basic adjustments; making reeds from start to finish begins at Level III. Robinson and Oelrich both prefer handmade reeds, ideally from a professional, with a good commercial reed as the fallback. For strength, Jones Double Reed suggests medium-soft or medium reeds for first-year players, and Armfield advises a soft or medium-soft reed of the highest quality you can afford.
Robinson's handout tells directors to avoid reeds held open with wire, while the UK maker Crook & Staple builds a wire into its student reed so a teacher can fine-tune the opening. Let your teacher choose your first reeds.
Soak, play, rinse, dry
Every source that gives a soaking time uses water, but the times differ.

Thirty seconds to four minutes: use your teacher's or reed maker's time. All five agree on water.
Jones's reed-care page gives a full routine: soak, blow excess water out through the cork end, play, then rinse the reed in fresh water, blow the water out, let it dry while you swab the oboe and store it in a case with ventilation holes. Jones says that in its experience this makes a reed last up to four times longer than one soaked in the mouth or kept in its original packaging. It also warns never to play or adjust a dry reed, because dry cane cracks.

The same routine every time you play. Robinson says to keep three or more reeds ready; Crook & Staple says three.
When to replace a reed
There is no agreed number. Yamaha's guide, writing about the reeds players make for themselves, says one can be used for "somewhere between 10 minutes and a week." For students, the double-reed supplier Hodge Products estimates 10 to 15 hours of playing for a well-kept reed, about three weeks for a beginner who plays at least 30 minutes a day, five days a week. Jones's care routine is meant to stretch that. Robinson's rule is simpler: keep three or more reeds in rotation, and when one is damaged, replace it and bring a new one in. When you buy, Lakota says to choose reeds with no chips in the tip and no cracks anywhere. Armfield adds that a new reed rarely plays well at first and usually needs a small adjustment, a job for your teacher or reed maker.
Choosing an instrument
Most professional oboes are made of grenadilla, also called African blackwood; student models are often plastic resin, which is cheaper and more durable. Wood reacts to temperature and humidity: Yamaha explains that warm breath in a cold instrument can crack the top joint, the part most likely to crack, so let a wooden oboe reach room temperature before you play. For a new wooden oboe, Yamaha's care guide says to keep playing to around 20 to 30 minutes a day for the first two weeks. Hybrid models combine a plastic top joint with a wooden bottom joint and bell; Fox's Renard 330 Hybrid is one.
Nearly all modern oboes outside Vienna are built on the French "conservatoire" key system, usually called "conservatory" in the US. Student and intermediate models are sold under names such as "simplified" or "modified" conservatory, and the name doesn't tell you which keys are there. Ask about low B♭ (some student oboes only go down to B3) and the left F key, an alternate F for the left little finger that not every oboe has. Robinson's handout advises against simplified models, while Yamaha's simplified YOB-241 is marketed as easier for beginners. In the UK you will also meet the thumbplate system; Howarth sells its S10 student oboe in a thumbplate version. Yamaha recommends semi-automatic octave keys for beginners: you work both octave keys yourself, as described above, while a fully automatic oboe has no side octave key.

Two questions to ask about any oboe. The names vary by maker; the questions don't.
Whatever you choose, have an oboist try it first: Oelrich asks for every student instrument to be tested by a professional oboist or oboe specialist so that all the pads seal. Yamaha's buying advice adds that you can't judge an oboe without a reed made by a professional, and that you should buy where you can get after-care, because oboes need periodic adjustment.
What it costs (November 2026)
Prices change and vary by country, so treat these as listings we saw in November 2026, not quotes. Renting ran from $29.99 to $55.99 a month at one US store (Beacock Music, local customers only) up to $115 a month for an intermediate wooden oboe at RDG Woodwinds; Howarth of London asked £35 to £55 a month. To buy, a new resin Yamaha YOB-241 was listed at $3,771 and a resin Fox Renard 330 at $4,870; a pre-owned YOB-241 was $2,700, and Howarth's wooden S10 was £2,195. Single reeds were $19.80 on sale (a Jones medium-soft, regularly $27.00) and £12.70 (Crook & Staple's student reed).

The same listings side by side: real listings, not averages.
Rent or buy? Crook & Staple's beginner's guide calls buying for a new beginner "initially an unwise choice" and suggests waiting until about grade 4 (a level in the UK's graded music exams), with your teacher's advice. Some rental plans credit payments toward a purchase: Bill's Music lets you apply up to 12 months of rent toward a new student instrument, and Howarth of London takes three months' rent off the price of a new one. Budget for several reeds, a ventilated reed case, a swab and cork grease.
Your first lessons
Robinson's handout, like our first lesson, starts with three left-hand notes: B, then A, then G, each adding one finger. Oboe music is written in treble clef at concert pitch, so a written B sounds the same B a piano plays; unlike the clarinet or saxophone, the oboe doesn't transpose. Our guide to transposing instruments explains the difference.
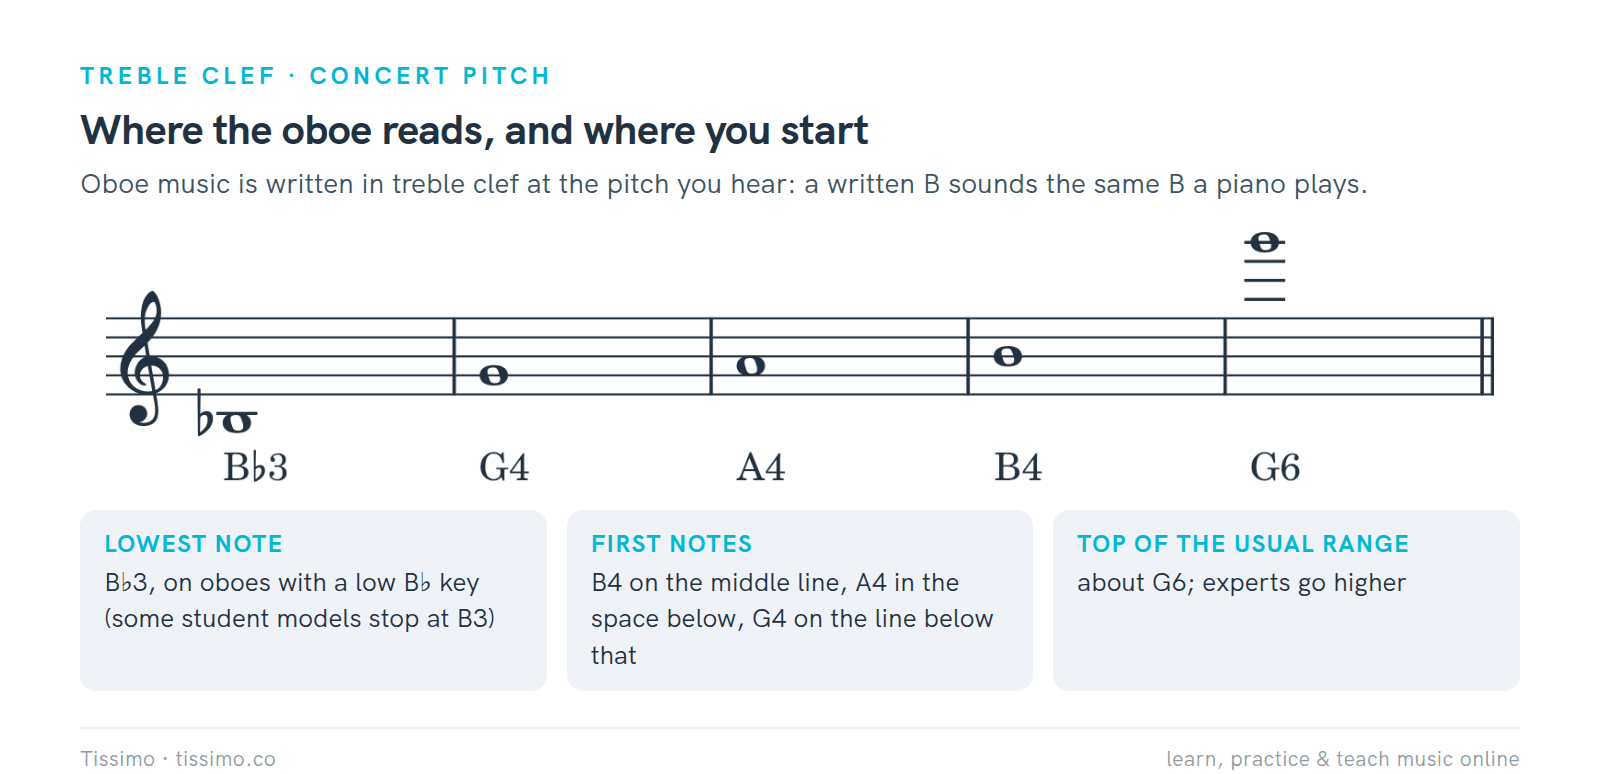
The usual range runs from B♭3 to about G6, and your first notes sit near its bottom: G4, A4 and B4.
Our first oboe lesson walks you through what to bring, how to let the teacher check your instrument and reed, how to read B, A and G, and an original four-bar tune. It deliberately leaves fingerings, embouchure and the first sound to your teacher. Two free sheets go with it: Oboe: B, A and G and Read, Rest, Play: Oboe B–A–G. If the staff is new to you, The Staff & the Treble Clef explains lines and spaces; its playing suggestions use a piano, so use it for reading only.

Both sheets train reading and counting, and both have a Listen panel with pitch and rhythm references. Your teacher supplies the fingerings.
How long does it take to learn the oboe? Stages, not dates
There is no honest single number. None of the teaching sources we read puts dates on the early stages; they describe an order. Jones talks about reeds for "first year players," and Crook & Staple's student reed is meant for beginners through grade 2 of the UK's graded music exams, but how long it takes you to get there depends on your practice, your reeds and your teacher.

A typical order, not a timetable. Stage 4 is the Eastman curriculum's Level I, which comes with no time limit, so don't read it as a first-year deadline.
After B, A and G, Abby Held's beginning-oboe exercises, shared by Ohio State University, step down from a comfortable G, adding fingers on one steady airstream until the low notes respond, then teach the octave mechanisms. Eastman's Level I benchmark asks for the range from low B♭ to high D, major and minor scales up to four sharps and four flats, correct use of the octave keys and half-hole, long tones and an understanding of basic reed care. Eastman doesn't say how long Level I takes, so treat it as the direction you're heading, not a first-year deadline.
When you reach Stage 3, our guide to the D5 to E5 handoff shows how to move from the half-hole to the thumb octave key, and two sheets support it: Two Vents, One Handoff and the check-yourself exercise Cover One Vent, Use the Other.
A practice session
Keep the same order every day. Robinson's handout says to practice every new note as a long tone to build tone control and the embouchure: hold it at one steady volume for as long as your teacher asks. After the new task, read one line from Oboe: B, A and G or Read, Rest, Play: Oboe B–A–G: say the letters, count the rests, then play.
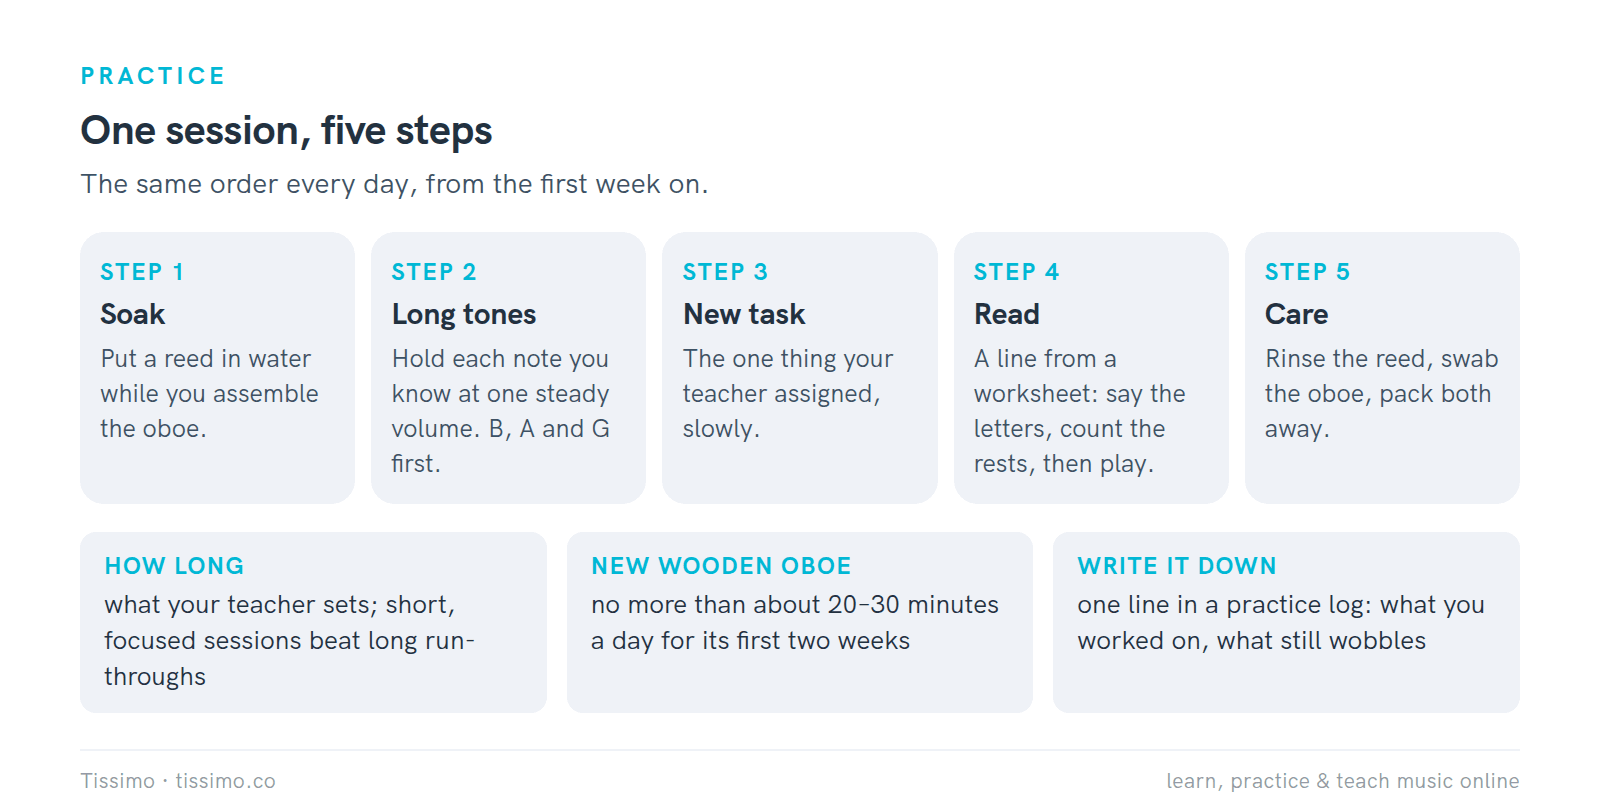
Soak, long tones, the new task, reading, care. Your teacher sets the length.
The How to practice handout recommends "short, focused sessions, not hour-long run-throughs." Its own five steps are written for piano (hands separate, hands together), so keep the oboe order above and borrow its fix-it loop (three clean repetitions in a row) and its weekly log. For a fuller weekly plan, see How to Build an Effective Practice Routine.
Finding a teacher
On the oboe a teacher is close to essential, because so much of the early work involves the reed: in Eastman's curriculum the teacher supplies the first reeds and discusses their care and adjustment, and Oelrich suggests finding local oboists who sell reeds. A teacher can also watch your embouchure. Our guide to finding the right music teacher covers what to ask.
A Tissimo oboe teacher can check your reed, your setup and your first notes in a live online lesson, and you can book a lesson when you're ready.
Free worksheets for this lesson
- Oboe: B, A and G — note cards, a rising line and an original tune
- Read, Rest, Play: Oboe B–A–G — naming, matching and two missing-note tunes
- The Staff & the Treble Clef — lines, spaces and the G clef
- How to practice — the fix-it loop and a weekly practice log
- Two Vents, One Handoff — later: the D5–E5 handoff
- Cover One Vent, Use the Other — later: check yourself on D5 and E5
Sources
- How to Play the Oboe: An instrument that is difficult but worth it! — Yamaha Musical Instrument Guide
- Care and Maintenance of an Oboe: Seasonal maintenance — Yamaha Musical Instrument Guide
- Oboe — Vienna Symphonic Library Academy
- William T. Robinson III, "So You Want to Teach the Oboe" — The Midwest Clinic, 2005
- Oboe Curriculum — Eastman Community Music School
- Jean Oelrich, "Four Keys to a Successful Start on the Oboe" — The Instrumentalist, April/May 2026 (first published September 1982)
- Terri Armfield, "Making Reeds Behave" — The Instrumentalist, September 2012
- Abby Y. Held, "Essential Exercises for Beginning Oboe" — Ohio State University School of Music
- Basic Fingering Chart for Oboe, Second Octave — The Woodwind Fingering Guide
- Oboe Reed Care — Jones Double Reed
- Student's Guide on Beginning the Oboe — Crook & Staple
- Aaron Lakota, "Oboe reeds for beginners" — aaronlakota.com
Read this article online: https://tissimo.co/articles/how-to-start-learning-oboe-reeds-difficulty-cost-and-the-first-year



Comments