 Back

How to Start Learning Flute: First Sound, First Notes and a Four-Week Plan
A flute has no reed to vibrate and no mouthpiece to buzz into. Your first job is not pressing keys: it is aiming a thin stream of air across a hole. This guide starts there, on the headjoint alone, then covers assembly, a balanced hold, the three notes the Tissimo flute worksheets build on (B, A and G), tongued starts, long tones, a first tune and a four-week plan. Octave numbers name the register: C4 is middle C, and G4 is the G just above it.
How a flute makes its sound
The UNSW Music Acoustics lab describes it simply: the jet of air from your lips travels across the embouchure hole and strikes its sharp far edge. A small disturbance makes the jet flick into and out of the hole, and when that flicking falls into step with the air vibrating inside the tube, you get a steady note. The keys choose which vibrations the tube favors; your air does the rest.

Panel A: the air jet crosses the hole and strikes the far edge, flicking in and out. Panel B: your lower lip covers part of the hole and the air aims across it, not down into it.
Two things are therefore yours to control: where the air hits and how fast it travels. Yamaha's flute guide puts the second one plainly: faster breath produces a higher pitch, slower breath a lower one. The UNSW page adds that flutists are usually taught to make the lip opening smaller for high notes.
Week one: the headjoint alone
Flute teachers often start on the headjoint by itself. Phyllis Avidan Louke and Patricia George, both writing in Flute Talk, use it so a beginner finds a sound before balancing the whole instrument.
- Hold the headjoint with the closed (crown) end to your left and the open end to your right, near its two ends, with your thumbs and index fingers. Keep your left-hand fingers out of the air's path, and don't press on the lip plate.
- Bring the headjoint to your chin rather than your chin to the headjoint. The embouchure hole should be level, facing the ceiling.
- Rest the lip plate against your chin so your lower lip covers part of the hole. Edwin Kruth, writing in Bandworld, says about a third; the rest stays open. Teachers disagree about the exact spot: Louke and George place the near edge of the hole about where the lip meets the chin, while Kruth sets it a little higher, on the red of the lip. Your teacher will fine-tune it.
- Breathe in, then blow a small, fast stream through a small opening near the middle of your lips. A slightly left-of-center opening is common and fine.
- Aim across the hole at the far edge, not down into it.
If you hear only air, roll the headjoint slowly in and out while you keep blowing until a tone appears: that is Kruth's first fix. Then make the opening smaller and the air faster, "like blowing out birthday candles," as Louke puts it. A focused tone rings; an airy one has a hiss riding on top. Take the headjoint away and put it back several times, so you can find the ringing spot from a cold start.
Start each sound with the tongue, as if saying "tu" (Yamaha's guide spells it "too" and notes that it sounds much clearer than "foo"). Then play the four bars below, tapping your foot. Louke has students play written four-beat patterns like these, built from quarter, half and whole notes and their rests, on the headjoint before they assemble the flute.

Week-one rhythms on the headjoint: blow only on the notes, count through every rest. The single line means "no particular pitch": on the headjoint you are practicing rhythm and tone, not a written note.
Cover the open end with your right palm while you blow and the note drops lower; uncover it and it jumps back. Louke uses the two sounds to keep headjoint practice varied, and Kruth uses the lower one to get the ear used to the lower pitch of the assembled flute.
The flute takes a lot of air, and Louke warns that beginners may feel light-headed in the first lessons. If that happens, stop, breathe normally for about a minute and keep the next rounds shorter. Several short rounds with rests beat one long one.
Put the flute together and line it up
Yamaha warns that a carelessly assembled flute can break or stop sounding well, so never grip keys or rods. Hold the body by the barrel at the top, where there are no keys, and the footjoint by its plain end. Slide the footjoint onto the body with a gentle twisting motion, straight in rather than at an angle, as Jupiter's owner's manual says. Then add the headjoint the same way.

The classic line-up: embouchure hole, main keys and footjoint rod on one straight line. It is a starting point, not a law; teachers adjust it to the player.
Patricia George pushes the headjoint all the way in and then draws it back out about a quarter inch, a common starting point that your tuner will correct later. For alignment she uses the "classic line-up": an imaginary straight line through the centers of the right-hand D, E and F keys and the center of the embouchure hole. Jupiter's manual names the C♯ key at the top of the body as the reference instead, and Michel Debost lines up the hole's outer edge with an imaginary line through the middle of the tone holes. Louke has the teacher put small matching marks on headjoint and body so you line up the same way every day. If nobody has set your flute up yet, start with the classic line-up in the figure and let your teacher adjust from there.
The footjoint rod starts at the center of the D key, the lowest of the right-hand finger keys. George then turns it a little farther out if needed, so your right little finger can slide onto the low keys easily.
Hold it in balance
Malcolm Pollock, a former chair of the British Flute Society, names three balancing points: the bottom lip and chin, the lower joint of the left index finger, and the right thumb. Brian Luce, professor of flute at the University of Arizona, lists the same three in Flute Talk, and Yamaha's guide asks you to keep the inside of the left index finger's first joint in contact with the flute.
The flute points to your right. Your left hand takes the upper half of the body, nearest the headjoint, and your right hand the lower half. A flute has more keys than you have fingers, so find your six home keys first: the left index, middle and ring fingers sit on the keys the Woodwind Fingering Guide's key map calls C, A and G, and the right index, middle and ring fingers on F, E and D. Louke marks these keys with small round stickers for beginners; ask your teacher to do the same, or match your hands to the photos in Yamaha's guide.

Three supports, and only three. The left thumb and the right little finger rest on keys but do not hold the flute up.
- Your left thumb rests on the B♮ lever, the main thumb key. There are two thumb levers side by side: the Woodwind Fingering Guide's key map places the B♮ lever closer to the footjoint and the B♭ lever closer to the headjoint. Use the B♮ lever for everything in this guide; with the thumb on the B♭ lever, the B fingering plays B♭.
- Your right thumb goes under the flute, below the index or middle finger or between them; comfortable placement varies from player to player.
- Your right little finger rests on the E♭ key for most notes, but Luce warns against using it as a fourth support.
- Keep the keys facing the ceiling, as Louke and George teach, never rolled back toward you. Luce explains what goes wrong when the flute rolls in: the long rods are its heaviest part, and when they lean toward you they pull the flute in until your lip covers too much of the hole. He goes a step further and turns the flute outward, so the rods sit on top.
- Relax your shoulders and let your elbows point down. Louke has students turn their body about 45 degrees to the right of the music stand and their head slightly to the left, so they still face the music.
Your first notes: B, A and G
Here are the fingerings, checked against two charts: the Woodwind Fingering Guide and Yamaha's flute fingering chart. Both agree on every note in the figure.
- B4: left thumb on the B♮ lever, left index finger down, right little finger on the E♭ key.
- A4: the B fingering plus the left middle finger.
- G4: the A fingering plus the left ring finger.

From B down to E, each step adds one finger. D4 adds the right ring finger and lifts the little finger, and C4 puts the little finger on the low C key. C5 is the only note here without the thumb.
On the staff the same three notes step down from the middle line: B on the line, A in the space below it, G on the next line down.
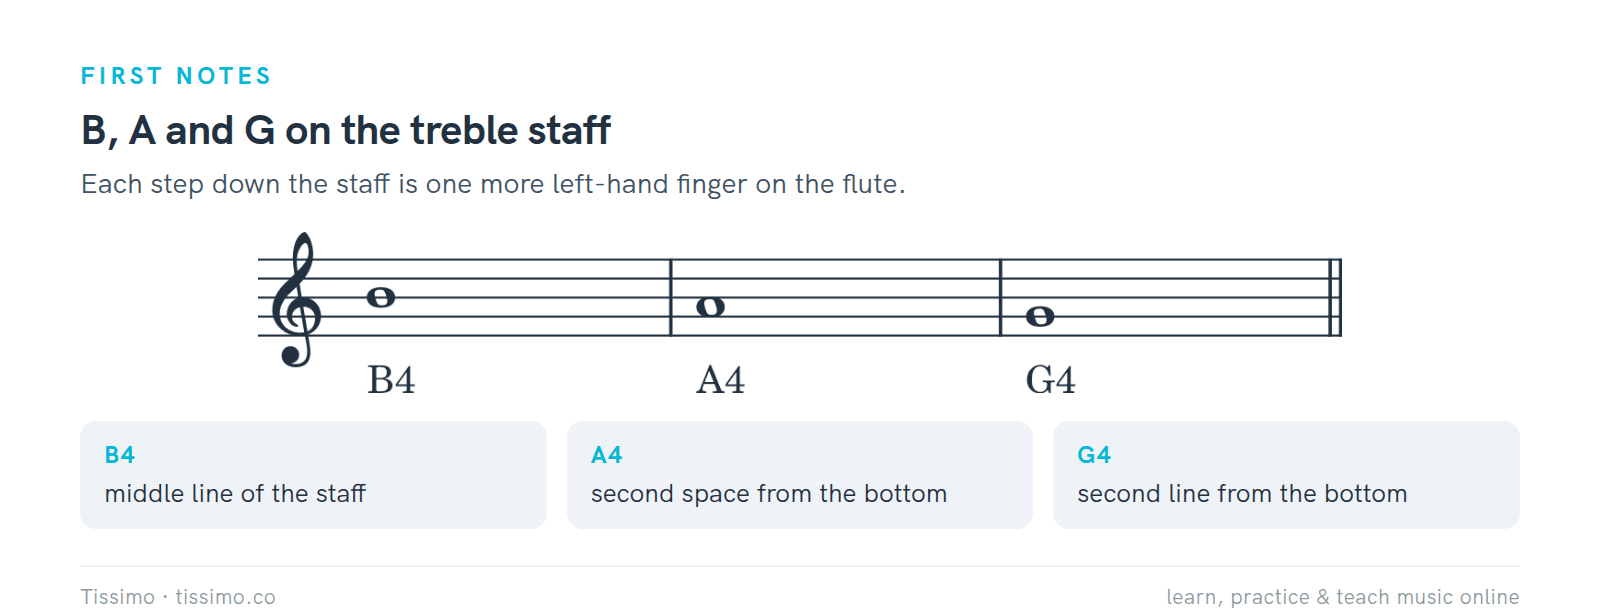
The same three notes on the staff: one step down the staff, one more left-hand finger on the flute.
The concert flute is pitched in C, so a written B sounds the same B a piano plays. If the staff is new to you, The Staff & the Treble Clef explains lines and spaces, and Name the notes: treble clef gives you 25 notes to drill. For the whole system, start with How to Read Sheet Music.
Start on B, change to A, then to G, slowly, keeping the air going. The Woodwind Fingering Guide's second-octave page shows that B5, A5 and G5 use the same keys as B4, A4 and G4. So if a note pops up an octave, your fingers are fine: slow the air a little. (The octave is the second harmonic of the same air column; The Harmonic Series and Why Instruments Sound Different explains the pattern.) Same Keys, Two Gs shows this shared G fingering, Choose the G You Meant trains your ear to tell the two apart, and our article on flute G4 and G5 is the next step once both registers come on demand.
If your flute is open-hole (a "French model"), five of its keys have a hole in the center that your fingertip has to seal completely. Temporary plugs can close the holes until your fingers cover them reliably. A closed-hole (plateau) flute plays the same notes with the same fingerings.
Start every note with "tu"
The tongue doesn't make the sound; as George reminds her students, it releases the air. If air leaks out before the tongue moves, you get a soft "hoot" at the start of the note. Keep the tongue light and quick, as in a whispered "tu." Louke starts many beginners with "spit-rice" tonguing, the tongue tip peeking between the lips as if spitting a grain of rice, and falls back on "tu" or "pooh" when that is hard to coordinate.

Three repeated notes and a rest on each of your first notes, then B, A and G in a row. Every note gets its own light "tu"; the air keeps flowing between them.
Count aloud before you play. The quarter note, the half note, the whole note and The Rests cover every value in this guide. They use piano examples, but the counting is the same on any instrument.
Once the separate starts are clean, try a slur: tongue only the first note under the curve and change fingers for the rest without a new tongue start. The Tissimo flute sheets use the same beginner rule: tongue the first note of each slur and each note outside a slur.

The same pitches twice: five tongue starts in bars 1–2, two in bars 3–4. The slurred line must take exactly as long as the tongued one.
When B, A and G are secure, Flute: One Slur, One Starting Attack maps the tongue starts of a longer line, Tongue or Connect? Read the Flute Groups has you mark them yourself, and our article on flute articulation goes further.
Long tones and a tuner
A long tone is one note held at one steady volume: the simplest test of steady air. Set a metronome to 60 and put a tuner beside your music.

Four beats of sound, four beats of rest. Use the rest bar to breathe in and reset before the next note.
Watch the needle. If the pitch sags at the end of the note, the air has slowed. If you roll the hole toward your lips the pitch goes flatter, and if you roll it away the pitch rises, according to the UNSW page: one more reason to line the flute up the same way every day. If every note reads sharp or flat by about the same amount, move the headjoint a little: pulling it out lengthens the flute and lowers the pitch, and pushing it in raises it. Standard concert pitch is A4 = 440 Hz; our guide to tuning explains the reference.
Tempo & the Metronome gives a simple ramp: start at 60, and raise the speed only 4 to 8 clicks at a time.
Add C, then go low
C5 is a surprise: lift the thumb off the B fingering and keep only the left index finger and the E♭ key. Moving between B and C is then one thumb motion.

B to C and back: only the left thumb moves. C5 sits in the third space, one step above B.
Going down from G, the right hand joins: F4 adds the right index finger, E4 the right middle finger and D4 the right ring finger. For D4, also lift your little finger off the E♭ key. Debost points out that even a light touch on that key keeps D4 and the lowest notes from responding. Middle C (C4) uses all six fingers, the thumb and the little finger on the low C key; it is the lowest note on a standard C-foot flute.

Step down from G to D, back up, then down to middle C. Each step down adds one finger, and for D the little finger also comes off the E♭ key. Slower air, not more force: the low notes take patience. Breathe at any barline you need to.
Your first tune
"Four-Note Walk" is an original eight-bar tune on G, A, B and C. Bars 2 and 6 each have a two-note slur, and the comma after bar 4 is a breath mark: shorten the long B a little, breathe quickly and come in on time for bar 5. Four bars is a long breath for a new flutist (about 15 seconds at this tempo), so at first also take a quick breath after the half note in bar 2 and after bar 6, and drop those extra breaths one at a time.

Count one bar aloud before you start. If a note slips up an octave, slow the air rather than changing fingers.
A four-week plan
The plan below is a suggested pace, not a deadline. Repeat any week whose "move on" line isn't true yet.

Each week ends with a check you can hear. Every day: short rounds with rests, long tones first, something new, something you already play, then swab and pack away.
Keep sessions short and focused, as How to practice advises; when a hard spot keeps breaking, its fix-it loop (three clean repetitions in a row) and weekly practice log work for the flute too.
Look after it every day
- Before you play, brush your teeth and wash your hands, as Louke recommends.
- After you play, take the flute apart and swab each piece. Thread a corner of the cloth through the cleaning rod's eye and wrap it so no metal touches the inside of the tube, as Yamaha's care page shows.
- Wipe the outside with a polishing cloth without pressing on the keys.
- Don't store the damp cloth inside the case: Jupiter's manual warns its moisture can cause mold on the pads.
- Between sessions the flute lives in its closed case. Never leave it on a chair or a music stand, where it can roll off.
- Leave the crown and the cork alone. To check the cork, your teacher slides the cleaning rod into the headjoint: the line near the rod's end should show in the center of the embouchure hole.
When lessons help
You can't see your own lips or the angle of your air, and those decide your tone. A Tissimo flute teacher can watch your embouchure and hold in a live lesson and tell you which week of the plan you're really in. You can book a lesson whenever you're ready. Later, once your single tonguing is quick and even, our article on first double tonguing shows the next articulation step.
Free worksheets for this lesson
- The Staff & the Treble Clef — lines, spaces and the G clef
- Name the notes: treble clef — 25 notes to name
- The quarter note — one beat, with a rhythm to tap
- The half note — two beats, counted through
- The whole note — four beats of steady time
- The Rests — silences counted like notes
- Tempo & the Metronome — metronome marks and the 4-to-8-click ramp
- How to practice — the fix-it loop and a weekly practice log
- Same Keys, Two Gs — one fingering for G4 and G5
- Choose the G You Meant — tell G4 from G5 by ear
- Flute: One Slur, One Starting Attack — separate versus grouped tongue starts
- Tongue or Connect? Read the Flute Groups — mark the tongue starts
- Two Articulations, Even Notes — later: T and K attacks on G4
Sources
- Flute acoustics: an introduction — UNSW Music Acoustics
- How to Play the Flute: Playing the Flute — Yamaha Musical Instrument Guide
- Basic Fingering Chart for Flute and Piccolo, First Octave — The Woodwind Fingering Guide
- Basic Fingering Chart for Flute and Piccolo, Second Octave — The Woodwind Fingering Guide
- Phyllis Avidan Louke, "First Lessons for the Beginning Flutist" — Flute Talk, The Instrumentalist
- Patricia George, "Begin With the Headjoint" — Flute Talk, The Instrumentalist
- Patricia George, "Add the Footjoint" — Flute Talk, The Instrumentalist
- Michel Debost, "Flute Alignment" — Flute Talk, The Instrumentalist
- Brian Luce, "The Demons of Hand Position" — Flute Talk, The Instrumentalist
- Malcolm Pollock, "How to teach flute technique – 2. Hand positions" — Collins
- Edwin Kruth, "Flute Embouchure" — Bandworld Magazine
- Flute Owner's Manual — Jupiter Band Instruments
Read this article online: https://tissimo.co/articles/how-to-start-learning-flute-first-sound-and-notes



Comments