 Back

Common Chord Progressions on Guitar: Open Chords, Numbers and the Capo
Five open chords, G, C, D, Em and Am, are enough for several of the most common chord progressions in popular music. What turns those shapes into songs is knowing which order they go in and why. This lesson gives you six progressions as open chords, shows each one as numbers so you can move it to another key, and then hands you the capo, which moves the whole thing to a new key without a single new shape.
Why a few progressions cover so many songs
Chord progressions are written in Roman numerals: the numeral is the step of the scale the chord is built on, uppercase means a major chord and lowercase a minor one. In G major the scale is G A B C D E F♯, so I is G, ii is Am, IV is C, V is D and vi is Em. In C major the same numbers give C, Dm, F, G and Am. A 7 after the numeral, as in V7, means the same chord with one more note, a seventh above its root: D7 instead of D in G, G7 instead of G in C. V7 pulls toward I a little harder than plain V, and you can play it wherever a progression in this lesson says V. In E it is also the easy option: B7 has an open shape, and B usually needs a barre.
That is the whole trick. A progression like I–V–vi–IV is the same music in every key; only the letter names change. The open textbook Open Music Theory calls I, IV, V and vi "probably the most common chords in all of pop music." Learn a progression as numbers and you have learned it in every key at once. The Nashville number system that session players use writes whole chord charts in numbers for exactly that reason.
This lesson stays on the guitar. For the theory behind each progression, at the piano, read the companion guide Common Chord Progressions in Pop, Rock, Blues, Jazz, and Hip-Hop.

The same numbers in the five most common beginner keys. In G and C every chord in the grid has an open-position shape; in D, A and E the dashed chords (Bm, F♯m, C♯m and B) are usually barre chords, which is where the capo comes in.
This lesson uses G, C, D, A and E because they are, in music educator Ethan Hein's words, "the most common keys played by beginner guitarists."
The open chords you need
Fourteen open-position shapes cover everything you play below. If chord boxes are new to you, How to Read Guitar Chord Diagrams explains the grid, and a legend under each chord figure repeats the symbols.

Nine shapes for the keys of G and C. G is shown with fingers 3-2-4; the F is the four-string version, with finger 1 lying flat across strings 2 and 1.
The shapes match the charts in the Guitar For Dummies authors' lessons on Dummies.com and Fender's chord lessons, and so do the fingerings, with one exception: Fender shows G with the 2-1-3 fingering. Two choices matter later. For G, the Dummies lesson gives the easier 2-1-3 to start with and 3-2-4 to switch to as your hand gains strength; this lesson uses 3-2-4 because it frees your index finger and turns the move to C into a slide. The F is the four-string F that Fender teaches as a step before the full six-string barre.

The I, IV and V chords of D, A and E, plus the three seventh chords used as V7. In E the V chord appears only as B7, because plain B usually needs a barre; Bm, F♯m and C♯m have no open shape here either.
Before you play a single progression, check each shape string by string: pick the strings one at a time, low to high, and listen for buzzes or dead notes. Em, Am and C: Map the Change walks you through exactly that check for three of these shapes, then maps which finger moves in each change.
Three strum patterns
You can play every progression in this lesson with one of three strums. Count "1 & 2 & 3 & 4 &" and keep your strumming hand moving down on the numbers and up on the "&"s, even when it misses the strings. The ⊓ and V signs in the figure come from string bowing marks: ⊓ is a downstroke toward the floor, V an upstroke toward the ceiling.

Pattern A is for learning changes, B for most loops, C once B is easy. In C the tie means you skip the strum on 3 while your hand keeps moving.
Start every new progression with pattern A. When the changes land on beat 1 without a gap, switch to B. Guitar Strumming Patterns for Beginners has more patterns and the beat grids behind them.
I–IV–V: three chords
I–IV–V is the simplest of the six: three major chords, home, away and the tension that pulls back home. In G it is G–C–D, in C it is C–F–G, in D it is D–G–A, in A it is A–D–E and in E it is E–A–B7, with B7 standing in for B. Play each chord for one bar of pattern A, then end on I: G, C, D, G.
A change that slows many players down in G is G to C. With G fingered 3-2-4, it becomes a slide:

G to C. The ring and middle fingers (coral) each move over one string toward the floor and stay on their frets; the index is the only new finger.
Practice the slide on its own first, then in rhythm; C back to G is the same move in reverse. The I–IV–V in A has guide fingers instead: fingers that stay on their string and slide one fret. From A to D, finger 3 stays on string 2 and slides from fret 2 to fret 3; from D to E, finger 1 stays on string 3 and slides back from fret 2 to fret 1. E back to A has no guide finger, so give it a silent beat 4: strum 1, 2 and 3, and on 4 rest your strumming hand on the strings while the fretting hand gets ready. Change on the Count: Open Guitar Chords trains exactly that habit on Em, Am and C, with a playing log for each change.
I–V–vi–IV and vi–IV–I–V: one loop, two starting points
These two are the same four chords in the same order, started at a different point. Open Music Theory calls the pattern the "singer/songwriter" schema, gives vi–IV–I–V as its common form and adds that the rotation starting on I "is also exceedingly common." Starting on vi gives the loop a minor color; the same textbook points out that either rotation can be heard in the major key or in its relative minor (G major or E minor in the figure below).

In G: I–V–vi–IV is G–D–Em–C (top line); vi–IV–I–V is Em–C–G–D (bottom line). Same chords, same order, a different first bar.
None of these four changes has an anchor, so start with pattern A and the silent beat 4 from the last section; C back to G is the slide in reverse.
In D the same loop is D–A–Bm–G and in A it is A–E–F♯m–D; Bm and F♯m are usually barre chords, which is why those two keys wait for the capo section. In C the loop is C–G–Am–F, and here the F is the change to watch. Play it slowly and listen to the notes inside the boxes:

The notes of the four boxes in C, low to high (guitar music is written an octave higher than it sounds). Am and F share A and C on the third and second strings, so those two strings keep their notes through the change.
Your index finger already sits on string 2, fret 1 in Am. For F, leave it there and flatten it so it covers string 1 too, then place fingers 2 and 3.
I–vi–IV–V: the 1950s loop
Open Music Theory calls I–vi–IV–V the "doo-wop" schema after its common use in rock ballads of the 1950s and early 1960s. In G it is G–Em–C–D; in C it is C–Am–F–G.
This progression is full of anchors: fingers that stay down from one chord to the next.

Anchor fingers in cyan. G to Em uses the 3-2-4 G; in C to Am, as the Dummies lesson puts it, "only finger 3 must change."
The Dummies G-family lesson points out the C–Am pair: both chords have finger 1 on string 2, fret 1 and finger 2 on string 4, fret 2, so only finger 3 moves. Em, Am and C: Map the Change marks the same two fingers "keep down." Open Music Theory adds that ii can stand in for IV (I–vi–ii–V, or C–Am–Dm–G in C). Dm is a small step from F: both have finger 2 on string 3, fret 2 and finger 1 at fret 1.
Chords & Progressions in G Major puts I–IV–V7–I, I–vi–IV–V7 and I–V7–vi–IV on one page at the piano, with audio.
ii–V–I: three chords, one held note
The ii–V–I is the jazz progression: Open Music Theory calls it "a fundamentally important progression in traditional jazz," with roots that move by fifths. Jazz players use seventh chords for all three, but with open chords you can play it as Dm–G7–C in C and Am–D7–G in G, and you will hear the pull.

Dm–G7–C. The top note is F in Dm and F again in G7, both fretted by finger 1 on string 1, fret 1; in C it falls to the open E.
That top note is your shortcut. Keep finger 1 on string 1, fret 1 from Dm to G7, then let it go for C. In G the same idea works one string over: Am and D7 both have finger 1 on string 2, fret 1. The F that falls to E is the seventh of G7 resolving to the third of C, the same voice-leading The ii–V–I in Every Key shows at the piano. The ii–V–I Progression Explained goes into the jazz harmony.
The 12-bar blues on guitar
The 12-bar blues is three four-bar phrases built on I, IV and V; in the basic form every chord is a dominant seventh, and two common additions are a quick move to IV in bar 2 and a V chord in bar 12 as a turnaround. In A that means A7, D7 and E7, all open shapes.

The 12-bar blues in A with the quick change (D7 in bar 2) and the turnaround (E7 in bar 12), four downstrokes a bar.
Strum it with pattern A first, then play it again with the boogie shuffle on The 12-Bar Blues Shuffle in A, where the root string stays open and only the note on the next string changes. (That sheet fingers A7 with fingers 2 and 3; either fingering works.) In E the chords are E7, A7 and B7, and there is a gift: E7 and B7 both put finger 2 on string 5, fret 2, so keep it down as you switch. 12-Bar Blues Chart Check has you fill in a chart in E and spot the quick change and turnaround; The 12-Bar Blues shows the form at the piano in C.

All six progressions in the five keys. The dashed chords have no shape in this lesson; the capo section shows how to play the loops in D, A and E without them.
The capo: same shapes, new key
A capo clamps across all six strings and acts as a movable nut. Each fret you move it up raises every string by a half step, so your shapes keep their fingerings while the sounding key moves up. That solves the problem from the first grid: the vi chords of D, A and E.

Find your shapes in the left column and the key you need in the row; the column gives the capo fret. The highlighted cells are the three examples below.
- A major with G shapes: capo at fret 2, "capo 2" for short. G–D–Em–C now sounds A–E–F♯m–D, so I–V–vi–IV in A needs no barre at all.
- D major with C shapes: capo 2. Am–F–C–G sounds Bm–G–D–A: vi–IV–I–V in D.
- E major with C shapes: capo 4. C–G–Am–F now sounds E–B–C♯m–A, the I–V–vi–IV in E without a full barre.
The arithmetic is simple: count the half steps from the key your shapes are in up to the key you need, and that is the capo fret. G to A is two half steps, so capo 2.
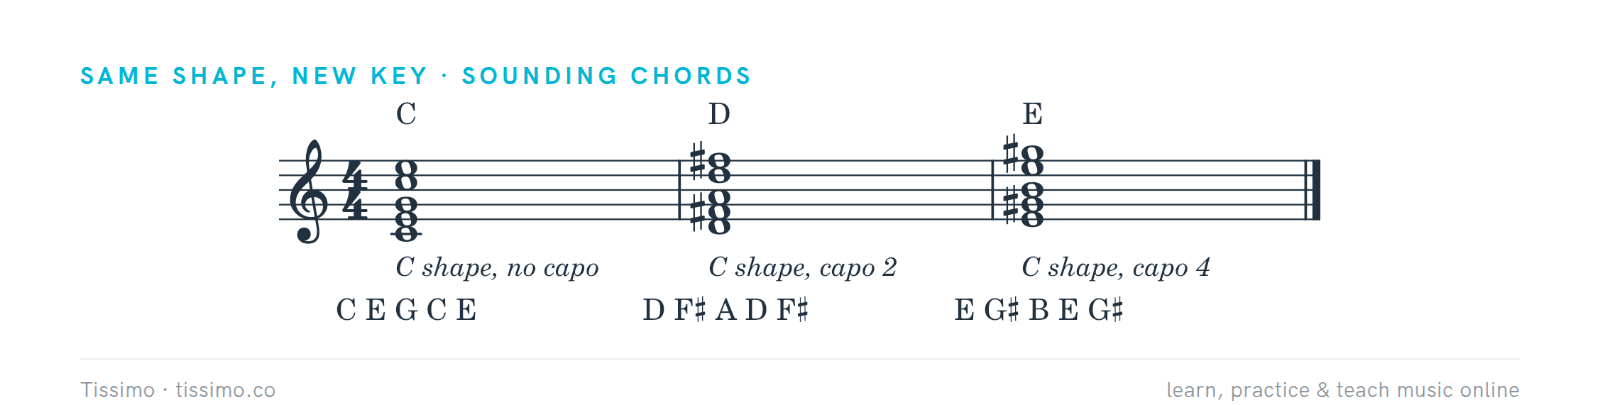
One C shape, three sounding chords. Every note moves up by the capo fret: two half steps at capo 2, four at capo 4.
Two habits help. First, name the sounding chord, not the shape: a C shape at capo 2 is a D chord to the bass player. One Shape, Another Sound shows four shapes at capo 2 with both names, and Tell the Band the Sounding Key drills it both ways. Second, clamp the capo just behind the fret and check your tuning when it goes on and when it comes off. The Capo Explained covers capo types; Barre Chords Explained is the next step when you want Bm and F♯m without one.
A two-week practice plan
Fifteen minutes a day is plenty: tune, spend two minutes on changes alone, then play loops slowly enough that every change lands on beat 1.

Two weeks, one new step every few days. Say each chord by number and by letter as you play it: that is how the numbers stick.
- Days 1–3: check G, C, D, Em and Am string by string; learn the silent beat 4 on Em, Am and C with Change on the Count, then use it on every pair.
- Days 4–6: I–IV–V and I–V–vi–IV in G, pattern A, then B.
- Days 7–9: add F; vi–IV–I–V and I–vi–IV–V in G and C, keeping the anchor fingers down.
- Days 10–12: check Dm, G7, D7, A7 and E7 string by string; then Dm–G7–C and Am–D7–G, and the 12-bar blues in A.
- Days 13–14: your loops at capo 2, saying the sounding chords out loud.
Free worksheets for this lesson
- Em, Am and C: Map the Change — check each string, track each finger, change on a slow count
- Change on the Count: Open Guitar Chords — name the shapes, look one bar ahead, log each change
- Chords & Progressions in G Major — three loops at the piano, with audio
- The ii–V–I in Every Key — Dm7–G7–Cmaj7 and its guide tones
- The 12-Bar Blues Shuffle in A — the chart and a boogie shuffle for A7, D7 and E7
- 12-Bar Blues Chart Check — fill a chart, find the quick change and turnaround, write a shuffle in tab
- The 12-Bar Blues — the twelve-bar map at the piano in C
- One Shape, Another Sound — shape names and sounding names at capo 2
- Tell the Band the Sounding Key — name the sounding chord, find the capo fret
Keep the numbers, change the key
Once a progression lives in your hands as numbers, a new song is mostly a question of which key it is in and where the capo goes. Start in G, keep the changes slow and the anchors down, and add one progression at a time. If a change keeps buzzing or a strum keeps rushing, a Tissimo guitar teacher can watch both hands in a live lesson and tell you which finger is causing it.
Sources
- How to Play Chords in the A Family on the Guitar — Dummies.com (Mark Phillips and Jon Chappell)
- How to Play Chords in the G Family on Guitar — Dummies.com (Mark Phillips and Jon Chappell)
- How to Play Chords in the D Family on Guitar — Dummies.com (Mark Phillips and Jon Chappell)
- How to Play Chords in the C Family on Guitar — Dummies.com (Mark Phillips and Jon Chappell)
- How to Play Dominant 7th Chords on the Guitar — Dummies.com (Mark Phillips and Jon Chappell)
- Essential Beginner Chords: G, C, and D — Fender
- How to Play the F Chord on Guitar — Fender
- The Capo: 6 Things You Need to Know — Fender
- The Standard Fifteen — Ethan Hein
- Four-Chord Schemas — Open Music Theory
- ii–V–I — Open Music Theory
- Blues Harmony — Open Music Theory
Read this article online: https://tissimo.co/articles/common-chord-progressions-on-guitar-open-chords-numbers-and-the-capo



Comments