 Back

Cello String Crossings: Play D and A in One Bow
Your teacher asks you to play D3 and A3 in one bow. You know both notes — you play them separately without trouble. But the moment they share a slur, something goes wrong: a tiny bump, or a brief silence, or an accent you did not intend. None of that means your bow is broken. Preparing gradually toward the next string level can help you connect the notes without changing either written duration.
This guide explains what a cello string crossing is, how neighboring open D3 and A3 let you focus on the bow, where the level change lives inside a four-note bow, and how to listen for a clean result. Work through it with your teacher nearby; the arm angle is theirs to set and check.
The cello has four strings, tuned in perfect fifths
The cello's four strings are tuned in perfect fifths: C2, G2, D3 and A3, from lowest to highest. That is the standard tuning of the modern four-string cello. Each string takes its name from its open-string pitch: the note it sounds when bowed without a left-hand finger stopping it.
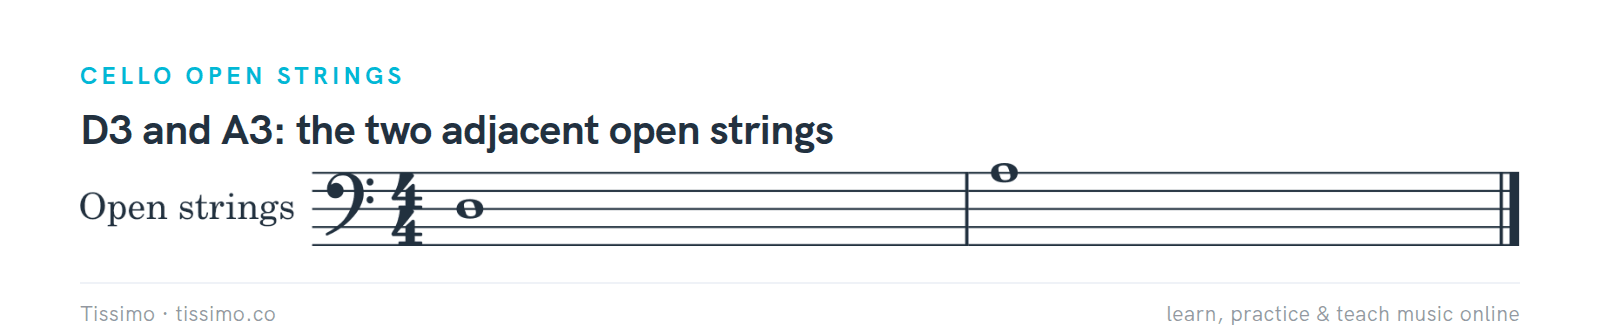
D3 and A3 written in the bass clef. D3 sits on the third line from the bottom; A3 sits on the top line. Both are open strings — no left-hand fingering. The Bass Clef & Grand Staff sheet maps every line and space.
D3 and A3 are the two highest strings on the cello. In conventional player numbering, A is string 1 and D is string 2; G is string 3 and C is string 4. The interval from D3 to A3 is a perfect fifth, the same interval that separates each adjacent pair: C to G, G to D, D to A. D and A are adjacent, so this pair lets you practice one string-level change without skipping a string.
Your left fingers do not need to stop either note. Keep the cello supported in the position your teacher has checked. Working on open strings lets you attend to the bow alone, with no stopped notes to coordinate.
What a string crossing actually is
When you bow a single string, the bow contacts it at a particular angle across the curved bridge. D and A are neighboring strings with no string between them. A small change in bow-contact angle reaches the next string; your teacher checks the movement for your setup.
A string crossing moves the bow from one string to another. This lesson uses only adjacent D and A and connects them within one bow stroke.

Schematic bridge end view, not to scale. D and A are adjacent. The two lines illustrate different bow-contact angles; your teacher checks the movement on your cello.
Ailbhe McDonagh’s string-crossing lesson distinguishes finding each string’s balanced level from connecting those levels in a passage. Start with that distinction: recognize each destination separately, then practice arriving there at the written time. The bridge drawing shows contact angles, not the height your elbow must reach.
Before you play: four things to confirm

Check these four things before your first crossing attempt. Items 1–3 are verifiable from the notation. Item 4 requires your teacher.
The first three items are things you can confirm from the written music and from this article. The fourth — the arm angle — is something your teacher sets and checks. Different cellos, different arm lengths and different bow holds produce different optimal angles. No article can substitute for a teacher watching your arm.
Play each open string separately first
Before connecting the two strings, confirm that each sounds cleanly on its own. Start with each open string held for four beats, as shown below. Later, The Half Note sheet will help you count the two-beat notes in the connected pairs.

D3 alone in measure one, A3 alone in measure two: whole notes, four beats each in 4/4. Two separate bow strokes. Check that each string rings steadily before you ask them to share a bow.
Play one slow four-beat D3, stop and reset, then play one four-beat A3. Use a bow region and direction chosen with your teacher. Listen for a steady sound throughout each note; if either string is unclear, settle that single-string task before connecting them.
Notice how the arm feels at each string. Aim for a balanced position without gripping or holding unnecessary tension. Keep the setup comfortable before adding the timing of a crossing.
Use the shorter notes and written rests below to rehearse finding the next string before connecting the sounds.

D3 alone, then A3 alone — two separate bow strokes; change strings during the rests before trying the connected version.
Here the written rests give you time to change string-contact level before the next sound. In the slurred version, prepare during the preceding note and connect the new string at its written onset.
The slur says: one bow
A tie joins two adjacent notes of the same pitch into one sustained sound. A slur groups notes into one bow direction; it can include repeated pitches. Our Ties vs. Slurs sheet illustrates the distinction with piano examples on different pitches; those examples do not cover every possible string slur. Here, follow the slur through either one down-bow or one up-bow without reversing.

D3 and A3 as slurred half notes. The curved line means one bow direction covers both. The arm level changes between them, but the bow never reverses.
The half note gives each pitch two full beats: D on 1–2 and A on 3–4. Keep D sounding through beat 2, then let A begin on 3. The next bar is silent, giving you four counted beats to reset. Later, the quarter-note pair shortens each note to one beat while keeping the same order of strings.
The same logic applies in the reverse direction.

A3 to D3: the reverse crossing. Prepare gradually toward D during A3, then sound D3 on beat 3.
Davidoff’s School of Cello Playing treats string transitions before its chapter on connecting several notes in one bow. Follow that progression here: find the levels, then connect them. The slur does not tell you which direction to start the bow. That is your teacher's choice, and it may change depending on what comes before and after. What the slur does tell you is that the bow keeps traveling in one direction across the crossing. The arm level changes; the bow direction does not.
The minimal crossing: a two-note slur
After the half-note pairs, try D3–A3 as quarter notes under one slur. There is only one crossing, and it happens the moment the second note begins. Count D on 1, A on 2, then silence on 3–4. The following full rest bar gives another four beats to reset.

D3 slurred to A3: the minimal crossing. The preparation happens as D3 is being bowed. A3 arrives in the same bow stroke.
Handout 440 shows D3–A3 and A3–D3 as half-note pairs, each pair in its own slurred bar, followed by the four-quarter-note D–D–A–A bow and a rest bar. The shorter quarter-note pair above is an additional practice step in this article.
With your teacher, bow D3 and begin a small, gradual preparation toward A while D3 continues for its full written value. Let A3 begin at its written onset without reversing the bow. Ask your teacher to check that the preparation does not shorten D3 or force the wrist.
Where the crossing happens inside the bow
Now look at the four-note bow: D3, D3, A3, A3 under one slur. There are four quarter notes and one bow direction. How many string crossings are in this bar?
The answer is exactly one. The string identity changes between beat 2 and beat 3, at the boundary between the second D3 and the first A3. Beats 1 and 2 are on the D string; beats 3 and 4 are on the A string. D sounds for the first two beats and A for the last two, even while the preparation begins toward the next level.
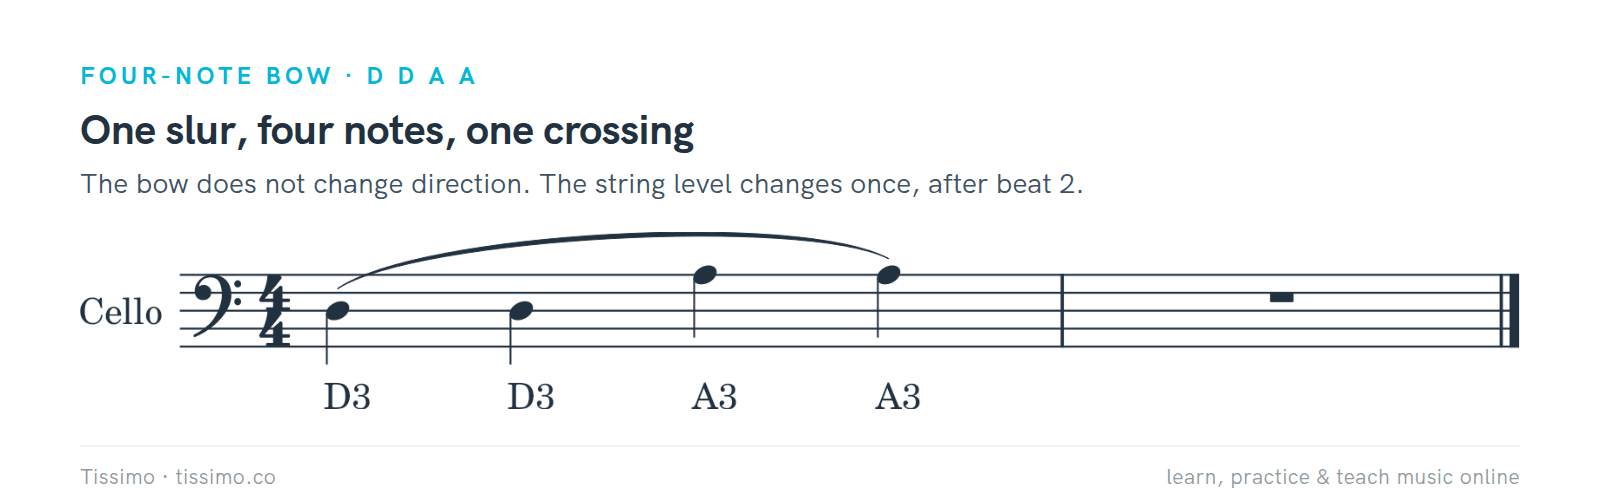
Four quarter notes under one slur: D3, D3, A3, A3. One crossing point, between beats 2 and 3. This is the pattern on Handout 440, with a rest bar to reset before repeating.
Count four separate quarter-note events. The repeated D and repeated A do not create extra string crossings. Ask your teacher to demonstrate a gentle same-direction rearticulation for the repeated notes; do not reverse the bow or replace the repeated quarters with tied notes.
Compare each note with the one before it: same string, no crossing; different string, mark a crossing. D–D–A–A has only the change from note 2 to note 3.
The crossing is halfway through this bar in time, at beat 3. That does not prescribe a fraction of the bow or a change of speed. Ask your teacher to choose a comfortable starting region and enough travel for all four notes, in either bow direction.

The crossing lives between beats 2 and 3. One slur, one bow direction, one arm-level change. The bow does not change direction; the string level does.
Prepare during the preceding note
In his CelloBello lesson, Paul Katz describes anticipating the next level with gradual motion, avoiding a sudden jerk toward the new string. For this slow exercise, use the preceding note as your preparation window. Preparing does not mean sounding A early: D must keep its full value.
While beat 2 is still sounding — while the second D3 is under the bow — prepare gradually toward A. Complete the contact change as A3 begins on beat 3. Ask your teacher to distinguish the preparation from the moment the new string actually sounds.

Prepare toward the A-string level during D3; sound A3 at its written onset. Keep the bow traveling in one direction.
Your teacher can watch the arm and tell you whether the movement is happening in time. Audio alone cannot reveal this: a recording shows whether the sound was continuous, but not whether the arm moved early. That observation is one your teacher makes in a live lesson.
Count, connect and reset
Use a slow quarter-note pulse agreed with your teacher. For the half-note pair, count 1–2 on D and 3–4 on A in one direction. Keep D sounding until A begins on 3; prepare without stealing either note’s time. Count all four beats of the following rest bar while you reset. Repeat with A on 1–2 and D on 3–4. For D–D–A–A, count one note per beat and change strings only as beat 3 starts. After each attempt, check the entry beat, both note lengths and any unintended accent.
The worksheets’ neutral piano audio checks pitches and timing, not physical bowing or cello tone. Read and count first, then use the recording to check your entries. A teacher’s cello demonstration supplies the sound and movement model.

Preparation begins during the preceding note; the new string sounds at its written onset. A–D–D–A is the two-crossing pattern introduced in 'The crossing annotated' below.
Follow one panel at a time. Say the four pitch names on the pulse, then point to the preparation lane while the current note continues. The preparation lane describes motion toward a destination; the sound lane tells you when that destination becomes audible. A preparation arrow is never an extra note or permission to shorten the preceding one.
The crossing annotated
The “↑ cross” label beneath the first A3 marks the arrival on the new string, on beat 3. The arrow marks a string change, not an instruction to lift the arm upward.

The crossing arrives at beat 3. The arm prepared during beat 2. In Exercise 134 you mark these crossing points in several different patterns of D and A.
Before playing a new cell, make a spoken plan. Name the starting string, count the notes under the slur and identify each place where the string name changes. For D–D–D–A, say “stay, stay, change” across the three boundaries. For A–D–D–A, say “change, stay, change.” These are answers about string choice; the slur separately answers the question of bow direction.
You can check the plan without moving the bow. Point to each printed note on a steady four-count pulse. On a repeated letter, keep pointing on the same string in your mental map. On a changed letter, name the new string exactly on its beat. Then repeat the count with the cello. If the spoken plan and the played entries disagree, return to the half-note pair rather than trying to repair the problem by playing faster.
The crossing position is not fixed at beat 3. It depends on the note sequence. In D3–D3–D3–A3, the crossing happens at beat 4, later in the bow.

Three D3 notes before A3: the crossing arrives at beat 4. The arm prepared during beat 3.
In A3–D3–D3–A3, there are two crossings: A3 to D3 between beats 1 and 2, arriving on beat 2, and D3 to A3 between beats 3 and 4, arriving on beat 4.

Two crossings in one bow. Start on A3, change to D3 at beat 2, then return to A3 at beat 4. Two preparations are needed: one during beat 1 and one during beat 3.
Exercise 134 asks you to mark string-change boundaries in four different note cells. It also gives two cells with deliberately incorrect crossing markers and asks you to find the repair. Compare the pitches on both sides of each marker before playing; a repeated pitch stays on the same open string.
Listen for continuity
After a few attempts, step back and just listen. A clean crossing sounds like one continuous note flow: D3 rings, and A3 follows without interruption. You should not hear a click, an accent or a moment of silence between them.

What to listen for. The goal is continuity: D3 and A3 at the same volume, no unintended gap and no accent.
An accent may come from a late or abrupt crossing, or from a change in bow speed or weight. A gap may mean the bow stopped or lost contact. Ask your teacher to watch one change while you listen, then adjust one cause at a time.
Keep the listening check specific. For the half-note D–A pair, ask whether D lasted through count 2 and A began on count 3. An early A shortens D even if the transition sounds smooth; a late A can disturb the pulse even if both pitches are recognizable. On the reverse half-note pair, apply exactly the same check to A’s duration and D’s entry. For the quarter-note pair, D begins on 1 and A on 2. Smoothness and accurate timing are separate things to listen for.
For repeated-quarter patterns, also check that you can hear all four events. The gentle pulses your teacher demonstrates should make the printed rhythm clear without adding extra string changes. If you hear only one sustained D followed by one sustained A, revisit the repeated-note articulation before combining it with the crossing.
Your teacher can identify excess arm motion that the sound does not yet reveal. A common pattern in early crossings is a larger arm swing than necessary; two adjacent strings need much less movement than beginners expect. Ask your teacher to watch one slow run-through and tell you whether the arm is moving too much, too little, or at the wrong moment.
Slow practice is your tool. Set a metronome at a tempo where you can count every note and hear the connection. Increase the tempo only while the rhythm and connection stay clear. Faster passages may need a different preparation and balance of arm, hand and finger motion; ask your teacher to adapt the movement.
Free worksheets for this lesson
- D to A: Change the String Level — a bridge schematic, one-bar half-note slurs in both directions, a four-quarter-note D–D–A–A bow followed by a rest bar, and a crossing-boundary mini-task
- Find the Crossing Inside the Bow — the companion exercise: mark string-change boundaries in four note patterns, correct two deliberately wrong markers, and perform two two-bar cells while your teacher observes
- The Bass Clef & Grand Staff — bass clef line and space names, with memory tricks and exercises
- Ties vs. Slurs — piano examples distinguish a sustained tie from smoothly connected notes under a slur
- The Half Note — the hollow notehead and how to hold through two beats, useful when practicing the half-note crossing pairs
A cello teacher can watch the crossing in a live lesson, set the arm level for your instrument, and tell you exactly when the preparation needs to start. If you are studying on your own or want a second opinion, find a cello teacher at Tissimo.
Sources
- Legato String Crossings — Paul Katz, CelloBello
- Cello Basics 17: String Crossings — Ailbhe McDonagh
- String Crossing Technique — Jamie Fiste
- Cello — Vienna Symphonic Library
- SVC110 Owner’s Manual — Yamaha
- School of Cello Playing — Carl Davidoff, translated by Miranda Wilson
- Bass Clef & Grand Staff — Tissimo worksheet
- Ties vs. Slurs — Tissimo worksheet
Read this article online: https://tissimo.co/articles/cello-open-string-crossings-one-bow



Comments