 Back

Sight-Reading for Guitarists: A Practical Plan
A pianist who sees a note on the staff knows exactly which key to press. A guitarist who sees the C in the third space of the treble staff has at least four places to play it, and the page rarely says which one. That single fact explains a lot of why guitarists read music slowly, or avoid reading at all. This plan fixes the problem in the order that works: learn the notes in one small area of the neck, read rhythm separately, then widen to positions, tab and chord charts, with a ten-minute drill to hold it together. If you want the piano contrast first, see how to sight-read piano music; most of what good piano readers do carries over, but the location problem is one pianists never face.
Why guitarists struggle: one note, many places
On the piano every pitch has one key. On the guitar, standard tuning is a series of ascending fourths with one major third between the G and B strings, so the same pitch turns up on several strings. Middle C (the pitch, which guitar music writes in the third space; see below), for example, is string 2 fret 1, string 3 fret 5, string 4 fret 10 and string 5 fret 15, and a guitar with 20 or more frets adds string 6 fret 20.

Four places for one pitch within the first 15 frets. Each sounds middle C (C4), written as the third-space C on a guitar part; the staff does not say which to choose.
A staff note gives pitch and duration, not location. A guitar teaching article from Yamaha puts it plainly: in standard notation the music can often be played in more than one fretboard location, which can be confusing. So a guitarist reading at sight has three jobs where a pianist has one: identify the note, choose where to play it, and keep the rhythm going while doing both.
The fix is to remove choices until reading is automatic. You decide in advance where your hand lives, which is what the rest of this plan does.
There is a second difference. A pianist reads two staves and sees both hands on the page; a guitarist usually reads one line and sometimes a chord symbol above it, and the instrument itself hides the answer: a fretboard has no labels. Expect the first weeks to feel slower than your playing by ear. That gap is normal and it closes with small, regular reading.
Learn the notes in first position
Start in first position: the open strings plus frets 1 to 4, one finger per fret. All the natural notes fit within frets 0 to 3. Before the notes, one fact about the page: guitar music is written an octave above the pitch you hear. That is why the open low E string appears as E3 on the staff but sounds E2. Wikipedia's article on transposing instruments lists the guitar among instruments that sound an octave lower than written, and the Tissimo guitar sheet uses the same convention.
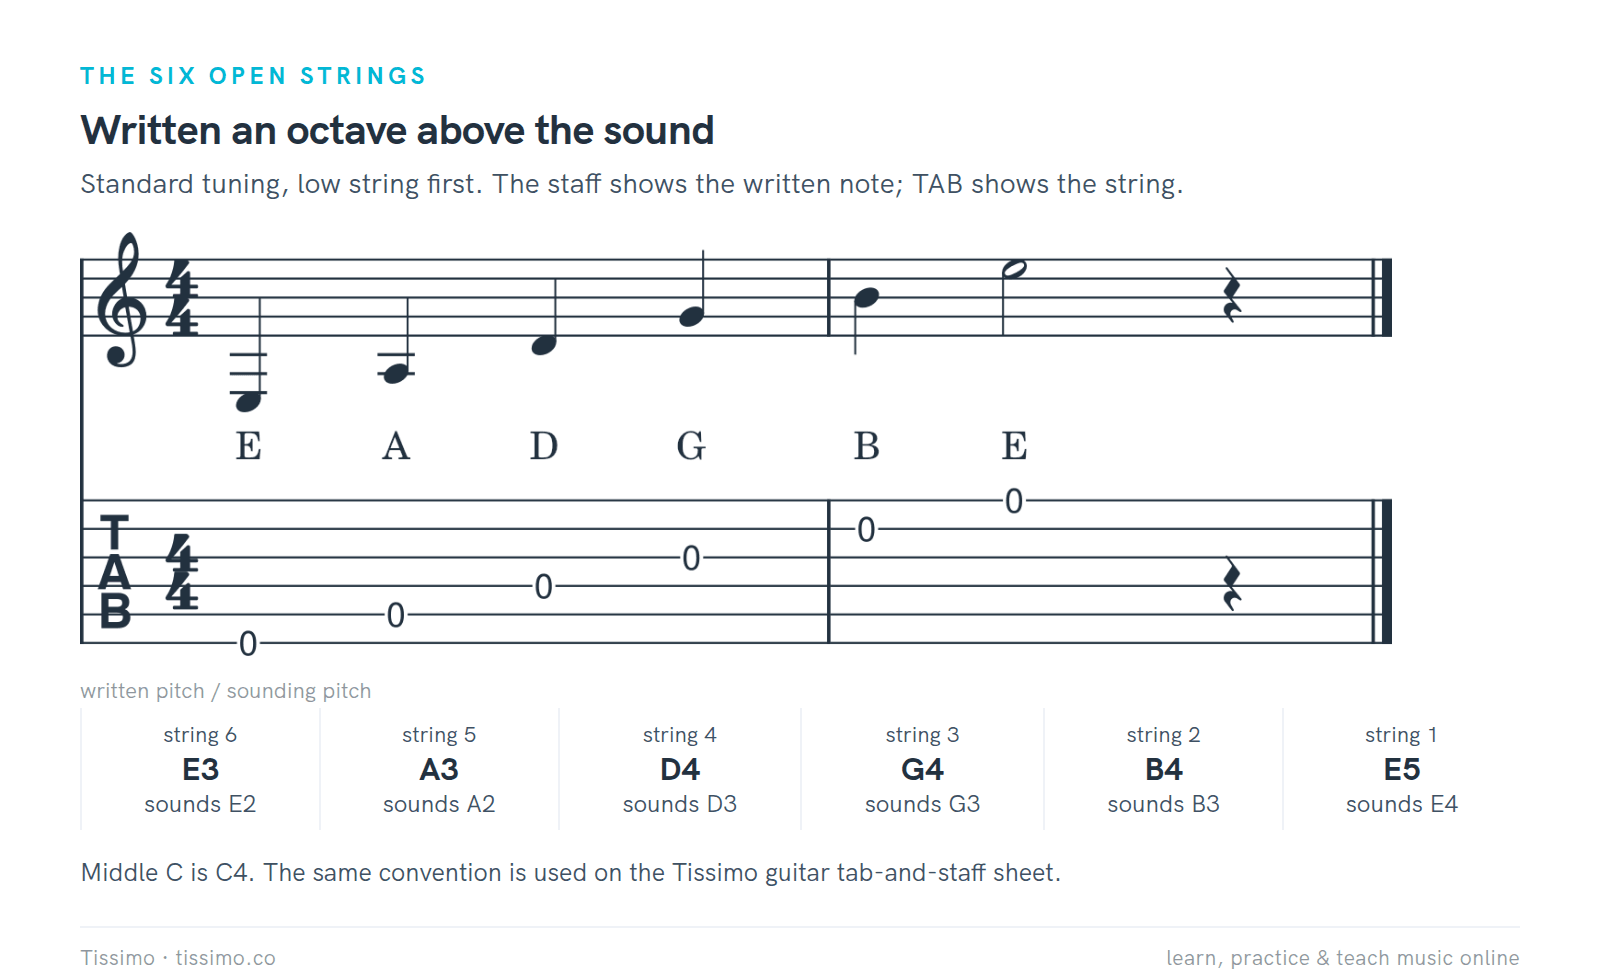
The six open strings. Written pitches E3 A3 D4 G4 B4 E5; sounding E2 A2 D3 G3 B3 E4. The low E sits well below the staff, on ledger lines.
You do not have to convert in your head. Treat the written note as the address and read it the way a flute or violin player would; the octave shift is built into the instrument. Some editions make this explicit with a small 8 under the treble clef; the notes read the same either way. The octave shift only matters when you compare the staff with a piano or a tuner. The worksheet One Guitar Phrase, Two Notations shows the string table and a short phrase in both staff and tab, with the sounding and written names side by side.
Now the map. Every natural note (no sharps or flats) from the open low E up to the G on the high string fits within frets 0 to 3:

All seventeen natural notes in first position, played one string at a time. Letter names sit under the staff.
Learn them in clusters instead of one at a time. The rule for the gaps never changes, only the open string you start from: E to F and B to C are one fret apart, and every other neighboring pair of natural notes is two frets apart. Start from the open-string name, apply the rule, and you can find any note in first position.
The low strings are the hard part because they live on ledger lines. The Ledger Lines sheet covers the first ledger lines below the staff (the pattern continues the same way down to the open low E), and The Staff & the Treble Clef covers the staff side. If you want the fretboard side as a separate project, see how to memorize the guitar fretboard.
For the link between the two, TAB Detective asks you to name the note at a given string and fret and to write tab digits under staff notes, which is exactly the lookup you are training.
A word on accidentals. When the key signature has a sharp, it applies to every note of that letter. In G major, every F is F♯: on the high string that is fret 2 (E plus two frets), on the low string also fret 2; on string 4 it is fret 4, the little finger. Add it as Level 4, once the natural notes are fast, so you are not learning the staff and the sharps at the same time.
Read the rhythm first
Many reading breakdowns are not wrong notes but stops. A wrong note passes in a flash, while a hesitation breaks the rhythm. Wikipedia's article on sight reading lists the ability to keep the basic pulse and read rhythm among the skills involved, and Tissimo's Sight-Reading: Set 1 gives the same advice: the beat is sacred and wrong notes are forgiven instantly. (The sets are written for piano, but the rules apply as they are.)
So separate the two problems. Level 1 is rhythm alone, on a single line with no pitches. Count aloud, tap or strum on muted strings, and say the count before you play.

Four bars, counted: 1 2 3 4 | 1 2 & 3 4 | 1 (2) & 3 4 | 1 (2) 3 - 4. In bar 3 the eighth note lands on the "and" of 2; in bar 4 the half note starts on 3 and rings through 4.
Notice what each bar asks. Bar 3 holds the first note through beat 2, because the dot adds half a beat, so the eighth note starts on the "and". Bar 4 has a silent beat 2, and your count must keep running through it. If you have never written counts under notes, Write the Counts is the right drill: write the count first, clap second, play third. For a complete tour of values, rests and syncopation, see how to count rhythm in music, and use a metronome to keep the pulse honest.
When the rhythm is solid, add pitches without changing it.

Level 2: the identical rhythm, now as a melody in first position on strings 1 and 2 (E D C D | E E F G E | G E D C | D, rest, C).
Because the rhythm is already familiar, your attention is free for string and fret. Level 3 is the same idea across all six strings in first position, including the low notes on ledger lines. When both are shaky at once, the answer is nearly always to go back down a level.
Position playing: let the hand stay put
Once first position is solid, the next step is a hand that does not wander. Guitarists usually name a position by the fret under the index finger, written with a Roman numeral. In passage work each finger covers one fret, so a position spans four frets, and three positions (frets 1 to 4, 5 to 8 and 9 to 12), together with the open strings, cover twelve frets on each string.

Three positions covering the first twelve frets. A position is named for the fret under your first finger.
Why does this help reading? Because it reduces the choice from four locations to one. If the passage lies within frets 5 to 8, every note has exactly one string and fret in fifth position, so reading becomes a lookup. The rule for choosing a position before you start: scan the whole phrase for its lowest and highest fretted notes and pick the position that holds them all. If nothing fits, mark where you will shift.
When you must choose a spot for a note at sight, four habits save time:
- Stay in the position you are in until the music forces you out.
- Prefer the string that keeps the next few notes in the same position.
- Shift on a rest, a long note or a repeated note, not in the middle of a run.
- Read the notes before the tab. Look at the fret numbers only to confirm.
Here is a practical example: one octave of C major, entirely inside fifth position.

Level 5: one octave of C major, written C5 to C6 (sounding C4 to C5), up and back without a shift. Fingers 1, 2, 3 and 4 take frets 5, 6, 7 and 8.
Play the same notes in first position and you must leave the position near the top of the scale, because the A, B and C above the G sit at frets 5, 7 and 8 on string 1. Neither version is better; the point is that you now choose on purpose. The Movable Major Scale Shape handout gives a two-octave shape you can slide to any key, and Fret Check: The Major Scale Shape tests whether you can find the degrees and move the shape. If you want a larger map of how shapes connect up the neck, see the CAGED system explained.
Tab as a bridge, not a crutch
Tablature answers the question staff notation leaves open: where. Its six lines are the six strings, with the high E on top in the usual layout, and the numbers are frets. Wikipedia notes that tab is not standardized; some writers put the low string on top, so check the legend. Yamaha's guide notes that tab is usually written below the standard notation so that bar lines, measures and rhythmic figures line up.
The weakness is rhythm. Plain tab gives you the order of notes and their positions, but not how long each lasts, unless the publisher adds stems or note-length marks above the lines.

The same riff twice. In the upper line the nine notes are engraved evenly, because plain tab gives no durations. The lower line adds them on the staff.
That makes tab a good bridge. Read the staff for pitch and duration, then glance at the tab to check where the note lives. Over time you glance less. The first goal is not to leave tab behind, but to stop needing it for rhythm. For the mechanics, see how to read guitar tabs and read guitar tab with rhythm.
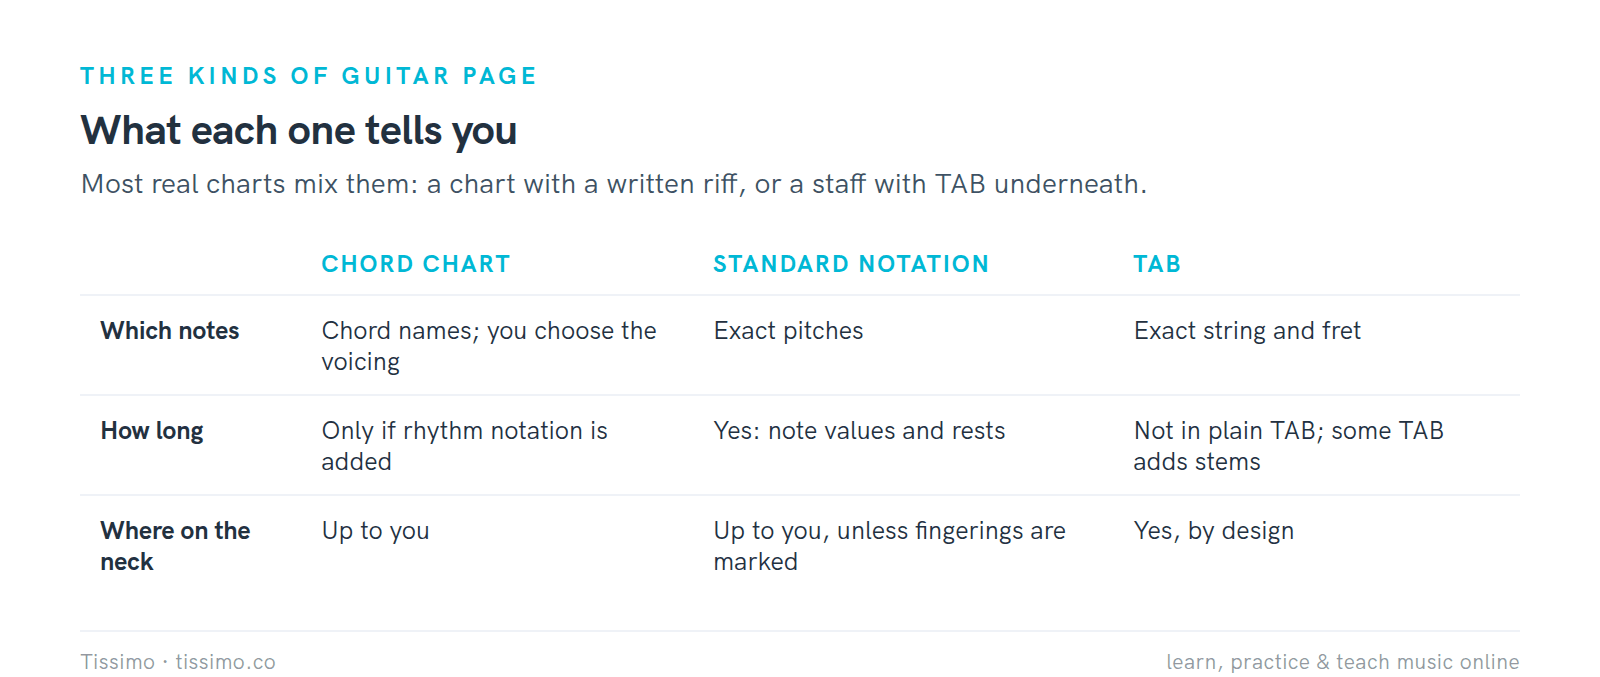
What each kind of page tells you. Many real charts combine them.
Chord charts versus standard notation
A chord chart is the most common notation for session musicians in jazz and popular music, according to Wikipedia. It gives the harmony and form but leaves the exact voicing to you. Chord names sit above the staff and the rhythm is shown in one of two ways: slash notation, one slash per beat, which leaves the strum or comping rhythm to you, or rhythmic notation, where the slashes carry the actual rhythm.

Four bars of G, Em, C and D as a slash chart (top), where the strum pattern is up to you, and one written-out realization with open-position voicings (bottom). The chart does not say which notes or strings.
The reading skill here is different. With a chart you read ahead for the next chord, not the next note. Practice the looking-ahead habit on Change on the Count, where you write the next chord for each bar before you play it, and map the finger movements on Em, Am and C. For melody plus chords on one page, see how to read a lead sheet, and for chord diagrams see how to read guitar chord diagrams.
An eye-tracking experiment described in Wikipedia's sight reading article indicates that highly skilled musicians tend to look further ahead of what they are playing, a distance called the eye-hand span. You do not need to measure it. Just keep your eyes one beat, then one bar, ahead of your hands, which is what the chord-chart sheet trains.
A daily graded drill
Reading improves with short daily sessions on new material, not with replaying the same page. Here is a ten-minute plan built on the levels above. Good sources of new material: beginner guitar method books and graded reading books; single-line treble-clef melodies written for violin, flute or recorder, which sit in a similar written range; and the next unread example in any method you already own.

Ten minutes: 2 + 2 + 3 + 2 + 1. The reading step is the only one where you do not stop.
- Rhythm first (2 minutes). Tap or strum the rhythm of the four bars you are about to read, on muted strings, counting aloud.
- Name and locate (2 minutes). Pick six notes from the page. Say the letter, then the string and fret, before you play.
- Read once (3 minutes). Count one bar in, then play four bars straight through without stopping.
- Fix the worst bar (2 minutes). Slow, three clean times in a row. This is practice, not sight-reading.
- Rate it (1 minute). Clean, survived or train wreck, written down.
Use the ladder to choose material. Stay on a level until three new pieces in a row read cleanly, counting, without stopping, then move up.

The six levels used in this article. Move up after three clean first reads of new pieces in a row.
Three habits make the drill work. Keep your eyes on the page, not on your fretting hand, because looking down loses the next bar. Count one bar in before you start, so the pulse is running before the first note. And write the rating down: a week of "survived" and "clean" results shows progress that day-to-day feeling hides.
Never read the same piece twice in a row; the second pass is practice. A good rule of thumb for new material is a line you have never seen, at a tempo where the rhythm never breaks. If it breaks, it is too hard: drop a level.
Free worksheets for this lesson
- One Guitar Phrase, Two Notations — string table, sounding versus written pitch, and one phrase in staff and tab
- TAB Detective — name the note at a string and fret and write the missing tab digits
- Sight-Reading: Set 1 — four short pieces to read once, without stopping (written for piano; the rules carry over)
- Ledger Lines — the notes above and below the staff
- The Staff & the Treble Clef — lines, spaces and the G clef
- Write the Counts — write the count under each note, then clap
- The Movable Major Scale Shape — one fret pattern for a major scale in any key
- Fret Check: The Major Scale Shape — name degrees and move the shape
- Change on the Count — look one bar ahead through Em, Am and C
- Em, Am and C: Map the Change — check each string and track each finger
Where to go next
Reading is a skill your eyes and hands learn together, and it moves faster when someone watches both. A Tissimo guitar teacher can hear where your count slips, see where your hand hesitates and choose material at the right level in a live lesson. You can book a lesson when you want that feedback.
Sources
Read this article online: https://tissimo.co/articles/sight-reading-for-guitarists-a-practical-plan



Comments