 Back

Classical Guitar for Beginners: Posture, Nails and First Pieces
A classical guitar asks for a little more setup than a strummed steel-string guitar. You sit a particular way, pluck single strings with named fingers, and read music from a staff rather than from tab. None of it is complicated, but the order matters. This guide takes you from the chair to your first pieces, ending with the opening of a lesson Fernando Sor published in the 1830s.
What makes the classical guitar different
The classical guitar has nylon strings rather than steel, and nylon strings pull with much lower tension. The three thinnest strings are plain nylon; the three bass strings are nylon wound with metal. The neck is wide, too wide for the fretting-hand thumb to fret notes comfortably, so normal technique keeps that thumb behind the neck. If you are still choosing an instrument, Choosing the Right Guitar for Beginners compares nylon, steel and electric guitars with real measurements.
The music is different as well. Much of the classical guitar repertoire is solo music, where one player covers melody and accompaniment, so you play with the thumb and fingers rather than a pick. And the repertoire is written mostly in standard notation. Tab works for simple pieces, but sooner or later you will need the staff, so this guide starts you on it in the first week.
Sit in the classical position
Classical guitarists normally play seated. The usual arrangement puts the guitar on the left thigh with the left foot raised on a footstool. The alternative is a guitar support, a small device that usually attaches to the side of the guitar and rests on the left thigh, so both feet stay flat on the floor. Both are standard; choose with your teacher. Everything here assumes a right-handed guitar; on a left-handed instrument, mirror it.

Two ways to raise the guitar: a footstool under the left foot, or a support on the guitar. In both, the neck rises at roughly 45 degrees and the headstock sits near eye level. The numbered dots are where the guitar touches you. Shapes are simplified.
Sit toward the front edge of the chair, tall but not stiff, with both shoulders level. Adjust the footstool or support until the headstock (the tuning-key end) is near eye level. Bradford Werner's sitting-position lesson suggests an angle of about 45 degrees or steeper, with the face of the guitar (its soundboard) close to upright rather than tipped back toward you. He lists four contact points: lightly on the chest, the right forearm, the right thigh and the left thigh. Yamaha's guide gives the same picture: sit forward, left foot on the footstool, tuning keys at eye level.
Treat these as starting points: Werner stresses that bodies differ, and a teacher can see in seconds what a mirror hides. One habit to avoid from day one is tipping the guitar back so you can see the whole fingerboard (also called the fretboard). From your seat you can still see the top edges of the frets, which is enough to find your place.

A thirty-second check to run at the start of every session. If anything aches, stop and ask your teacher to look at your setup rather than playing through it.
The right hand: p, i, m, a and two strokes
Classical guitar music names the plucking fingers with letters from their Spanish names: p (pulgar) for the thumb, i (índice) for the index finger, m (medio) for the middle finger and a (anular) for the ring finger. The little finger, c, appears rarely. The fretting fingers get numbers instead, 1 to 4 from index to little finger, and 0 means an open string. Classical Guitar Corner's finger-name guide lays out both systems.

Letters for the plucking hand, numbers for the fretting hand. The drawing names fingers only; your teacher shows you the hand shape.
Let your right forearm rest on the edge of the guitar, about a third of the way from the elbow to the wrist, so the hand can hover over the strings near the soundhole. Werner's right-hand lesson describes curved fingers that move in toward the palm, then relax back to their starting place after each pluck, with no tension held.
Every finger pluck ends in one of two ways. A free stroke, also called tirando, clears the neighboring string. A rest stroke, also called apoyando, lands on it. For i, m and a, that neighbor is the next string toward the bass: pluck string 1 and the finger comes to rest on string 2; pluck string 2 and it rests on string 3. Classical Guitar Corner's fundamentals page calls the free stroke by far the most common movement and notes that players use the rest stroke's strong sound to bring out melodies. Both are worth learning; your teacher will demonstrate them and choose which comes first.
Try both on the open first string. Rest the tip of i on string 1 near the soundhole and pluck by moving the finger in toward your palm so that it passes just above string 2: a free stroke. Pluck again and let the fingertip come to rest against string 2: a rest stroke. Repeat with m. The thumb, p, usually takes the three bass strings, and a joins in for arpeggios; the pieces in this guide need only i and m.
How do you choose? Look at the string your finger would land on. If it carries a note that must keep ringing, a rest stroke would land on it and cut it short.

In bar 1 the E stands alone, so either stroke can work. In bar 2 the open B rings for four beats under two plucked E's: a free stroke on each E keeps the B ringing. Start the B with the finger your teacher chooses; it is outside the i–m count, which continues across the barline on the E's.
Two companion lessons take each skill further. Classical Guitar Free and Rest Strokes works through this exact choice with the handout Where Does the Finger Finish? and the exercise Keep the Neighbor Ringing. Keep i–m Alternation Across Barlines and Rests covers the other basic right-hand habit, alternating i and m at every new pluck. If you also want arpeggio patterns with the thumb, Fingerpicking for Beginners is the next step; it also explains planting, placing the fingers on their strings before the first note.
Nails or flesh? Decide with your teacher
Most classical guitarists today play with fingernails on the plucking hand. According to Classical Guitar Corner's article on playing without nails, nails make speed, clarity, volume and tonal contrast a little easier. The same article points out that playing with the fingertips alone is a long tradition and still a valid choice: it gives a warmer sound and saves the time that nail care takes, though speed and volume need more work. Fernando Sor, whose study you will meet below, played without nails on his plucking hand; Wikipedia's biography notes this too.

Two valid ways to pluck. There is no single correct nail shape or length: it depends on your hands, your strings and the sound you want.
If you do grow nails, the shape and length are personal. Players who use nails rarely pluck with the nail alone: Werner recommends that the flesh and the nail touch the string at the same time. His fingernail lesson says it shows only how he files his own, and observes that beginners' nails are often too long at first, which makes rest strokes and an arched hand position harder. So do not grow or shape anything yet: short nails and the fingertips are a simple way to start, and your teacher can help you decide later.
The left hand: thumb behind, fingertips near the fret
Your left thumb rests behind the neck and supports the fingers from there; it does not wrap over the top. Press with the tips of curved fingers, just behind the fret, with the finger coming down roughly perpendicular to the fingerboard. Yamaha and Werner's left-hand lesson both give these points; Werner adds a straight wrist and a thumb placed roughly behind the second finger.
For the first notes you will use first position: finger 1 plays fret 1, finger 2 plays fret 2, finger 3 plays fret 3 and finger 4 plays fret 4. The eight notes below need only fingers 1 to 3. Classical Guitar Corner's reading guide calls this the one-finger-per-fret rule and adds that the rule is quickly broken once you play more than one note at a time.

Every natural note in first position, frets 0 to 3, as sounding pitches. The highlighted notes on strings 1 to 3 are the eight you will read first. E to F and B to C are one fret apart; other neighboring letters are two frets apart.
One small habit makes a big difference, and Sor himself pointed it out. In the note printed above the first lesson of his Op. 60 (in the Frankfurt edition used below), he says the first six lessons are only for practicing where each note is found. But if you follow the fingering and leave a placed finger down until it is needed elsewhere, or until its string must sound a lower note or ring open, you will, in our translation, "without noticing it, acquire the habit of placing the left hand well."
Read notation, not just tab
Guitar music uses the ordinary treble clef, with one twist: the guitar sounds an octave lower than written. Yamaha's tuning page says guitar notes are usually shown one octave higher than the actual note, and Classical Guitar Corner adds that the technically correct clef has a small 8 under it, often left out. It changes nothing about how you read the lines and spaces; it only tells you that the sound is an octave lower.
The six open strings, from lowest to highest, sound E2, A2, D3, G3, B3 and E4 in standard tuning, as listed on Wikipedia's standard tuning page. Tune to these pitches before every session. A clip-on tuner or a tuner app is enough: the same Yamaha page says guitars must be tuned before they are played and notes that guitarists now usually use a tuner. New nylon strings "will stretch greatly," as Guitar World's restringing guide puts it, so expect to retune often at first.
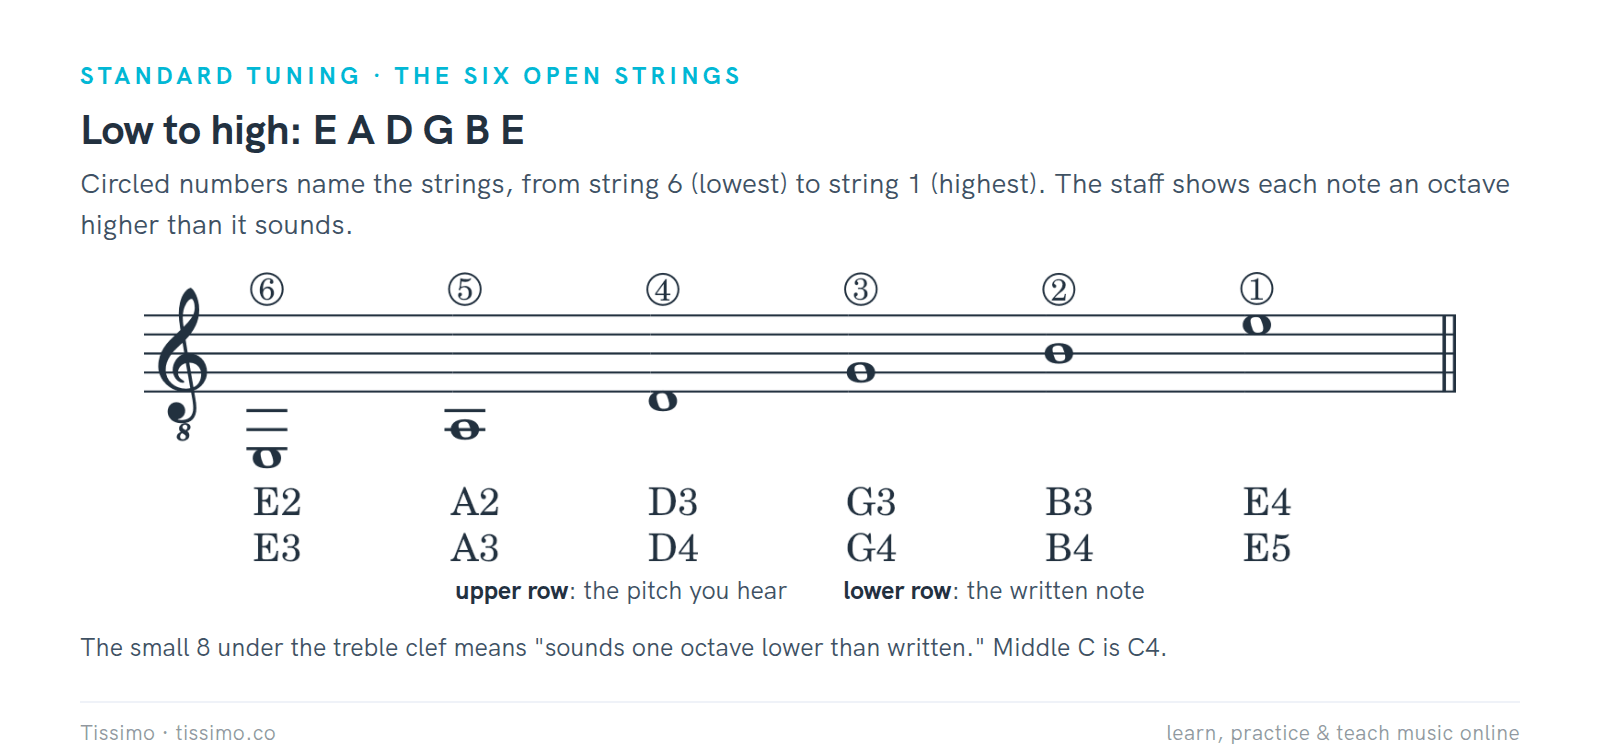
The six open strings. Low E hangs below three ledger lines and the high E sits in the top space. Each note is written an octave above the pitch you hear, which is why the labels differ by one octave number.
That octave matters when you compare guitar music with music for another instrument. Middle C (C4) is string 2, fret 1. On the guitar staff it sits in the third space; on a piano's treble staff the same pitch sits on a ledger line below the staff.

Same sound, two addresses. On the guitar staff, middle C is written C5 in the third space; on a piano or flute staff, it is C4 on the first ledger line below.
If the staff is new to you, start with The Staff & the Treble Clef and our general guide, How to Read Sheet Music. Ledger Lines helps with the notes below the staff. Like The Staff & the Treble Clef, it is written for piano, so the C on its first ledger line is, on the guitar, string 5, fret 3, an octave below middle C. Then read your first eight guitar notes, all on strings 1 to 3 and all in first position:
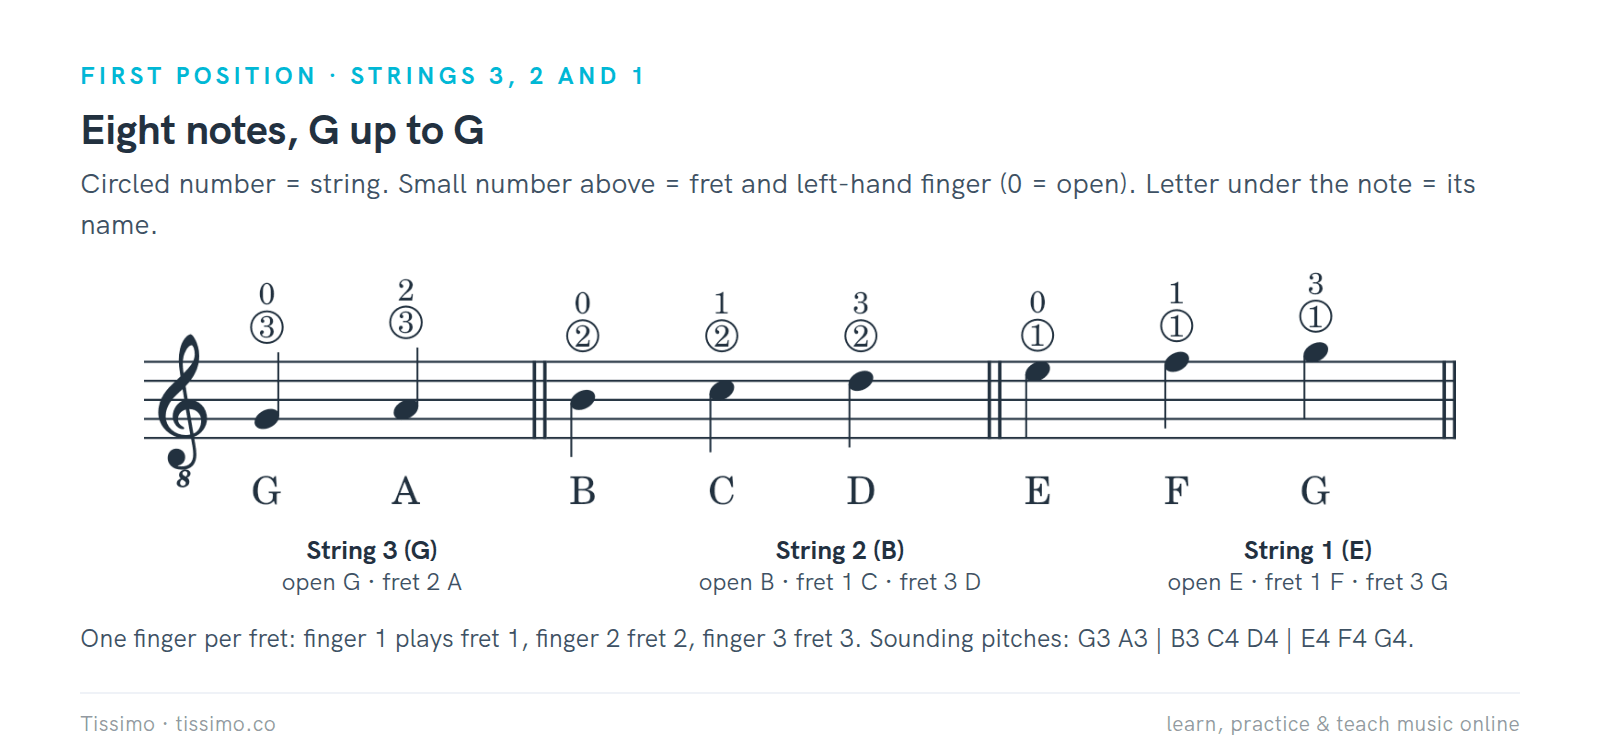
Eight notes, G up to G. Strings 3, 2 and 1 give you G A, B C D and E F G. The small number above each note is both the fret and the left-hand finger.
The eight written notes fill the treble staff from line 2 to just above line 5. One Guitar Phrase, Two Notations shows the same phrase in tab and on the staff, with a table of open strings, sounding and written. TAB Detective has you name the sound of eight string-and-fret positions on strings 1 to 3, and How to Read Guitar Tabs explains the tab side if you meet it in other music.

Reading check. Answers: 1 C (string 2, fret 1), 2 E (string 1, open), 3 G (string 3, open), 4 D (string 2, fret 3), 5 F (string 1, fret 1), 6 A (string 3, fret 2), 7 B (string 2, open), 8 G (string 1, fret 3).
Say each name before you play it. For faster recognition, Name the notes: treble clef gives you 25 notes on or near the treble staff to name. Later, How to Memorize the Guitar Fretboard extends the map to the whole neck.
Your first pieces
Study 1: open strings, i and m
The first study, written for this guide, uses only the two highest open strings, so your left hand rests while you set up the right. Begin with i and alternate i and m at every new pluck. A rest takes no turn, and a barline does not reset the count. A metronome at 60 beats per minute, the tempo the two worksheets below use, is a comfortable start.
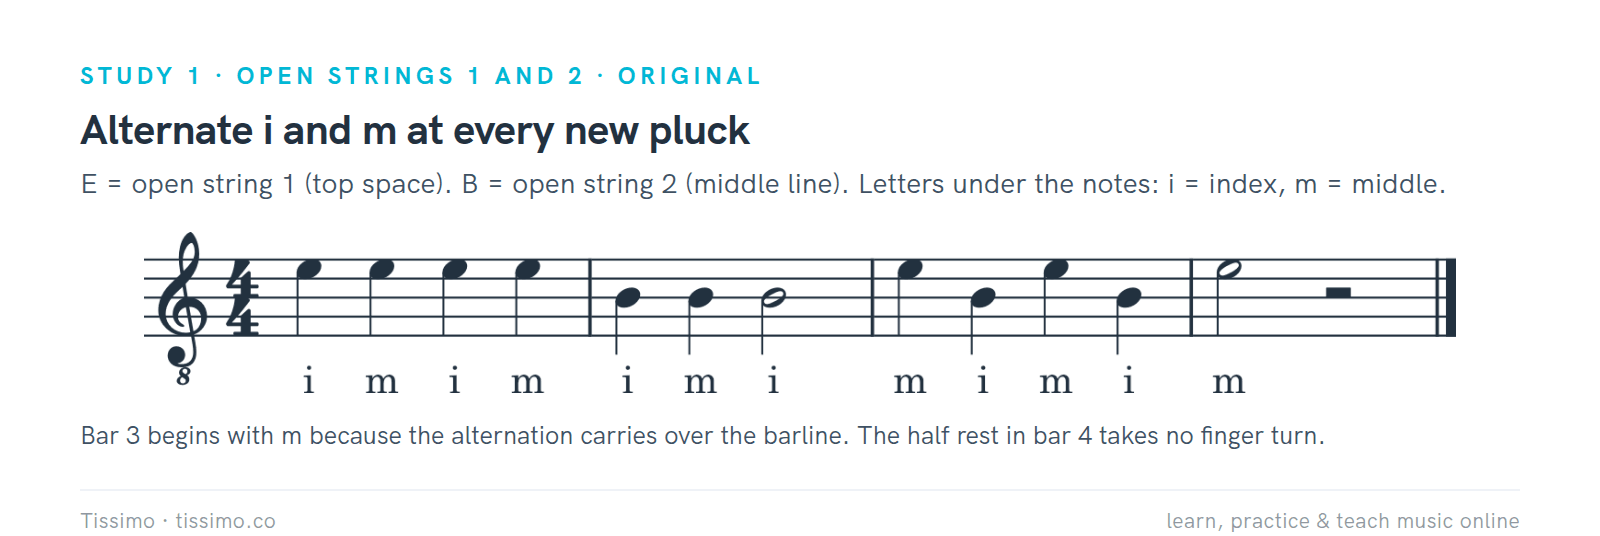
Study 1. Bar 2 has three plucks, so bar 3 begins with m. Count "1, 2, 3, 4" aloud and hold each half note for two full beats. To make the half rest in bar 4 silent, touch string 1 lightly: an open string rings until you stop it.
With only one string sounding at a time, either stroke fits. Alternate the Plucks, Not the Beats has two similar cells, and Which Finger Plucks Next? adds blanks to fill and labels to repair. For counting, The quarter note, The half note and The whole note cover the three note values in these two studies, and The Rests the half rest.
Study 2: first position on strings 1 to 3
The second study, also original, uses all eight notes from the map. Read the note names aloud once before you play.
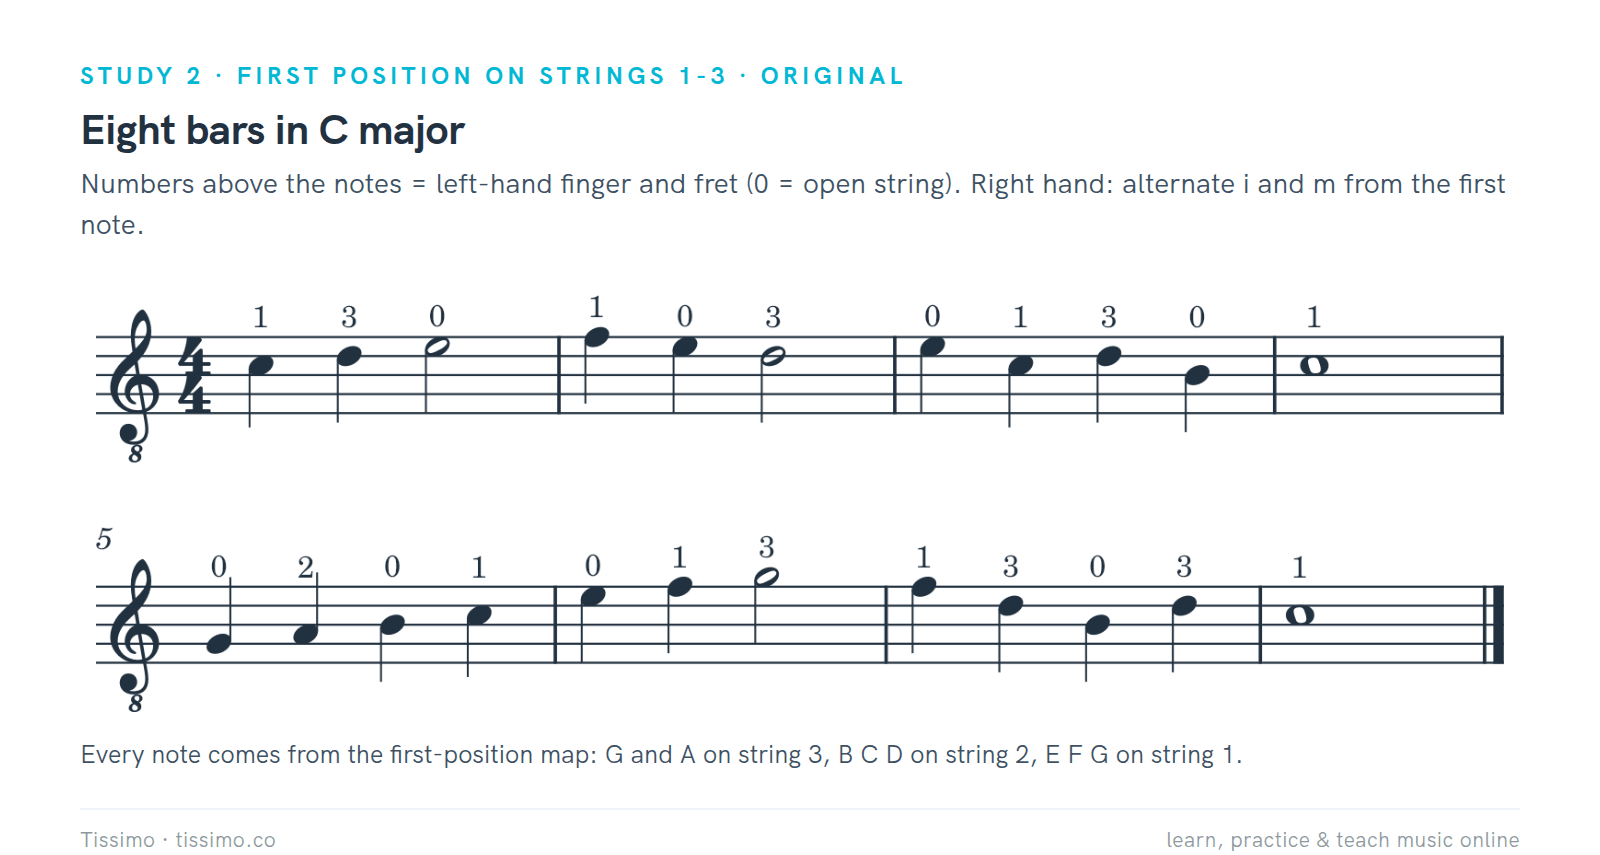
Study 2. Every fretted note follows one finger per fret, so finger 3 always plays fret 3 here. Try Sor's advice in bar 1: finger 1 can stay on C while finger 3 plays D, and both can stay down through the open E. In bar 2, finger 1 is needed for F, so it moves.
Sor, Op. 60, No. 1: the opening
Fernando Sor (1778–1839), a Spanish guitarist and composer, wrote several sets of studies for students. His Introduction à l'étude de la guitare, Op. 60, a set of 25 progressive lessons, was first published in 1836–37, according to IMSLP. Lesson 1 is mostly a single melody line, and its first four bars use only notes from the eight you have just learned.

Sor, Op. 60, No. 1, bars 1–4, from the Frankfurt edition published by Fr. Ph. Dunst (plate D. 543) and checked note for note against the Mutopia Project edition. Fingerings are left out here.
Read it slowly, with i and m alternating. Bars 1 and 2 are identical; bar 3 climbs C, D, E, G and bar 4 comes back down F, E, D and then drops to the open G on string 3. The full lesson continues for four more bars and repeats, and then a second half follows. Bars 7 and 8 reach the open D on string 4, an F♯ on string 1 (fret 2), a three-note chord and a low G on string 6 (fret 3), so take them with your teacher. Sor's own fingerings sometimes differ from one finger per fret: both editions mark the D in bar 4 with finger 4, not 3. Fingerings are choices, and this one makes a good first conversation about fingering with your teacher.
A plan for the first month
Classical Guitar Corner says that fifteen- to thirty-minute sessions every day will improve your playing faster than one or two long sessions a week (an hour a day is its ideal), and it puts technique ahead of repertoire. This plan follows that advice and adds one new step per week in each area. It starts with the free stroke because that is the more common movement; if your teacher starts with the rest stroke, swap the right-hand steps of weeks 1 and 2.

Move on when a step feels easy and relaxed, not on a fixed date. Your teacher may reorder the steps or slow them down.
Free worksheets for this guide
- The Staff & the Treble Clef — five lines, four spaces and the G clef that names them
- Name the notes: treble clef — 25 notes on or near the treble staff to name
- Ledger Lines — notes above and below the staff, with C anchors
- One Guitar Phrase, Two Notations — tab and staff aligned, with sounding and written pitches for every open string
- TAB Detective — name the sounding note for a string and fret, then match rhythms
- Where Does the Finger Finish? — free stroke and rest stroke on the open E, with B ringing below
- Keep the Neighbor Ringing — decide when B must keep sounding and which stroke protects it
- Alternate the Plucks, Not the Beats — i and m counted by pluck across barlines and rests
- Which Finger Plucks Next? — fill and repair i/m labels, then a four-bar open-string reading
- The quarter note, The half note and The whole note — the three note values in these studies
- The Rests — quarter, half and whole rests, and how to count through them
Where a teacher helps most
Several of the common beginner mistakes that Classical Guitar Corner lists, such as poor hand positions, repeated fingers instead of alternation and lifted fingers, are hard to see on yourself. So are a guitar tipped back, a raised shoulder or a finger that lands on the string it should clear. A Tissimo guitar teacher can check your seat, your strokes and your nails in a live lesson and choose your next pieces with you. You can book a lesson whenever you want that feedback.
Sources
- Classical guitar — Wikipedia
- How to Play the Classical Guitar: The basic position — Yamaha
- How to Play the Classical Guitar: First tune the guitar — Yamaha
- Beginner Classical Guitar Lessons (The Fundamentals) — Classical Guitar Corner
- How to Read Guitar Sheet Music — Classical Guitar Corner
- Guitar Finger Numbers — Classical Guitar Corner
- Can I Play Classical Guitar without Nails? — Classical Guitar Corner
- Sitting and Guitar Position for Classical Guitar — Bradford Werner, This is Classical Guitar
- Right Hand Position and Technique — Bradford Werner, This is Classical Guitar
- Left Hand Technique for Classical Guitar — Bradford Werner, This is Classical Guitar
- Fernando Sor — Wikipedia
- Introduction à l'étude de la guitare, Op. 60 (Sor) — IMSLP
- 25 Leçons Progressives, No. 1 (Sor, Op. 60) — Mutopia Project
- Fingernail Lesson for Classical Guitar — Bradford Werner, This is Classical Guitar
- Standard tuning — Wikipedia
- How to Restring a Classical Guitar — Guitar World
Read this article online: https://tissimo.co/articles/classical-guitar-for-beginners-posture-nails-and-first-pieces



Comments