 Back

Two-Mallet Marimba: Give Both Notes One Start
C4 and E4 can be the right notes and still make the wrong beginning. If the contacts are far enough apart to hear separately, you hear one note followed by the other; either the lower or the upper note can arrive first. Your task is to find both bars, prepare both hands, and give the two pitches one shared start.
This lesson uses two mallets total: one in each hand, with comfortable single strikes already established by your teacher. Begin with C4 in the left hand and E4 in the right. C4 means middle C. Your teacher can move both notes up or down by the same octave to choose a comfortable register. The written examples below stay at C4/E4 and the other printed pairs.
The printable Two Bars, One Start supplies four pairs and room to prepare between them. Work through the steps here before trying its whole line. Success means two correct targets beginning together, with a comfortable stroke and a clear plan for what comes next.
1. Read two pitches as one event
Two noteheads stacked on one stem tell you to begin both pitches together. Read upward to name them, but do not turn that reading order into a playing order. An onset is the moment a note begins; two notes beginning together form one onset group. In the first example, the lower note is C4 and the upper is E4. Say “C and E,” then imagine one shared beginning.
The Staff & the Treble Clef locates middle C on its ledger line and names the nearby lines and spaces. Its piano explanation associates the treble staff with higher notes; here, both marimba hands read the same staff. The clef names pitches, not which hand must play them.

C4 sits on the ledger line below the staff; E4 sits on its bottom line. Play C4 with L and E4 with R, together on beat 1. The second bar moves to D4/F4.
For this lesson, use a simple assignment: lower pitch left, upper pitch right. That is the printed rule for these exercises, not a universal rule for all marimba music. Check both noteheads before moving. Reading only the upper one leaves half the target undecided.
Check the duration after naming the pitches. Two hollow heads on a shared stem do not ask for two beats per hand in sequence. Each pitch occupies the same two-beat space. Start them together and continue counting once for the whole pair, rather than counting a separate rhythm for each hand.
A percussion double stop means both mallets or sticks strike together, as Riley Warren explains in Yamaha’s warm-up discussion. Here it means two pitched bars struck by two hands. Four-mallet “double vertical” terminology concerns two mallets held in one hand; the Percussive Arts Society’s explanation belongs to that different technique.

Bar 1 starts C4 on beat 1 and E4 on beat 2. Bar 2 starts both on beat 1: the same pitches, with a different attack plan.
Point to the first bar and say “first C, then E.” Point to the second and say “C and E together.” The pitches match, but the starts do not. You can understand this difference before playing: the page changes from two successive events to one paired event.
2. Find both bars before playing
Stand in the comfortable position your teacher has established. Locate C4, then E4, and bring each mallet into its prepared position without striking. Pause there. If either target is uncertain, find it again before you begin; the first stroke should not double as a search for the second bar.
Marimba bars follow the piano’s pitch layout, with raised accidentals in groups of two and three, as Yamaha’s instrument anatomy shows. From the player’s side, C is the natural bar immediately to the left of a two-bar raised group. That pattern identifies the letter C; ask your teacher to identify which C is middle C (C4) on your instrument. All four pairs in this lesson use natural bars in the lower row, so you can concentrate on preparing two targets.

The two-bar raised group identifies the C landmark on its left. Here L targets C4 and R targets E4. The schematic gives note addresses; ask your teacher to identify middle C and the contact areas on your instrument.
Look at both destinations as a pair, then check each mallet’s intended bar. Avoid giving the upper note all your attention simply because it is easier to see on the staff. Ask your teacher to confirm the contact areas and your setup on the actual instrument; the map supplies addresses, not measurements.
Choose the instrument’s suitable mallets with your teacher. Yamaha’s mallet-selection guide describes how mallet construction changes tone. You do not need a new mallet type to solve a reading problem. Keep the equipment and requested sound consistent while checking this small coordination task.

Name the pitches, locate the bars, hear each pitch alone, then prepare one cue for both contacts.
Use that preparation sequence on the Two Bars, One Start maps before reading its notation line. Say “left C, right E,” find the two bars, and stop before the attack. Preparing successfully without playing gives you a clear starting point for the next step.
In One Start or Two?, each hand-assignment card lists the upper pitch first, such as E4 + C4. Your left-hand answer is still C4. Use pitch height and the printed hand rule, rather than assigning the first name to the left automatically. That small reading check prevents an avoidable target swap.
3. Hear each target before combining it
Play C4 alone, then E4 alone, using your established single strokes. Listen to each pitch. After a pause, prepare both again and play the pair. The separate notes are a pitch check; they are not a slowed-down version of the final attack, which still needs one shared beginning.
Now try D4 and F4. If you accidentally play E4 instead of F4, fix the target before judging togetherness. Two wrong notes can arrive together, just as two correct notes can arrive apart. Keeping these questions separate makes your next change specific: find the bar, or coordinate the beginning.
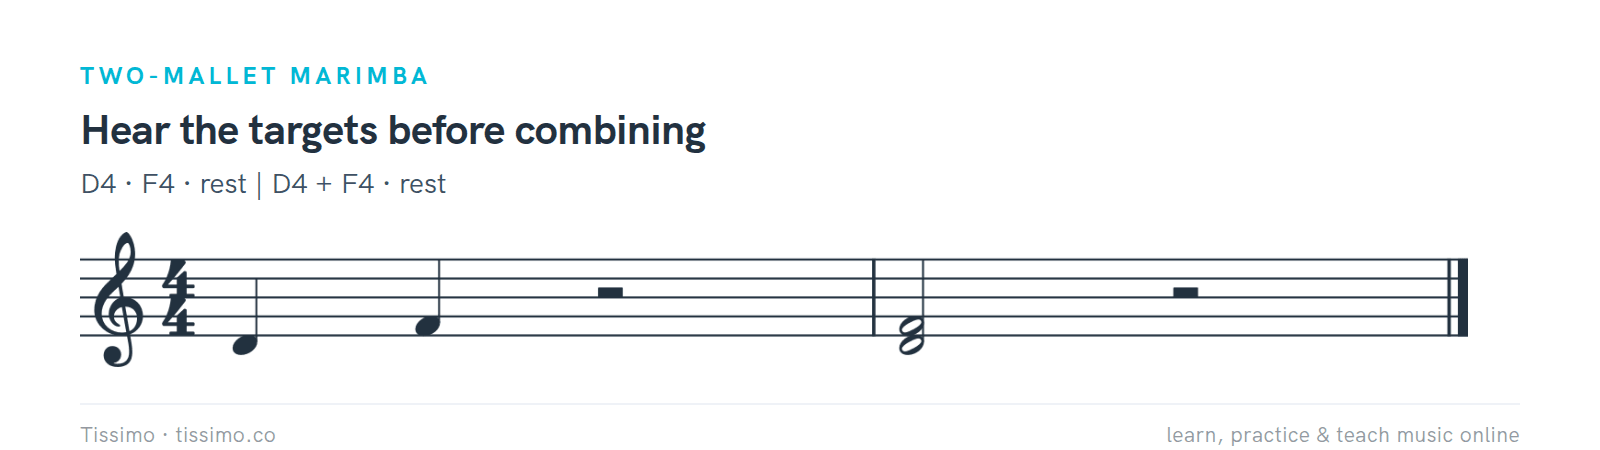
Check D4 and F4 separately, then combine them on the next downbeat. L plays D4; R plays F4.
All four printed pairs are thirds: C–E, D–F, E–G and F–A. Count letters including both ends: C, D, E makes three. C–E and F–A span four half steps (semitones), making them major thirds. D–F and E–G span three, making them minor thirds. You can play the lesson without memorizing those names first.
Use Hearing Intervals for the separate pitch-distance question. It includes major and minor thirds and a comparison of intervals heard together. A wider or narrower pitch distance does not tell you whether the attacks aligned. Keep listening for when the notes begin as well as which notes you hear.
Try asking two different listening questions on separate attempts. First ask whether you recognize both intended pitches. Then ask whether you hear one beginning or a small succession. You need not name the interval quality during the timing attempt. Reducing the question helps you give a useful answer instead of a general impression.

Four pairs give four shared starts and eight contacts. C/E and F/A are major thirds; D/F and E/G are minor thirds. Prepare the next targets during each rest.
Name the route without playing: “C/E, D/F, E/G, F/A.” Then locate each pair in your own time. A third does not specify a fixed physical hand span across every register or instrument. Let your teacher adapt the locations if needed, keeping the paired-onset task clear and comfortable.
4. Coordinate two familiar strokes
Return to C4/E4 and leave the targets unchanged. Ask your teacher to demonstrate the paired attack, then guide your preparation. Use a shared spoken cue such as “ready, play” for one attempt. Think of both contacts belonging to “play,” rather than one hand starting the other.
Keep the single-stroke motion your teacher has taught. This page cannot prescribe a useful height, angle or force for your hands. If the movement becomes uncomfortable, pause and have the teacher adjust it. Changing the register or returning to separate strokes is a reasonable way to simplify the task.

Two C4/E4 pairs, one on beat 1 of each bar. Keep the targets unchanged while comparing the shared starts.
After impact, let the mallets leave the bars in the manner your teacher demonstrates. Do not press down to prolong a half note. Vienna Symphonic Library’s marimba guide distinguishes an ordinary attack and resonance from a dead stroke, where the mallet remains on the bar and damps it.
A half note here occupies beats 1–2 of 4/4; the half rest occupies beats 3–4. Strike once on 1 and keep counting. The Half Note teaches the two-count value, but its piano instruction to hold a key is not an instruction to hold mallets against marimba bars.

Bar 1 has one paired attack on 1; bar 2 has two, on 1 and 3. The evenly spaced guides show four beats per bar; PLAY marks attacks and count marks the other beats.
Count “1, 2, 3, 4” through both bars of the comparison. In the first, play only on 1. In the second, play on 1 and 3. More attacks are a changed rhythm, not a more successful way to fill the first half note. Stay with the single paired attack while it needs attention.
5. Listen for a spread at the beginning
Listen to the very front of the sound. A paired attack has one shared beginning containing two pitches. A spread gives you a first impact and a second impact. The lower note can lead, or the upper can lead. Neither order fulfills the simultaneous instruction in these examples.
Ask your teacher for a clearly together model and a clearly separated comparison, using the same pitches. Keep the comparison easy to hear; you are learning what to attend to. Do not search for an acceptable number of milliseconds. The goal is the intended shared attack, with your teacher judging the result.

Aligned dots show shared starts. In the fourth row both contacts occur after the requested beat: togetherness and beat placement are separate checks.
If the pair sounds uneven, describe only what you can hear: “I heard the lower note first,” or “I could not tell.” A louder note can also draw your attention. Let your teacher check sound balance and movement before deciding that every prominent pitch must have arrived earlier.
“Flam” is useful descriptive language for a split impact, but an intentional snare flam is another musical instruction. Composer and orchestrator Tim Davies describes its grace note before the main stroke. Do not add a small preliminary strike to the marimba pair. Both printed notes belong to the same start.

A pair shares one beginning; a spread separates its contacts; a two-mallet alternating roll repeats successive attacks.
A roll also changes the attack plan: repeated strokes sustain the sound through successive attacks. This lesson asks for one contact per hand in each pair, followed by space. A ringing tail is not a roll, and a long written value does not automatically ask you to keep alternating.
The One Start or Two? exercise includes listening references and time-axis cards. Its neutral piano examples demonstrate pitch and onset relationships only. They cannot demonstrate marimba decay, grip, rebound, or which hand played a note. Use your instrument and teacher’s observation for the physical check.
Its deliberately spread examples are contrasts, not timing tolerances. Listen without looking at the revealed answers, decide “one start” or “two,” then check. If you cannot tell, replay the reference with your teacher. You can practice hearing the distinction before your own pair is consistently together.
In the fourth row, both contacts miss the requested beat by the same amount. They still begin together. Check these separately: do the two notes share a start, and does that start land on the counted beat? When you play the line, aim for both.
6. Move both targets during a rest
Once one prepared pair is manageable, add a destination. Play C4/E4 on beat 1, count 2, then use beats 3–4 to prepare D4/F4. Play the new pair on the next 1. The rest gives the move its own place; avoid rushing the first pair to get a head start.
Say the next notes before beginning the line. In Two Bars, One Start, each of four bars contains a half-note pair and a half rest. There are four shared starts and eight mallet contacts. Count the pairs as four events, even though each event contains two pitches.

Strike on 1, count 2, and move to the already identified next pair during 3–4. Be ready before its attack.
A rest specifies no new attack here; it does not promise that a resonant marimba suddenly becomes acoustically silent on beat 3. Let your teacher guide the requested sound and release. For this onset lesson, avoid inventing a damping action just to make the ring match a piano reference.
Try the four pairs upward, then reverse them. Read the reverse route before playing: F4/A4, E4/G4, D4/F4, C4/E4. Changing direction changes your preparation task. Keep the same roomy rhythm so you can notice whether both targets are ready before each attack, rather than measuring how fast you move.

Reverse the route while keeping the same rhythm and hand rule. Reading the descending order first can help you avoid continuing upward out of habit.
If moving both hands obscures the shared start, use C4/E4 followed by C4/F4. The left target stays C4 while the right changes from E4 to F4 during the rest. Both hands still strike on the next 1. An unchanged destination does not mean that hand gets to play early.

Keep C4 as the left destination and prepare F4 with the right during the rest. Both hands strike again on the next 1.
You can also begin with a rest: count “1, 2,” then play together on 3. Find the pair during the opening rest and keep counting afterward. This variation tests whether you prepared a shared cue, rather than assuming that every pair must begin on the first number you say.

Use beats 1–2 to prepare C4/E4, then D4/F4 in the next bar. The beat guide locates the attack on 3; continue counting 4 before the next bar’s opening rest.
Use a pace at which preparation is comfortable. The handout’s reference is quarter note = 60, but that is a model tempo, not a deadline or achievement level. If the next pair is unready, stop, locate both bars, and begin again with your teacher’s cue. Guessing through the change hides what needs work.
For a quiet preparation rehearsal, read two adjacent bars and identify the next destinations during the counted rest without making contact. Then return to the first pair and add the real attack. Keep that rehearsal brief and purposeful: it answers whether the route is understood before you ask the hands to coordinate the new sound.
7. Check notes and togetherness separately
Before using the One Start or Two? play lines, complete its hand-assignment and time-axis tasks. Under its rule, C4/E4 means left C4 and right E4. Equal positions on the time axis mean equal onset times; unequal positions mean separate starts. Those written answers do not certify a physical performance.
For your playing check, ask your teacher to observe one short line. Report two results separately: did both mallets reach the intended bars, and did their attacks begin together? Add whether you prepared both targets during the rest, before the next attack. A correct pitch result should not conceal a split attack, or the other way around.

Check targets, shared starts and preparation separately, then choose one repair.
Try this new pair order only after reading it silently: C4/E4, E4/G4, D4/F4, F4/A4. Find the destinations first. The changed order removes the easy assumption that the next pair always lies one natural bar farther right, while retaining familiar pitches and the same half-note-plus-rest rhythm.

The route skips to E/G, returns to D/F, then moves to F/A. The rhythm stays the same while the destination order changes.
If the notes are wrong, return to the pair map and name both bars. If the notes are correct but split, return to one unchanged pair and your teacher’s shared cue. If the change causes trouble, rehearse the next preparation without striking. Choose one repair before attempting the line again.
Keep the teacher’s three check boxes independent on each play line. You might reach the correct bars and start together but arrive at the prepared position only at the last moment. Marking preparation separately identifies why the next change still feels uncertain. It also prevents a successful isolated pair from being mistaken for a secure moving line.

Two D4/F4 pairs isolate timing from changes of destination. Prepare again during each half rest.
A useful note afterward is specific: “D/F correct; upper pitch sounded first; repeat with targets still.” That tells you more than “bad coordination.” An uncertain listening judgment can stay uncertain until your teacher checks it. You are learning to identify a result, not to diagnose joint movements from sound alone.
Finish by returning to one comfortable pair. Name it, locate it, hear its targets, and give it one shared start. A Tissimo teacher can watch the two contacts and listen with you in a live lesson, helping you choose the next small adjustment while keeping the task manageable.
Free worksheets for this lesson
- Two Bars, One Start — four lower-row pair maps, timing contrasts and a four-bar preparation line.
- One Start or Two? — hand assignments, time-axis decisions, listening checks and short play lines.
- The Staff & the Treble Clef — locate the written pitches before finding both bars.
- The Half Note — count two beats from one start; adapt the piano action to marimba.
- Hearing Intervals — compare pitch distances separately from attack timing.
Sources
- 6 Strokes for Front Ensemble Warm-Ups — Riley Warren, Yamaha
- Anatomy of a Marimba — Troy C. Wollwage, Yamaha
- Types of mallets and mallet selection — Yamaha
- Playing with Four Mallets: Double Vertical Strokes — Percussive Arts Society
- Marimba — Vienna Symphonic Library
- Percussion: A Hit Job, Part I — Tim Davies
Read this article online: https://tissimo.co/articles/marimba-two-mallet-simultaneous-intervals



Comments