 Back

Viola Second Finger on D: Low F, High F-sharp
Play your teacher-established E on the viola’s D string, then imagine two ways to reach G with finger 3. One passes through F natural; the other passes through F-sharp. Both middle notes use finger 2. What changes is its target: low 2 for F, high 2 for F♯.
This lesson is for you if E4 with finger 1 and G4 with finger 3 are already familiar in first position. You will read both F versions in alto clef, choose the appropriate second-finger placement, and name which neighboring finger lies a half step away. The Second Finger: F or F-sharp? handout keeps the two patterns together for practice.
1. Fix the D string and first position
Ask your teacher to confirm open D, finger-1 E and finger-3 G before comparing anything. Those are your references throughout this lesson. Keep the same string and first-position setting in every example; changing strings or moving the whole hand would introduce another problem before you have heard this one clearly.
The viola’s open strings are C–G–D–A, low to high, as listed in Vienna Symphonic Library’s viola reference. Here, D means D4, the D just above middle C. The octave number identifies the pitch register; it is not a finger number. Finger 0 means the open string.

Open D, finger-1 E and finger-3 G establish the reference pitches before either second-finger target appears.
In alto clef, middle C sits on the middle staff line. Counting upward gives D in the space above it, E on the next line, F in the next space, and G on the top line. Vienna Symphonic Library’s viola reference confirms both the tuning and the clef’s middle-C location. Viola notation gives these pitches at sounding pitch.
Use Reading alto & tenor clefs if you need to rebuild that reading anchor. Its alto-clef examples locate middle C and ask you to name nearby notes with octave numbers. For this lesson, stay with the alto portion: the tenor-clef comparison is useful background, but you do not need to switch clefs to place either F.
Count four steady beats in each bar and give each quarter note one beat, using the comfortable bowing your teacher chooses. Listen for the same E and G each time. If either is still uncertain, settle that reference first. The task becomes much clearer when you can compare the changing note against two pitches you already recognize.
2. Keep the finger number separate from the pitch
A digit above a note answers “which finger?” The notehead, clef and accidental context answer “which pitch?” A printed 2 cannot tell you by itself whether to play F or F♯. You need both pieces of information before placing the finger.
In the next example, each half note lasts two of those beats.
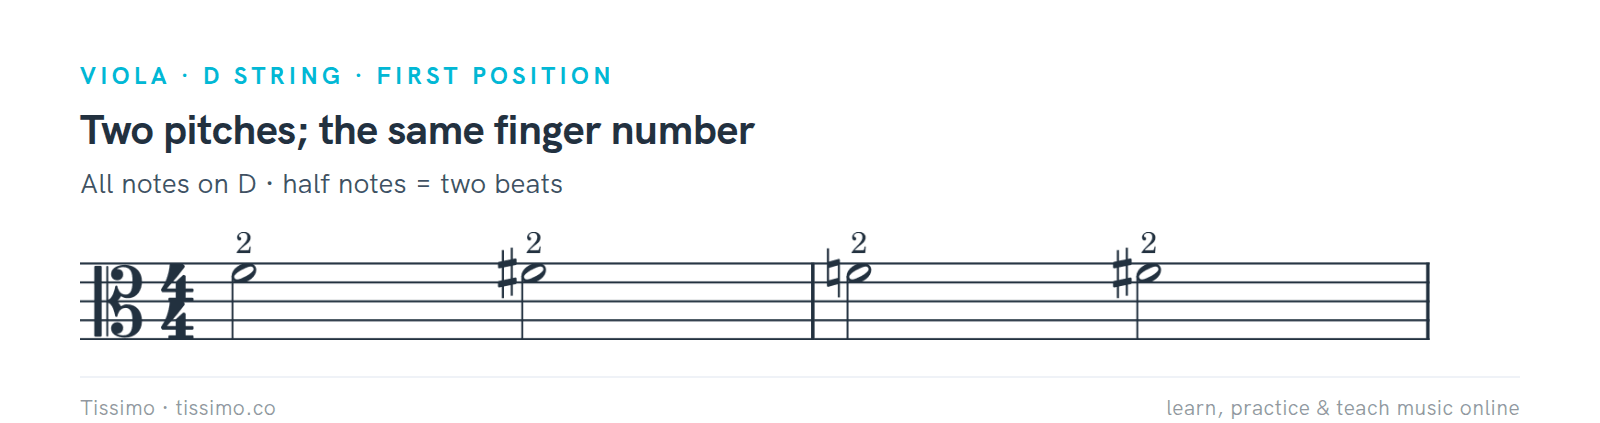
F4–F♯4 | F♮4–F♯4, all with finger 2. Each sharp selects F♯. The natural at the start of bar 2 is a reminder: under the empty signature, that F would already be natural after the barline.
For this particular D-string map, finger 1 plays E4, finger 2 plays either F4 or F♯4, and finger 3 plays G4. Say the full name when you read: “F natural, low second” or “F-sharp, high second.” That extra word prevents a familiar fingering digit from overriding a newly printed accidental.
Low and high describe the pitch choice within this pattern. They do not tell you to raise or lower the hand in the air. On the same string, the F♯ stopping point lies closer to the bridge than the F stopping point. Stopping closer to the bridge shortens the vibrating string and raises the pitch; moving the stopping point toward the nut lowers it. Ask your teacher to demonstrate these two targets while your first-position E and G remain your references. The UNSW string-acoustics explanation describes this length–pitch relationship.
The diagram below is an abstract pitch map, not a drawing of your fingertips on the instrument. Its spacing shows interval counts, without specifying a physical measurement.

Low 2 puts the half step between E and F; high 2 puts it between F♯ and G. Spacing represents pitch intervals, not measured finger distances.
Teacher Mark Pedus’s viola finger-pattern curriculum introduces a pattern with the semitone between fingers 2 and 3, then contrasts a low-second-finger pattern while retaining the third-finger note. Our examples isolate that contrast on D. Other strings, altered reference fingers and later positions require their own reading and placement decisions.
If a teacher has marked your music with a plain 2, keep that marking and add the full pitch name while studying. Replacing the digit with a different finger would change the assigned fingering. This lesson asks you to solve the pitch change using the same finger, with the teacher confirming a comfortable way to reach each target.
3. Compare E–F–G with E–F♯–G
Start with E–F–G. E to F is a half step, also called a semitone; F to G is a whole step, or two half steps. Low 2 therefore has the smaller pitch interval beside finger 1. Play E–F–E first, then include G, so you can hear where that smaller interval belongs.

Low 2 gives F natural: E–F is a half step and F–G a whole step.
Now compare E–F♯–G. Raising F by one half step makes E–F♯ a whole step and F♯–G a half step. High 2 has its semitone beside finger 3. The Puget Sound half-step lesson explains the distance vocabulary; here you apply those distances to pitches on one viola string.

High 2 gives F♯: E–F♯ is a whole step and F♯–G a half step. Later F notes inherit the sharp within each bar.
Keep E and G as the references when you alternate the examples. Say “small gap below” for F and “small gap above” for F♯. You are locating the smaller pitch interval. Your teacher can show how that relationship feels on your viola with your hand, rather than asking you to copy a diagram’s apparent finger spacing.
The counts from open D offer a second way to check. E is two half steps above D; F is three; F♯ is four; G is five. Subtract adjacent counts: E–F is 3 minus 2, whereas F♯–G is 5 minus 4. Both give one half step, although they involve different finger pairs.

Half steps above open D4: E4 = 2, F4 = 3, F♯4 = 4, G4 = 5.
Do not move E or G to make an uncertain second finger seem correct. If either reference pitch changes unexpectedly, pause and re-establish E and G before comparing finger 2 again. Return to the opening example, ask for the teacher’s reference again, and compare just one pair. A clear two-note check is more useful than several repetitions with an unsettled frame.
4. Find the semitone beside finger 1 or finger 3
Cover the pitch map and finish these two statements aloud: “F natural is a half step above…” and “F-sharp is a half step below…” The answers are E and G. Translate those into finger relationships: low 2 beside 1; high 2 beside 3. “Beside” names the semitone partner, without requiring the fingertips to touch.

E–F–F–E checks the low pair; G–F♯–F♯–G checks the high pair. Each pair remains a half step in either direction.
Reverse each pair as well. E–F and F–E span the same interval; G–F♯ and F♯–G do too. A descending melody does not automatically call for low 2, and an ascending melody does not automatically call for high 2. The required pitch decides the placement, regardless of which direction the phrase travels.
If you confuse the two patterns, check the other gap. Low F leaves a whole step to G. High F♯ leaves a whole step from E. Being able to explain both gaps makes the pattern more secure than remembering only which fingers look close together. Use the mini-task on Second Finger: F or F-sharp? to identify the semitone partner on paper.

Low F is a half step from E, finger 1. High F♯ is a half step from G, finger 3.
A teacher may demonstrate the shape with several fingers prepared, or ask you to compare individual notes. Follow that guidance about which fingers remain down. The diagram does not prescribe finger contact, thumb placement or squeezing. Its job is to tell you which pitches are neighbors; observing your hand is a separate part of the lesson.
Try giving the explanation without the words low or high: “This F is one half step above my E,” or “This F-sharp is one half step below my G.” Then add the placement label. If the labels disappear from your memory during a piece, the interval relationship gives you a way to rebuild the answer.
5. Read F natural after F-sharp in the same bar
The examples so far have an empty key signature. A sharp printed before F raises it one half step. A natural printed later in that measure cancels the sharp and restores F natural, as the Puget Sound accidental lesson explains. On this D string, that written cancellation changes high 2 to low 2.

In bar 1, the first two F notes are sharp; the natural on beat 3 makes the next two natural.
Read bar 1 from left to right: F♯, F♯, F natural, F natural. The first sharp still applies at beat 2, although there is no new sign. The natural takes effect at beat 3 and remains active at beat 4. You therefore choose high–high–low–low. A missing sign beside a note does not mean you can ignore the earlier sign in its measure.
The natural: back to plain shows F♯ returning to F♮ and explains why the natural can cancel a sharp before the barline. MacEwan University’s accidental chapter likewise distinguishes the sharp’s upward change from the natural’s restoration. On the viola, make that reading decision before working on the physical change.

Within a bar, a natural replaces an earlier sharp. After the barline, return to the key signature; this example has no signature sharps or flats.
At a new bar, return to the key signature. In our empty-signature examples, a newly attacked F without an accidental is natural again. If the next bar needs F♯, its sharp must be established there. Do not carry the previous bar’s high-second choice forward just because it is the most recent placement you played.

With an empty signature, bar 2 starts on F natural. A new sharp on beat 3 selects F♯ again.
These cells contain no ties across barlines. In other music, read the actual signature and any tie as well; “new bar means natural” is only the outcome for the empty signature used here. The reading drill Accidentals on the staff practices inherited signs, cancellation and barline changes in treble and bass clefs. It supports the notation skill without supplying a viola finger map.
An intervening E or G does not cancel an earlier F-sharp in the same bar. Trace from the first sharp to the later F notehead, checking whether a natural or a barline has appeared between them. Dr. Brian Blood’s accidental rules describe this same-line-or-space scope. All the F events here are F4, so no octave change complicates that check.
If the key signature contains F♯, an unmarked F is F-sharp: use high 2 in this D-string pattern. A natural beside F changes it to low 2 for the rest of that bar, unless another accidental changes it again. At the next bar, an unmarked, newly attacked F returns to F♯ under that signature.

One sharp in the signature supplies F♯. The natural makes both F notes in bar 1 low 2; both unmarked F notes in bar 2 return to high 2.
Compare the first F of each bar in this one-sharp example. Bar 1 explicitly cancels the signature’s F♯ with a natural; its later F stays natural. Bar 2 needs no new sharp beside either F because the signature supplies it again. The first bar’s placement plan is low–low, and the second bar’s is high–high.
6. Mark low and high second finger in two short cells
For each cell, name every F event before playing. Follow the worked L/H labels in Cell A, then add your own labels to Cell B. Leave E as finger 1 and G as finger 3. Those annotations are a practice aid; they do not replace the note names or become new musical accidentals. Read them back as a complete instruction: “F natural, finger 2, low, semitone to finger 1.” For a sharp, substitute “F-sharp, finger 2, high, semitone to finger 3.” This checks the connection among the staff, the finger digit and the neighboring pitch before the bow starts.

Read the signature and earlier signs, name the pitch, then choose low or high second finger.
In Cell A, bar 1 has E–F–G–E. Its F is natural: the worked label is L. Bar 2 begins F♯–G, then F♮–E: the labels are H and L at those F events. The two-bar plan is therefore L | H–L. Read the natural before reaching it, so the pitch change is already decided when finger 2 is needed again.

Worked Cell A: L at bar 1 beat 2, H at bar 2 beat 1, L at bar 2 beat 3. L/H are practice labels, not accidentals.
Try naming pitches while your teacher plays the cell, then play it yourself with the selected bowing. Keep the quarter-note pulse comfortable. If the natural is missed, isolate bar 2 and say “F-sharp, G, F natural, E.” Correcting that reading is a specific task; simply repeating the complete cell faster gives you less opportunity to make the choice.
Cell B begins from G: G–F♯–F♮–E | D–F–G–F. Its second-finger plan is H–L | L–L. The empty signature supplies natural F in the second bar. Going down from G still begins with high 2, while going up from open D in the next bar reaches low 2. Direction alone gives the wrong shortcut.

Cell B descends through F♯ and F natural, then reaches F natural from open D in the next bar.
After marking these examples, use Keep Finger 2; Change Its Place for another reading check. It asks you to label six F notes, read two short examples, and correct two statements that name the wrong half-step neighbor. Keep the answers covered until you have explained the note name and semitone partner yourself. After naming the notes yourself, use the worksheet’s neutral piano recordings to check pitch and timing.
Now attempt the exit check below. Cover the answer paragraph below the next practice paragraph before you start. Name each F, mark its placement, and identify its semitone neighbor. You can complete this on paper even if you are away from the viola. A correct written result tells you the plan is clear; playing it accurately remains a further check.

Name each F, choose low or high 2, and identify the semitone neighbor. Answers follow below.
The printable exercise uses its own Cell A and Cell B, with different note orders from the article’s cells. Read those staves afresh. Its answer lines ask for the bar and beat, complete pitch name, placement label and semitone neighbor. Writing all four items lets you identify exactly where a reading answer went wrong, instead of copying a remembered sequence of L and H.
Exit-check answers: F♯4–E4–F♯4–G4 | F4–F♯4–F♮4–E4. The five F choices are high–high; low–high–low. High F♯ has finger 3 as its semitone neighbor; low F has finger 1.
7. Let your teacher check balance and intonation
Bring one low cell, one high cell and one mixed cell to the next lesson. Ask the teacher to watch what happens to E, G and your hand balance when finger 2 changes target. Ask: "Can I reach both F targets while keeping E, G and my hand balance reliable?"

Check the written pitch, the sound you produced and your hand balance separately.
Separate three possible difficulties. If you named F♯ as F, revisit the accidental reading. If you named the pitch correctly but played the other target, pause to connect the name with low or high. If you chose the intended target but it does not match the teacher’s reference, work on intonation with the teacher watching your placement.
Choose one F in Cell B and record its bar and beat. First name it without playing. Next compare your played pitch with the teacher’s reference. Finally, play the whole cell while the teacher observes your hand. Record which check needs another attempt: reading, pitch match or hand balance.
The handout’s neutral pitch references help you hear the intended notes and timing. They do not demonstrate a viola hand, bow contact or your instrument’s response. Pedus’s curriculum emphasizes relaxation and intonation while introducing finger patterns; your own teacher can judge those qualities during the actual attempt. Stop and reset if you find yourself forcing the comparison.

Prepare the reference pitches, compare one low and one high example, then read and play a mixed example.
For the next practice pass, use the three steps in the summary above. Keep a comfortable pace and repeat a step when it needs attention. A Tissimo teacher can check the connection between your reading, pitch choice and hand balance in a live lesson.
For a useful lesson note, record one concrete result: “I read the natural correctly but need help placing low 2 after G,” for example. Treat that sentence as an observation about an attempt, not a diagnosis of your hand. Bring the marked measure to your teacher so you can repeat the same small task and compare the result.
Free worksheets for this lesson
- Second Finger: F or F-sharp? — compare the D-string pitch maps, alto-clef examples and a mixed four-bar cell.
- Keep Finger 2; Change Its Place — label low/high notes, read two short examples and correct two half-step statements.
- Reading alto & tenor clefs — locate middle C and name nearby notes with octave numbers.
- The natural: back to plain — see a natural cancel a sharp and compare the barline reset.
- Accidentals on the staff — practice note naming and accidental carryover in treble and bass clefs.
Sources
- Viola Chapter 2: Finger Patterns — Mark Pedus
- Violin Acoustics: An Introduction — UNSW Music Acoustics
- Viola — Vienna Symphonic Library Academy
- Half Steps and Whole Steps — University of Puget Sound
- Accidentals — University of Puget Sound
- Key Signatures and Accidentals — Dr. Brian Blood, Dolmetsch
- Accidentals and Enharmonics — Devin Hart, MacEwan University
Read this article online: https://tissimo.co/articles/viola-low-high-second-finger-d-string



Comments