 Back

Mirror Practice at the Piano: Symmetrical Inversion from Ganz to Hamelin
Play D5–E5–F♯5–G5–A5 with your right hand, using fingers 1–2–3–4–5. Now let your left hand answer D3–C3–B♭2–A2–G2 with exactly the same numbers. The first line rises; the second falls. Both put finger 3 on a black key. You have begun symmetrical inversion, the mirror practice Marc-André Hamelin teaches.
You will learn to find the keyboard’s two mirror points, reflect a passage into the other hand, and test the result in four worked examples. Start with the Mirror Keyboard: D and A♭ reference. Keep the original music nearby: the reflection is a temporary exercise, and returning to the original is part of the work.
1. What Hamelin teaches, and where Ganz fits
Symmetrical inversion sends each note to the opposite side of a chosen center, at the same distance in half steps. Rhythm stays unchanged. Finger numbers stay unchanged. Pitch direction reverses: an upward whole step becomes a downward whole step. This is neither playing the notes backward in time nor simply moving the tune to the other hand.
In Ethan Iverson’s December 2008 interview, Hamelin explains that he learned symmetrical inversion from an exercise book by pianist and teacher Rudolph Ganz that his father owned. He describes practicing mirrored versions of left-hand exercises too. The approach works in either direction; it is not reserved for a supposedly weaker left hand. Hamelin is its advocate here, rather than its inventor.
In his 2023 tonebase demonstration, Hamelin identifies D and A♭ as the two centers and applies the idea to repertoire. He also demonstrates it in an earlier documentary clip, uploaded by nonnon86 on July 11, 2007; that date is the upload date.
Pianists try it to give the other hand a comparable sequence of finger actions and to examine awkward patterns afresh. Hamelin reports benefits, but equal improvement between hands is an experience-based claim. You can use the exercise thoughtfully without treating it as a proven shortcut. Begin with a pattern you can already play slowly and comfortably.
For a student, the immediate benefit you can verify is simpler than a claim about the brain: the other hand now has a clearly defined task. You can hear a wrong note, identify a changed finger, and decide what to correct. A parent can follow those checks without expecting a young player to imitate Hamelin’s concert technique. The examples below progress from a fixed position to crossing, turning and reading a real phrase.

The original five-finger figure, beginning on D5, one octave above D4. Ascend to finger 5, then retrace three notes. F♯5 occurs twice, with finger 3 each time. Here and below, numbers beside notes are finger numbers: 1 is the thumb and 5 the little finger. Play this line alone before adding its reflection; the high starting register leaves room for the mirrored left hand below the axis.
2. Why the mirrors are D and G♯/A♭
Find a group of two black keys. D is the white key between them. Each neighboring black key reflects into the other; continuing outward preserves the pattern of black and white keys. The piano keyboard helps you locate the repeating groups before naming individual notes.

D4 is the axis, or center key. Its immediate neighbors are C♯4 and D♯4, both black; two half steps away are C4 and E4, both white. Three away are B3 and F4, both white; four away are B♭3 and F♯4, both black. The brackets count pitch distances, not ruler measurements across the wooden key fronts. The pattern continues beyond the four pairs drawn.
Now find three black keys. Their middle key is G♯, also called A♭. Reflect around that key and the pattern matches again. These are the only two pitch classes that preserve the full black-and-white pattern; other D and A♭ keys supply the same centers in other octaves. The symmetry concerns the repeating layout, within the instrument’s ends.

G♯5/A♭5 supplies the other kind of mirror center. One half step away are G5 and A5, both white; two away are F♯5 and A♯5, both black. Three away are F5 and B5, both white; four away are E5 and C6, both white. This schematic illustrates the key-color pattern; it does not assert that every manufacturer’s key shapes and offsets are geometrically identical.
Count every piano key when measuring a distance. D–E spans two half steps, but E–F spans one despite both pairs using neighboring white keys. Use Half steps & whole steps if that distinction needs practice. Counting only letter names would produce the wrong reflection.
Try a deliberate comparison. Above D4, E4 is two half steps away. Below D4, the matching key is C4, also two away. F4 is three above D4, so its partner is B3, three below. The white-key gaps change size as you travel, yet the semitone distances remain equal. This is why the full table includes the less obvious F–B pair alongside the easier-to-remember C–E pair.
The complete table below names all twelve starting keys and their partners. G♯ and A♭ name the same piano key; likewise C♯ and D♭. The table identifies pitch classes, meaning note names without a specified octave. It cannot tell you the register until you choose one particular axis key.
Use the table as a check rather than a substitute for measuring. If you write C→E correctly but choose the wrong E, the names look convincing while the hands no longer reflect around your marked key. On paper, add an octave number to the first reflected note immediately. At the piano, point to the axis between the hands before sounding their first pair, then check a second pair to confirm the pattern.

The full table: C→E; C♯/D♭→D♯/E♭; D→D; D♯/E♭→C♯/D♭; E→C; F→B; F♯/G♭→A♯/B♭; G→A; G♯/A♭→G♯/A♭; A→G; A♯/B♭→F♯/G♭; B→F. Both axes produce these same partner names. Read any arrow backward to recover the original key. A self-partner such as D does not necessarily stay in the same octave: only the actual axis key stays in place.
3. Mirror a passage, including its octave
Write down the center with its octave: D4, for example, is the D just above middle C, which is C4. D5 lies twelve half steps above D4, so its reflection D3 lies twelve below. If you change only the reflected hand’s octave, you have changed the axis too.

C4 becomes E4 around D4, but E3 around A♭3. The two chosen axes are six half steps apart; their reflections are twelve half steps apart. This example keeps the original C4 fixed. Choosing the neighboring A♭ below a D axis therefore lowers the reflected line an octave. Moving both hands freely to more comfortable octaves without recalculating the center would lose this exact relationship.
Use this procedure with the opening figure, then with a short passage of your own. The Mirror Keyboard reference keeps the partner table beside you.
- Choose a small cell and settle its original fingering.
- Choose a D or A♭ axis and write its octave. For a first hands-together attempt, place the axis below the whole right-hand cell, or above the whole left-hand cell, so the hands stay on separate sides.
- For each note, count half steps to the axis and travel the same distance beyond it.
- Copy rhythm and finger numbers unchanged.
- Check the partner names against the table, then play the reflection alone.
Check that every reflected note fits on your keyboard. If the hands overlap or the reflection falls beyond the keys, choose another D or A♭ axis and recalculate the whole cell.
For the first pair, D5 reflects to D3. E5 lies fourteen half steps above D4, so its partner C3 lies fourteen below. Continue note by note: F♯5 becomes B♭2, G5 becomes A2, and A5 becomes G2. In numerical terms, the reflected pitch equals twice the axis pitch minus the original pitch. Counting is enough; no algebra is required at the piano.

The five-finger figure reflected around D4. The left hand plays D3–C3–B♭2–A2–G2–A2–B♭2–C3. Each simultaneous pair is equally far from D4. Fingers remain 1–2–3–4–5–4–3–2, including 3 on the black keys. Nothing asks you to swap 1 and 5. Both hands move outward at first, then inward, while every eighth-note attack remains aligned in time.
Test your understanding before looking back: what should the left hand play when the right returns from A5 to G5? It returns from G2 to A2, using 5 then 4. “Opposite direction” applies at every change, including a turn back toward the center. It does not mean that the left hand must keep descending throughout the exercise. The mapping follows each individual note, not an overall arrow drawn over the phrase.
For a continuous key-by-key check, try the short chromatic fragment below. The Chromatic Scale: Both Hands develops the idea on its second page, using the D and A♭ mirror points. Its chromatic fingering gives matching numbers to matching key colors.

An outward chromatic fragment: every move is one half step, and each black key in one hand meets a black key in the other. The same physical key can have different spellings in different contexts; D♯5 and E♭5, for example, coincide. Follow the actual key rather than expecting accidental signs to match. Keep the attacks quiet and even, especially through RH E5–F5 and LH C3–B2, where both hands use 1–2.
Choose the neighboring A♭ axis when the other reflection’s register is more useful. The next comparison shows two alternatives for one line. Read the clef carefully: both displayed alternatives belong to the left hand, even though the upper one uses treble clef.

Same original, different centers: RH C4–D4–E4–F4 becomes LH E4–D4–C4–B3 around D4, or E3–D3–C3–B2 around A♭3. The second alternative is exactly one octave below the first. Play these left-hand options separately. The upper option overlaps the original right-hand register; use the lower option for a first hands-together attempt. Decide which center you are using before starting, and retain it for every note of the chosen cell.
4. A scale fragment with a thumb crossing
Play the D-major octave below, keeping its written fingering. The important event is F♯5 with finger 3 followed by G5 with the thumb. Mirror that event and the left hand moves from B♭2 with 3 to A2 with 1. Both thumbs pass under while pitch directions oppose each other.

D major ascending, with a thumb-under after F♯5. The finger sequence changes from 3 to 1 at G5, not at the next note A5. The final D6 takes 5 because this example ends there; a continuing multi-octave scale would require its continuing fingering. Say the eight numbers once before playing, then listen for an unbroken eighth-note pulse through the crossing.
The left-hand result uses D–C–B♭–A–G–F–E♭–D: the B♭-major collection descending from D. Do not replace it with D major descending. The same tonal scale in contrary motion is a different exercise. Our D-major contrary-motion page practices that familiar scale coordination; it does not preserve the black-and-white pattern key for key.
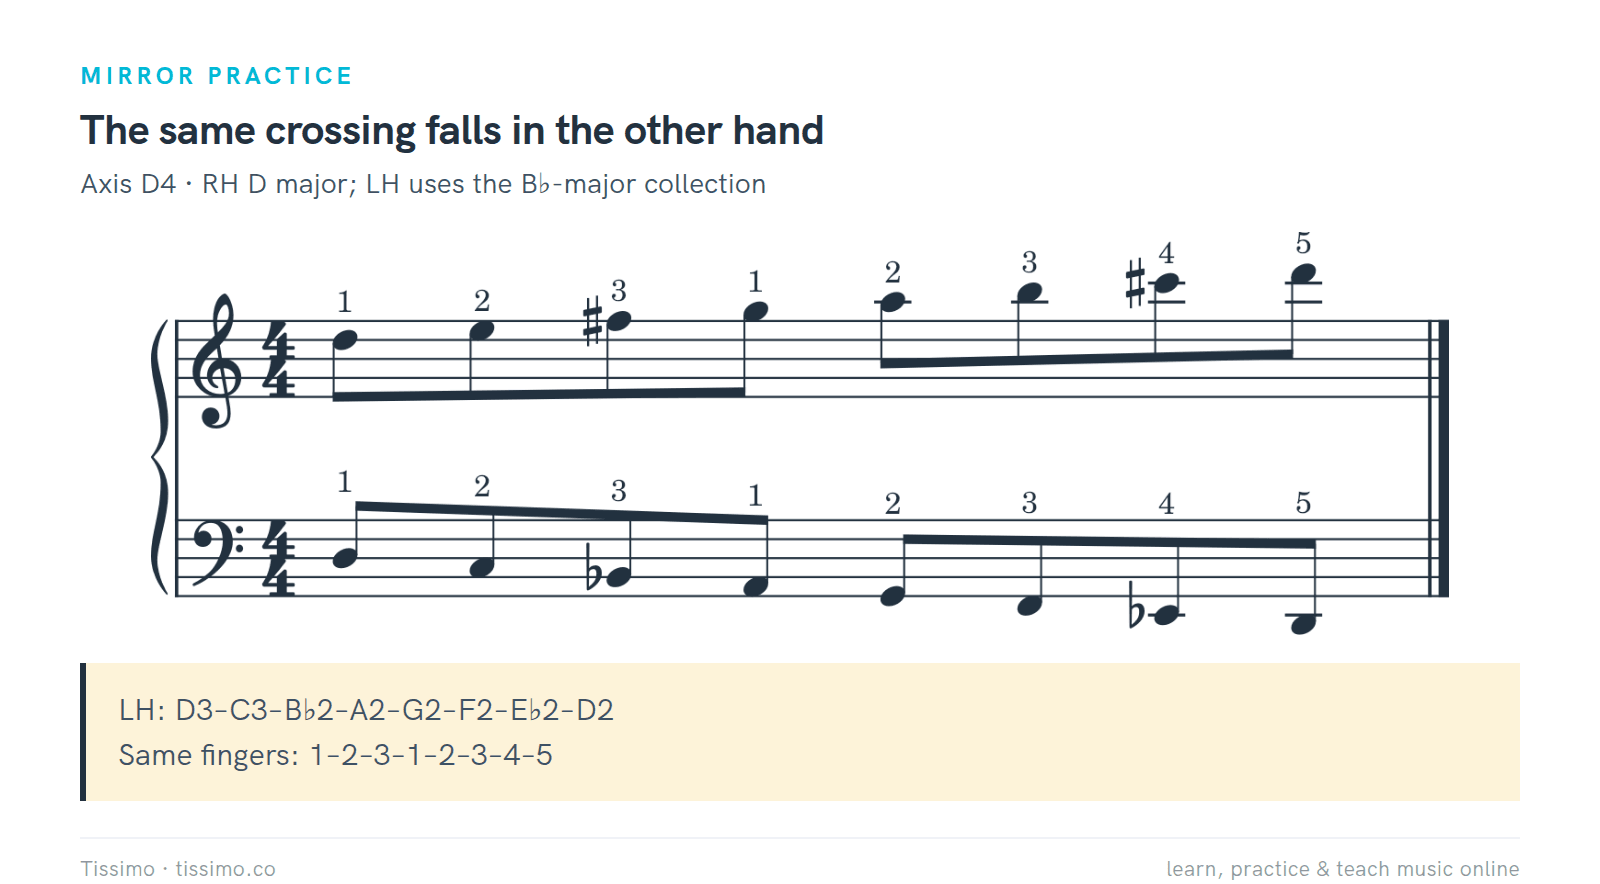
The exact reflection of the D-major octave. RH F♯5 and C♯6 pair with LH B♭2 and E♭2, respectively; the black keys therefore fall under matching fingers 3 and 4. On both sides, the change from finger 3 to the thumb comes between the third and fourth attacks. The reflected line begins on D, but that starting note alone does not make its collection D major.
Isolate the crossing if it bumps. Play four slow notes, release, and repeat only after you can name both lines. Let the hand travel with the passage rather than holding the thumb rigidly underneath. The aim is an easy transition; pushing harder does not correct a mistaken key or finger.
On the return journey, reverse the notes and read the fingers in reverse order too: 5–4–3–2–1–3–2–1 for each complete octave back. Now the third finger passes over the thumb at the corresponding place. That reversal describes returning along the scale; when first constructing a mirror, you still copy the original’s temporal order unchanged. Keep those two operations separate on the page: reflection changes pitch direction, while playing backward changes the order of events.
You can also mirror a left-hand difficulty into the right. Begin with the left hand’s actual notes and fingering, choose a D or A♭ axis that places the reflection comfortably, and follow the same procedure. The table works both ways because reflecting a note twice returns to its starting key. Do not assume that the right hand’s usual fingering for the resulting notes is the fingering you need for this comparison.

The crossing cell at a slower written rhythm: 2–3–1–2 in each hand. RH E5–F♯5–G5–A5 mirrors LH C3–B♭2–A2–G2. Make four evenly spaced attacks, then stop and release before another attempt. This deliberate quarter-note version separates the movement problem from the longer scale; it is not a transcription of the original eighth-note rhythm. Restore that rhythm when returning to the octave.
5. A broken chord changes its harmony
A broken chord plays its tones successively. Block & Broken Chords compares that delivery with sounding them together. Here C5–E5–G5–E5 uses 1–3–5–3. Preserve that order of attacks while reflecting each pitch around D4.

The original C-major broken chord, with a return through E5 after each G5. This is an up-and-back figure, not three notes simply repeated in rising order. Use the written 1–3–5–3 sequence twice, without holding the first three notes as a chord. The exercise’s short span lets you inspect the change of direction before attempting more widely spaced arpeggios from repertoire.
C5 becomes E3, E5 becomes C3, and G5 becomes A2. The result contains A–C–E: A-minor tones. That harmonic change is expected. Symmetrical inversion preserves distances in opposite directions; it need not preserve chord quality or make attractive accompaniment to the original.

Around D4, C5–E5–G5–E5 reflects to E3–C3–A2–C3. The right hand’s rising four-half-step third C5–E5 becomes the left hand’s falling four-half-step third E3–C3; the next three-half-step rise E5–G5 becomes C3–A2 falling. Together, the lower notes form A minor. Maintain the original temporal order and the identical 1–3–5–3 fingering instead of reversing the written sequence.
Listen first for accurate intervals in the reflected hand alone. When combining hands, listen for synchronized attacks and releases rather than a familiar tune. If the harmony distracts you, alternate single-hand attempts before combining them. Keep the pedal off for these short examples so overlapping resonance does not conceal uneven releases.
To check the chord transformation, play the three right-hand tones together once, then the three reflected left-hand tones together. Name the lower set from its lowest note: A2–C3–E3. Then return to the broken order E3–C3–A2–C3. The lowest note names this root-position triad, but the exercise starts on its highest tone. A reflected passage need not begin on the root of the harmony it happens to produce.
6. Apply it to Bach: two bars, one hand
Take the right-hand opening of Bach’s Invention No. 8 in F major, BWV 779. The pitches and rhythms here follow the Peters edition, plate 8275 (IMSLP #19938, printed page 18), available through IMSLP’s Inventions collection. Expression marks are omitted; finger numbers are practice suggestions added here. This is our worked application, not a transcription of Hamelin’s video demonstration.

BWV 779, RH bars 1–2: count three quarter-note beats per bar. The first bar contains an eighth rest and five eighth notes; the second contains one eighth and ten sixteenths. Practice fingering is 1–2–1–4–1 after the rest, then 5–4–3–2–4–3–2–1–4–3–2. Accidentals are written locally instead of using F major’s signature. Dynamics, articulation and slurs from the source edition are omitted to focus this exercise on pitch, rhythm and fingering.
Mark D4 as the axis. F4 lies three half steps above it, so the left hand starts on B3, three below. A4 maps to G3; C5 maps to E3. Keep the opening rest. Keep your complete score open beside the exercise so you can return to the actual piece after this detour.

The left-hand reflection of those two bars: rest–B3–G3–B3–E3–B3, then B2–C3–D3–E3–D3–E3–F♯3–G3–F♯3–G3–A3. The two B♭4s in the original become F♯3s: use finger 2 for the first and finger 4 for the second. The leap from the last B3 of bar 1 to B2 at bar 2 reverses the original F4-to-F5 octave. Copy the rest and note lengths as carefully as the pitches.
Work on bar 1 alone before taking bar 2. Bar 2’s sixteenths may need a slower practice tempo at first. Once each hand can play independently, combine them at that same tempo. The lower line below is your mirror exercise; Bach’s real left-hand part is different.
Count bar 2 as six eighth-note slots: its first slot contains F5, and each of the remaining five contains two sixteenths. Speak “one-and, two-and, three-and” to locate those slots, then subdivide the paired sixteenths evenly. In the mirror, B2 occupies the first slot. Keeping that longer opening note prevents the written change of note value from turning into an accidental acceleration across the bar.

Bach’s original right-hand line above its reflected exercise below, with D4 as the common axis. Each sounded pair lies at equal half-step distances on opposite sides of D4. Both parts share the exact rhythm and fingering. Count the opening silence together. After one careful combined attempt, stop the exercise and return to the original right hand; later restore the piece’s real left hand and its musical phrasing.
7. A short routine: separate, combine, return
Use about one minute per step below, adjusting freely. This is a suggested routine, not Hamelin’s prescribed schedule or a tested training dose. For independent writing practice, Mirror the Passage gives short passages to reflect and check. Choose one cell rather than racing through every example.

A short routine: identify the center and fingering, practice each hand alone, try slow contrary motion, then return to the original. Spend the time where the problem actually is. One correctly mapped, comfortable cell is enough for a first session. Repeating a wrong octave or a changed finger number does not become useful merely because both hands are moving together.
Choose a tempo at which you can anticipate the next key. If needed, start without a metronome while naming notes, then establish a gentle pulse. Listen for an unintended accent at the thumb, a gap at a leap, or one hand arriving late. Reduce the cell when you cannot locate the cause.
For a parent helping at home, ask the student to explain one pair and point to the center. Then listen for a steady beat. You need not diagnose muscle actions or demand identical-looking wrists. The useful comparison is whether corresponding fingers reach their assigned keys comfortably, without a new effort appearing at each change of direction.
Return to the original at the same starting tempo. Ask whether its rhythm, accuracy or ease changed, and check again another day. A striking sensation during the mirror exercise is not itself evidence that the piece improved. Keep regular musical practice, including the original hand and the real accompaniment, in the session.
A useful notebook entry needs only three observations: the cell, the starting tempo, and the error you are listening for. Write “gap after thumb” or “wrong octave on first note” rather than “bad left hand.” After the return attempt, record whether that specific problem remained. Comparing the same cell at the same pulse makes the observation more informative than judging how impressive the combined exercise sounded. There is no required streak of successful repetitions.
For your first repertoire trial, choose one melodic voice. If you later reflect a chord, map every tone and sound its partners together, keeping the finger assigned to each tone. Preserve rests and tied durations too: reflection changes pitch placement, not the timing of attacks or releases. With several voices in one hand, work through one voice at a time before combining them.
8. Correct the common mistakes; weigh the evidence
A wrong octave can preserve the table’s partner names while losing the selected center. Check the first pair’s distance on both sides. A wrong axis often reveals itself through mismatched key colors. Replacing the fingering with the other hand’s habitual scale fingering defeats this particular comparison: thumb matches thumb, not little finger.

Check pitch placement, corresponding fingers, pulse and ease before repeating. The first two are mapping checks; the latter two concern how you play the result. Stop and release if the hand becomes rigid. If a passage requires an uncomfortable reach, choose a smaller cell and discuss the fingering with a teacher instead of treating discomfort as proof that the exercise is working.
Ordinary contrary motion only means opposite pitch directions. The C-major contrary-motion scale starts both hands on C and uses its scale fingering. That center is not one of the keyboard’s two exact color-pattern axes. For the actual D/A♭ key mirror, return to page 2 of the chromatic handout.
Researchers call improvement in an untrained hand intermanual transfer; cross-education also appears in this literature, including strength training. Perez and colleagues (2007) demonstrated transfer in a finger-sequence task. That supports the possibility of cross-hand learning, not equal benefits from practicing piano repertoire in reflection.
Verwey and Clegg (2005) found moderate transfer to mirrored sequences after one-handed practice, but no such transfer after two-handed practice in their reaction-time task. Ruddy and Carson’s review (2013) discusses different mechanisms and task-dependent outcomes. A simple story about one brain hemisphere teaching the other would overstate that evidence.
Furuya, Nakamura and Nagata (2013) studied twelve right-handed men with no previous instrument training. Six practiced a sequence with their nondominant left hand for four days; six served as controls. The transfer test used a mirrored right-hand sequence with matching fingering. Right-hand speed improved in both groups, without clear evidence of an additional cross-hand benefit from the training. That limited task does not settle every question about Hamelin’s practice, but it directly cautions against promising automatic carryover.

The evidence supports a possibility, with substantial limits. Some laboratory sequences transfer across hands; the cited piano-speed experiment did not show that transfer. None of these results establishes equal gains for both hands from this repertoire routine. Treat the exercise as something to evaluate against a specific playing problem, rather than a replacement for practicing the original music.
9. Keep a useful experiment small
Check the method on a fresh cell: RH C5–D5–E♭5–F5, four quarter notes with fingers 1–2–3–4, reflected around D4. Write the left-hand notes and octaves before checking the answer: E3–D3–C♯3–B2, with the same 1–2–3–4. Around A♭3, the answer is E2–D2–C♯2–B1. Each left-hand line keeps the rhythm and moves in the opposite pitch direction. For more writing practice, Mirror the Passage provides six questions with an upside-down answer key. For a longer chromatic follow-up, The Chromatic Scale introduces the basic fingering before the both-hands handout extends it.
Keep one practical question beside the piano: does returning from the mirror help this particular cell? If accuracy or ease improves, retain the experiment briefly and reassess. If it adds confusion, simplify or leave it aside. A Tissimo piano teacher can check the axis, fingering and thumb crossing in a live lesson, then help reconnect the exercise with the original phrase.
Free worksheets for this lesson
- The Mirror Keyboard: D and A♭ — two axes, partner table and a fingered example.
- Mirror the Passage: Symmetrical Inversion — short reflection tasks with a check-yourself key.
- The Chromatic Scale: Both Hands — the D/A♭ mirror on page 2.
- The Chromatic Scale — one-octave chromatic fingering.
- Contrary-motion scales: D major — compare ordinary scale coordination with exact key mirroring.
- Contrary-motion scales: C major — practice the familiar scale in opposite directions.
- Half steps & whole steps — count every key when measuring distances.
- The piano keyboard — locate letters from black-key groups.
- Block & Broken Chords — compare simultaneous and successive chord tones.
Sources
- Interview with Marc-André Hamelin — Ethan Iverson, December 2008
- Marc-André Hamelin teaches SYMMETRICAL INVERSION at the Piano — tonebase Piano, March 11, 2023
- Marc-André Hamelin – Supervirtuoso Documentary Part 5/10 — nonnon86, July 11, 2007
- 15 Inventions, BWV 772–786 — Peters, plate 8275, IMSLP #19938, p. 18
- Neural substrates of intermanual transfer of a newly acquired motor skill — Perez et al., 2007
- Effector dependent sequence learning in the serial RT task — Verwey and Clegg, 2005
- Neural pathways mediating cross education of motor function — Ruddy and Carson, 2013
- Transfer of piano practice in fast performance of skilled finger movements — Furuya, Nakamura and Nagata, 2013
Read this article online: https://tissimo.co/articles/hamelin-mirror-practice



Comments