Back
Back
Ableton Live for Music Production: A Beginner's Guide to Session View, Audio & MIDI Setup
Ableton Live began life as a tool built for DJs and live performers — musicians who needed to improvise on stage, not just arrange tracks in a quiet studio. That performance-first DNA still shapes how the software works today, even if you're producing entirely from home.
Ableton Live is software for creating and performing music, with effects, instruments, sounds, and creative tools built in — everything you need to make almost any kind of music in a fast, flexible workflow. Ableton Live 12 is the current version of this popular music production software. This illustrated tutorial walks you through the basics: what you need to get started, how Session View and Arrangement View differ, setting up your audio interface, connecting a MIDI controller, and recording your first MIDI instrument.
How To Get Started With Live
To use Ableton Live, keep in mind the following system requirements:
- A Windows or Mac computer with a version of Ableton Live installed (the newest version currently available is Ableton Live 12). The teacher uses the Suite edition, but you can also use the Intro edition and the Standard edition.
- Consider using a MIDI controller and sound card so you can get more out of the course.
- A 30-day trial version of Ableton Live 12 Suite is available to download on the official Ableton website.
What Are The Most Important Ableton Live Features?
Session View
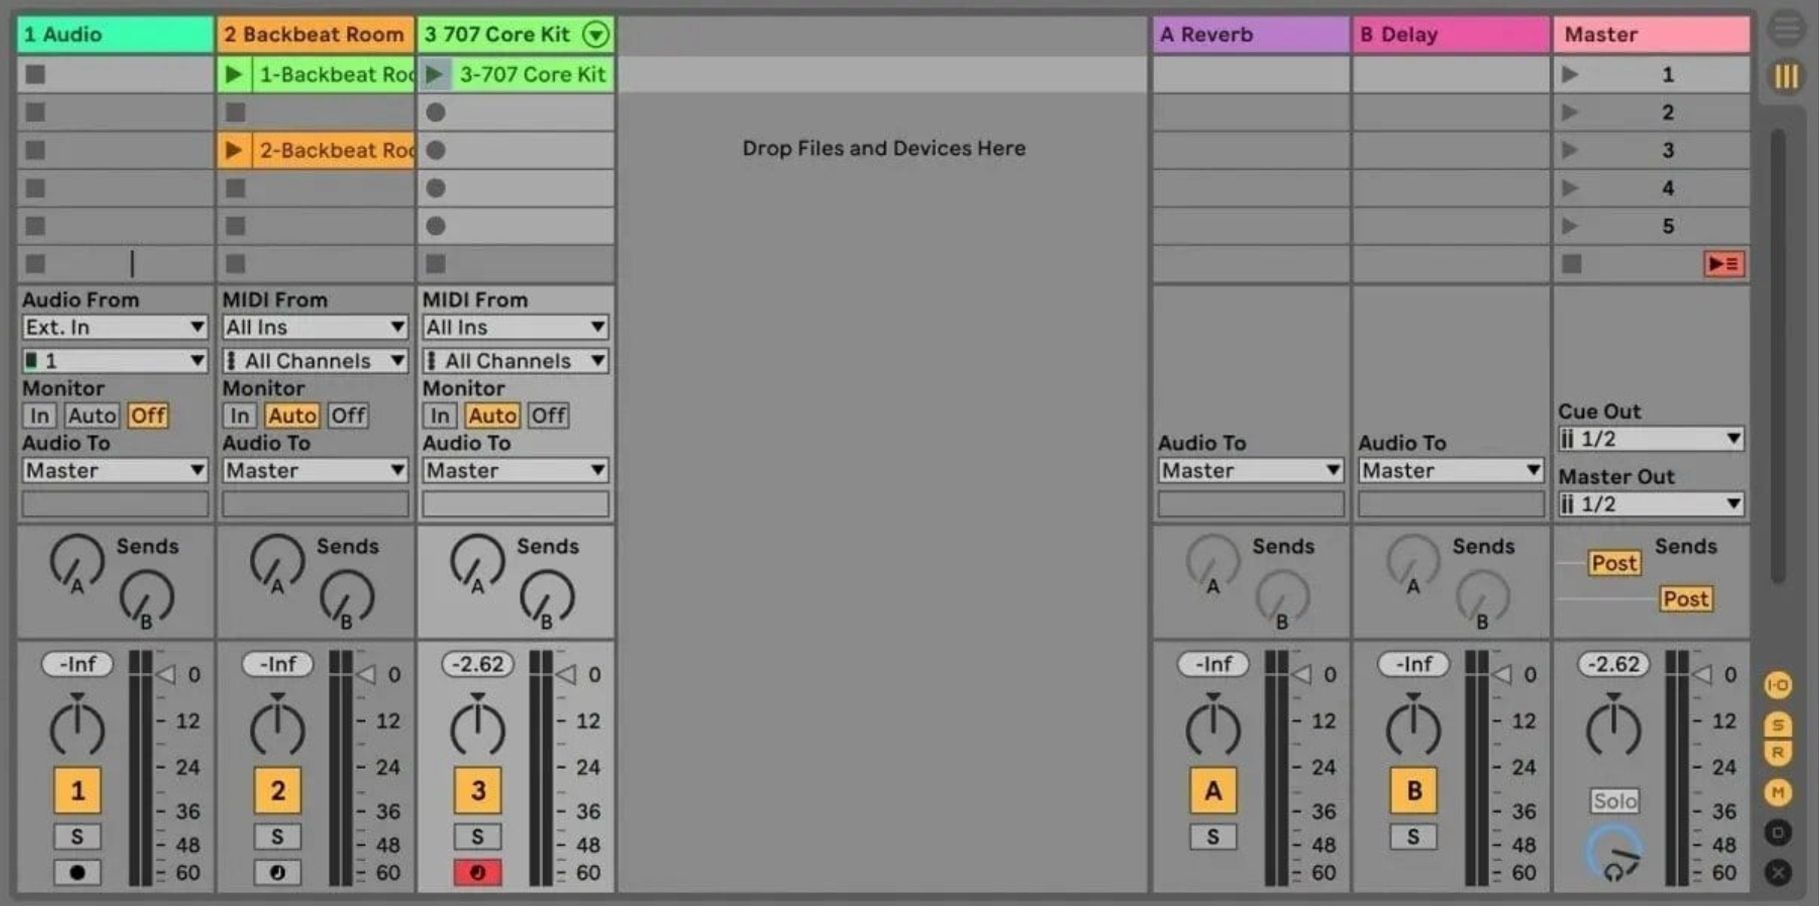
You can create traditional linear arrangements or improvise without timeline limitations in Live's Session View. It's possible to move freely between musical elements and play out your ideas without stopping the music or interrupting the flow. Ableton's Session View is a big plus compared with other DAW programs — it gives you the freedom to mix and match musical ideas without being constrained by timelines. It's a great place to start for a beginner's first project: just drag and drop your musical ideas, and they'll be absorbed at lightning speed, making it an ideal place for improvisation. You can create new sounds, use audio effects, and play around freely in this mode, triggering any combination of MIDI and audio loops of varying lengths without stopping the music.
Try it yourself: drop a drum loop into one clip slot and a bassline into another, then launch them together to hear how they sit. That instant, no-commitment combination is exactly the kind of improvisation Session View is built for.
Arrangement View

You'll find an Arrangement View as well, which allows you to get into details and look at your composition in a linear view. Other DAW applications use this feature too. The Arrangement View lets you organize your music along a timeline. It records multiple runs of audio or MIDI notes and performances in one take — simply click through, find the best parts of each, and stitch them together for the cohesive end result you want.
Develop your initial idea or organize the parts to create the right musical flow for your track. You can also improvise an audio track by recording what you do in Session View into your arrangement.
Ableton Tutorial: How To Set Up an Audio Interface in Ableton Live
When you have the right Ableton tutorial, it's easy to learn to use this interface. Start by setting up your audio settings — this lets you connect your primary audio interface, along with monitors, microphones, and other recording devices.
Just follow these steps:
Preferences > Audio, then select > Driver Type "CoreAudio" for Mac OR "ASIO" for Windows.
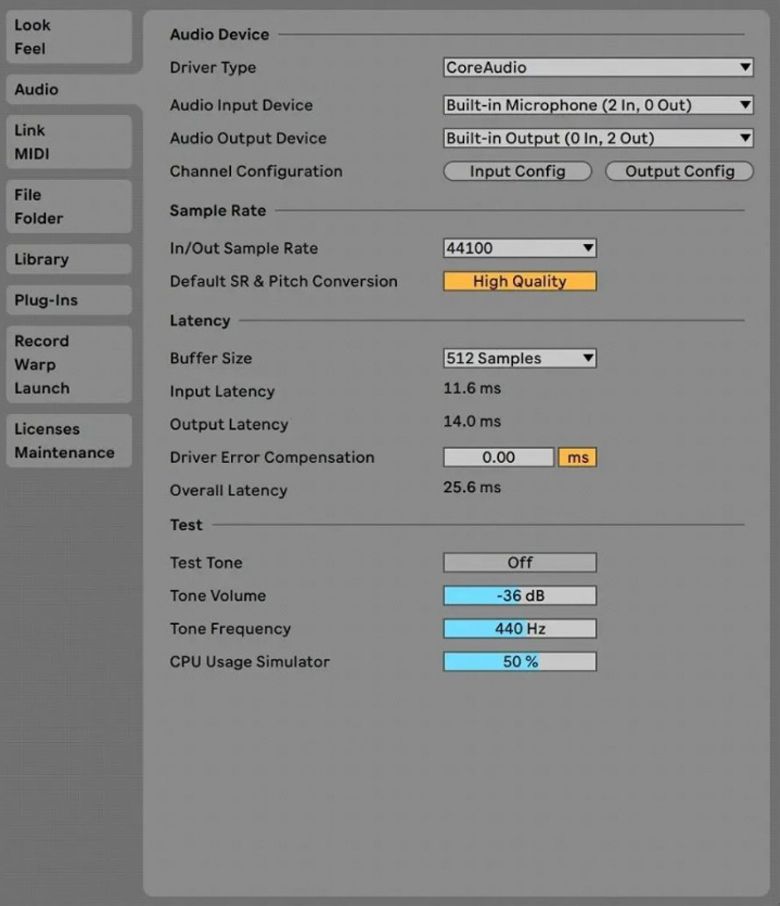
The next step is selecting your Input and Output Devices. In most cases, these are the same. Most interfaces do not require drivers to be downloaded, so you should automatically see your device listed. Otherwise, you can always check the company website to make sure no drivers are needed.
Making sure you configure "Latency" properly is an important step. It's especially crucial for DJs or in case of any live performance. You'll see a parameter called "Buffer size" which determines Ableton's responsiveness while processing audio. "Low latency" means faster responsiveness when you want to play or record MIDI, but it's more taxing on your CPU. "High latency" causes more lag but lower CPU usage, so it's recommended for the mixing stages when you're adding multiple plugins. When you perform live, it's advised to use a lower buffer size — for example, 128 or 256 samples — to minimize latency. For mixing with heavy plugin loads, a higher value such as 512 samples can help prevent audio dropouts.
Ableton Tutorial: How to Set Up a MIDI Interface in Ableton Live?
Open "Preferences" and choose the "Link MIDI" tab to set up your MIDI controller keyboards and pads. The majority of controllers will automatically get configured to Ableton when you plug them in, letting you select them from the dropdown menu called "Control Surface".
The next step is setting the inputs for your chosen controller. You'll probably find your device easily, but if you run into trouble, try these quick fixes:
- Unplug the controller, plug it back in, then reopen the Link/MIDI tab so Ableton rescans connected devices.
- Check the manufacturer's website for the latest drivers or firmware — outdated firmware is a common reason a controller won't show up.
- Confirm the device is enabled as both a "Track" and "Remote" input in the MIDI Ports list, not just listed under Control Surface.
- If nothing else works, check the MIDI preferences in your computer's own system settings to make sure the OS sees the device at all.
Ableton Tutorial: How To Play and Record a MIDI Instrument?
Start by enabling the record for the MIDI channel (find the circular button at the bottom of the screen). Make sure your MIDI devices are all set up already.
At this point, you should be able to hear the drum sounds when playing on your keyboard or pad. If you haven't set up any MIDI device, you can alternatively use your PC's keyboard as input for triggering the MIDI. To activate it, go to the top-right menu and select the Keyboard icon, or simply press the [M] key.

The record and play menu appears in two ways in Ableton: "Arrangement View" and "Session View". When you're in "Session View" and creating a Clip, you can record MIDI notes for your newly selected drum kit by selecting the "Session Record" button in the top center menu of the screen.

Hit the "Session Record" button when you want to record notes, so the notes you play will be recorded into a new clip. You can enable the metronome from the top-left menu for more accurate note-playing, or give yourself a count-in just like a performer.

Ready to Go Beyond the Basics?
This is just a starting point — there are plenty of in-depth Ableton Live resources out there, from YouTube tutorials to full online courses. When you're ready for feedback tailored to your own tracks, you can book a live 1-on-1 session with a real Ableton instructor on Tissimo. Browse available courses in the Tissimo Course Search to find a teacher who fits your style.