 Back

Beginning Violin Vibrato: Return to a Secure Stopped Pitch
Your teacher placed a finger on the A string, drew a slow bow, and the note seemed to shimmer. That shimmer was vibrato — a left-hand motion that causes the pitch to undulate around the stopped note. Before you try anything yourself, there are three things it is easy to mistake vibrato for, and one thing you will need to do every time: return accurately to where you started.
This article walks through each stage your teacher will guide you through. You will establish the stopped note, understand what vibrato actually is and is not, observe the teacher's demonstration with focused attention, attempt a brief motion, return to the reference pitch, and understand why the bow and the left hand are treated as separate concerns in these first sessions. At the end, there is guidance on what to notice and record after each attempt, which is more useful at this stage than trying to describe what the motion felt like.
Establish the stopped note
Before any vibrato motion begins, you need a note that is clear, steady, and in tune. That note is C♯5: second finger on the A string, resting firmly on the string at approximately 554 Hz. Place the finger, draw one full bow stroke from frog to tip at a soft dynamic, and let the note ring without any left-hand movement at all.

C♯5 — second finger on the A string, approximately 554 Hz. This is the reference note you will return to after every attempt.
The goal here is precise: one note, stopped cleanly, held without any shifting or squeezing. Your teacher will listen carefully to make sure the pitch is secure before asking you to do anything else. If the note wobbles when you try to hold it still — if the sound has an involuntary quiver when your intention is to stay completely still — the intonation is not yet stable enough to begin vibrato. That is not a failure; it is useful diagnostic information for your teacher, who may suggest some additional intonation work before returning to this lesson.
Why C♯5 specifically? It sits comfortably in the middle of first position on the A string, where second finger has two clear neighbors: the open string A4 below, and the fourth finger E5 above. That placement gives you two familiar reference points to locate and check the stopped position. The treble clef worksheet shows where C♯5 sits on the staff if you want to confirm the note name before the lesson.
Listen to the note after you lift the bow. Try to keep the pitch alive in your inner ear during the silence. That internal pitch — the memory of the sound — is the reference against which you will check every return. Training this listening habit is one of the most valuable things you can do at this stage of your playing, and it will serve every other intonation skill you develop.

Half note C♯5 with a hold marking. Place the finger, draw the bow stroke, and keep the hand still for the full value before continuing.
Your teacher may ask you to repeat this a few times: play the note, stop, listen to the silence, play again. The purpose is not to check whether you remember the note — of course you do — but to build the habit of comparing a played sound against a heard one. That comparison is what you will use to judge whether the pitch returned after the motion.

Hold the note for bar 1, then rest in bar 2. Try to keep the pitch alive in your inner ear through the rest bar.
Hear pitch versus loudness variation
Vibrato is a pitch phenomenon. The left hand causes the frequency of the string to rise and fall slightly around the stopped note. That rising and falling of frequency is what you hear as shimmer or warmth in the sound. What vibrato is not is a change in loudness — that belongs to the bow, not the left hand.
Understanding this distinction before your first attempt will help you recognize whether what you hear during the teacher's demonstration matches what you thought vibrato sounded like.

Pitch variation (left): frequency rises and falls around the reference — this is vibrato. Amplitude variation (right): frequency stays constant while loudness pulses — this is tremolo or bow-pressure variation, not vibrato.
Acousticians describe vibrato primarily as a cyclical variation in pitch; the UNSW Music Acoustics violin pages note that it also produces strong timbre changes as the spectral envelope varies strongly across each cycle. As the Wikipedia "Vibrato" article frames it, pitch variation is the defining property: the frequency oscillates cyclically around the reference, creating the characteristic sound. Loudness changes, while they can accompany vibrato in practice, follow from the bow rather than the left hand.
It also helps to name the three most common confusions clearly before your first attempt.

Three things that are not vibrato. A trill alternates between two notes. A slide ends on a different pitch. Tremolo or bow pressure pulsing changes loudness, not pitch.
A trill is a rapid alternation between C♯5 and another note — typically D5 (a half step above) or D♯5 (a whole step above). Two distinct pitches are being sounded in rapid succession. If you listen to a trill and to vibrato side by side, the trill is clearly two notes and the vibrato is clearly one. The hearing intervals worksheet can help you sharpen your ear for the half-step and whole-step distances involved, so you can hear the difference concretely rather than just describing it.
A slide, sometimes called portamento, moves the finger along the string from one stopping position to another. The destination pitch is genuinely different from the starting pitch — you have traveled to a new note. Slides are an expressive technique in their own right, but they are not vibrato. The distinction matters because some students unconsciously slide their finger slightly during early vibrato attempts, which changes the pitch of the note instead of simply oscillating around the original pitch.
Bow pressure or bow speed variation can create a throbbing or pulsing quality in the sound, but this is a loudness variation, not a pitch one. (On the violin, "tremolo" more often refers to rapid re-bowing — a different technique from the amplitude pulsing shown here.) The fundamental frequency stays constant; only the amplitude changes. The half notes worksheet introduces the idea of holding a note steady for its full value, which is directly relevant here: a sustained bow stroke at even pressure and speed is exactly what you want while learning to isolate left-hand motion. Anything that changes the bow's behavior will make it harder to hear what the left hand is doing.
Vibrato, by contrast, stays on one note. The pitch varies cyclically around C♯5 — the frequency oscillates in a periodic motion and always returns to the same reference point. The note name never changes. C♯5 before the motion is the same C♯5 after the motion.
Watch the teacher's left-hand model
Your teacher will demonstrate the motion before you attempt anything. When they do, watch the left hand, not the bow. Several things are worth noticing:
- The bow keeps moving steadily — the teacher's bow arm does not stop or change its speed during the vibrato. The bow is doing its job independently.
- The left-hand motion is visible but contained. The movement does not travel to a different string position. The finger stays on the string.
- The note sounds like a single pitch with a characteristic warm or expressive quality. It does not sound like two notes alternating, and it does not slide somewhere new.
- When the teacher stops the motion and holds still, the note settles back to C♯5 clearly.
That last observation is the most important one for your first attempts: after the motion, there is a still, stopped note, and it is C♯5. The motion has a beginning and an end.

The bow sustains throughout. A down-bow stroke from frog to tip on the A string is a good length for observing the teacher's demonstration while maintaining an even sound.
Your teacher is the right person to explain what the hand is doing and where the motion originates, because the physical details of vibrato teaching are student-specific. What your hand needs depends on your setup, your arm length, your finger shape, and the work you have done so far in lessons. The goal of watching the demonstration at this stage is to train your ear to the sound result, and to understand that the motion ends cleanly on the reference pitch. The physical how is your teacher's territory.
Ask your teacher to demonstrate stopping the motion as clearly as demonstrating the motion itself. The moment of return is a teachable moment: the sound settles, the shimmer stops, and the note is simply C♯5 again.
Try a brief comfortable motion
When your teacher invites you to try, the instruction will be specific to what they have observed and introduced. As a general principle, the first attempt is brief: one motion, then stop. Not a continuous vibrato, not a counted number of oscillations, not a timed exercise — just a sense of what the movement feels like, followed by a moment of intentional stillness.
Before you try, play C♯5 and confirm the pitch is clear and steady. Walking up the A string by step — A4, B4, C♯5 — and arriving on C♯5 as the target note is a useful preparation. Pause there and confirm the pitch before attempting any motion.

Approaching C♯5 by step. Play A4 and B4 as preparation, land on C♯5, and hold it steady — confirm the pitch before attempting any motion.
After the brief motion, stop deliberately. Let your hand return to stillness on the string. The finger remains in place on the same spot. The bow may continue to sound the note, or you draw a new bow stroke from the frog. The question your teacher will ask, in one form or another: is the pitch still C♯5?
It is normal for the first motion to feel awkward. You are asking your hand to do something it has never done before in a controlled way. The finger's relationship to the string is familiar, but the motion itself is new. Many students expect the motion to feel smooth immediately, and are surprised when it does not. That surprise is useful: it tells you the nervous system is genuinely doing something new, not just repeating a familiar movement.
A simple practice rhythm can help keep the early attempts from turning into an endurance exercise. Play a quarter note C♯5, then a half note C♯5, then rest. The rest gives you a moment to check the pitch, breathe, and reset before the next attempt.

Quarter — half — rest. Play the short note, hold the long note, use the rest to check and breathe before the next attempt.
If the motion felt tense or forced, say so to your teacher immediately. That feedback helps them adjust what they are asking you to do. Vibrato that starts from a position of tension in the hand, wrist, or arm will not become comfortable with repetition. The goal at this stage is not to produce vibrato that sounds polished — it is to find a motion that is genuinely comfortable, however small or brief it is, from which a fuller technique can grow.
Return to the reference
The most important habit to establish in these first attempts is not oscillation speed or the distance the pitch travels — it is return. After any motion, the finger settles on the string at exactly the same pitch as before. C♯5 sounds the same after the motion as it did before.
This sounds obvious, but it is easy to miss. During the motion, the finger naturally shifts its contact with the string slightly. When the motion stops, the finger needs to find its original position again — not a new position that is close to the original, but the actual original stopping point. Your teacher will confirm the return by listening, but you can also train this check yourself.

Before and after: both bars read C♯5. The pitch of the note does not change when vibrato is introduced — only its quality of sound changes.
A useful self-check: play C♯5 before any motion, draw the bow, then play C♯5 again after the motion has stopped. If both sound the same when compared to your inner-ear pitch, the return was accurate. If the second note sounds lower or higher than the first, the finger shifted during the motion and settled somewhere slightly different. Your teacher will help you identify which direction it drifted, and what to adjust.

C♯5 sits between two landmarks you already know: open A (A4) below, and fourth finger E5 above. Second finger is the reference position; the goal after any motion is to find that spot again.
The stop-and-check pattern below makes the return observable and traceable across several attempts:

Bow — check — return. Bar 1: sustain C♯5 with one bow stroke. Bar 2: rest, compare with inner-ear pitch. Bar 3: play C♯5 again, your teacher confirms the match.
The octave below (C♯4) is a useful comparative reference if you have access to a piano or a tuner. C♯4 and C♯5 share the same pitch class — same note name, different octave. Hearing the lower note first and then playing the upper one can help anchor the pitch in your ear before the attempt, and give you a clearer target to return to afterward.

C♯5 (upper) and C♯4 (lower): the same pitch class, one octave apart. Hearing the lower version can help locate C♯5 in pitch space.
Developing the habit of return now will serve you well as the vibrato develops into a continuous motion. Many players who skip this step find, later on, that their pitch drifts slightly flat or sharp during long vibrated notes — a sign that the baseline stopped pitch was not clearly established at the start. Beginning with a clear reference and a clear return builds the right foundation.
Keep the bow and the left hand separate
In the early stages of vibrato, it can feel natural to adjust the bow when the left hand starts moving, as if both hands are suddenly doing something new at the same time. This is a natural coordination response, but it is not helpful here. Keep the two hands separate in their tasks.
The bow's job is to sustain the note clearly and evenly — the same contact point, the same speed, the same weight. The left hand's job is to make its motion and return. Neither hand should interfere with what the other is doing. If the bow flinches when the left hand moves, the sound changes in a way that makes it harder to hear the pitch result of the motion.
A soft dynamic helps with this separation. At a gentle volume, you can hear the pitch more precisely without a powerful bow stroke covering up small intonation variations.

A gentle bow stroke at p lets you hear the stopped pitch without a loud tone masking small inaccuracies. Keep bow contact even while the left hand experiments.
The principle from the half notes worksheet is directly relevant: hold the note for its full value, keeping the bow in even contact with the string throughout. Any change in bow speed or pressure during the attempt will create a loudness variation that can be confused with a pitch variation, making it harder to assess the left hand's accuracy.
A down-bow stroke from the frog to the tip at a slow tempo gives you approximately four beats of even sound — enough time to begin the motion, sustain it briefly, stop it, and still hear the return on the same bow. That is more than enough for an early attempt.
A common observation at this stage: the vibrato motion that looks controlled from the teacher's perspective may feel quite unfamiliar from the inside. The sensation of the finger moving on the string in a new way does not feel smooth immediately. Your proprioceptive sense — the felt position of the hand — is adjusting to a pattern of motion it has not used before. That adjustment takes repetition, and the repetition needs to be calm and accurate, not effortful and rushed. Let your teacher set the pace.

The A major triad on the A string: open A4, second finger C♯5, fourth finger E5. C♯5 sits between two familiar reference points, which makes it easier to confirm its pitch by ear.
The vibrato timeline shows how all three elements — bow, teacher-led motion zone, and return — fit together across four beats:

Four-beat map of an early vibrato attempt. The bow sustains throughout. Teacher-led motion occupies beats 2 and 3. At beat 4, motion stops and pitch returns to the reference. The student then confirms the landing.
Beat 1 is the reference: the bow sounds C♯5 cleanly and the left hand is still. Beats 2 and 3 are the motion zone: the teacher introduces the movement, and the pitch undulates. Beat 4 is the return: the motion stops, the finger settles, and the pitch is again C♯5. That sequence — establish, move, return — is the structure of every early vibrato attempt.
Log pitch return and ease, not speed
After your first attempts, the most useful information to capture is not how many oscillations the motion contained, how wide the pitch range was, or how long the vibrato lasted. Those properties belong to a later stage of development. What matters now is: did the starting pitch feel secure, did you return to the same note, and how did the motion feel — comfortable or tense?
Your teacher makes the assessment of pitch accuracy. You report what you felt. Both pieces of information are useful, and together they give a much better picture of what happened than either piece alone.
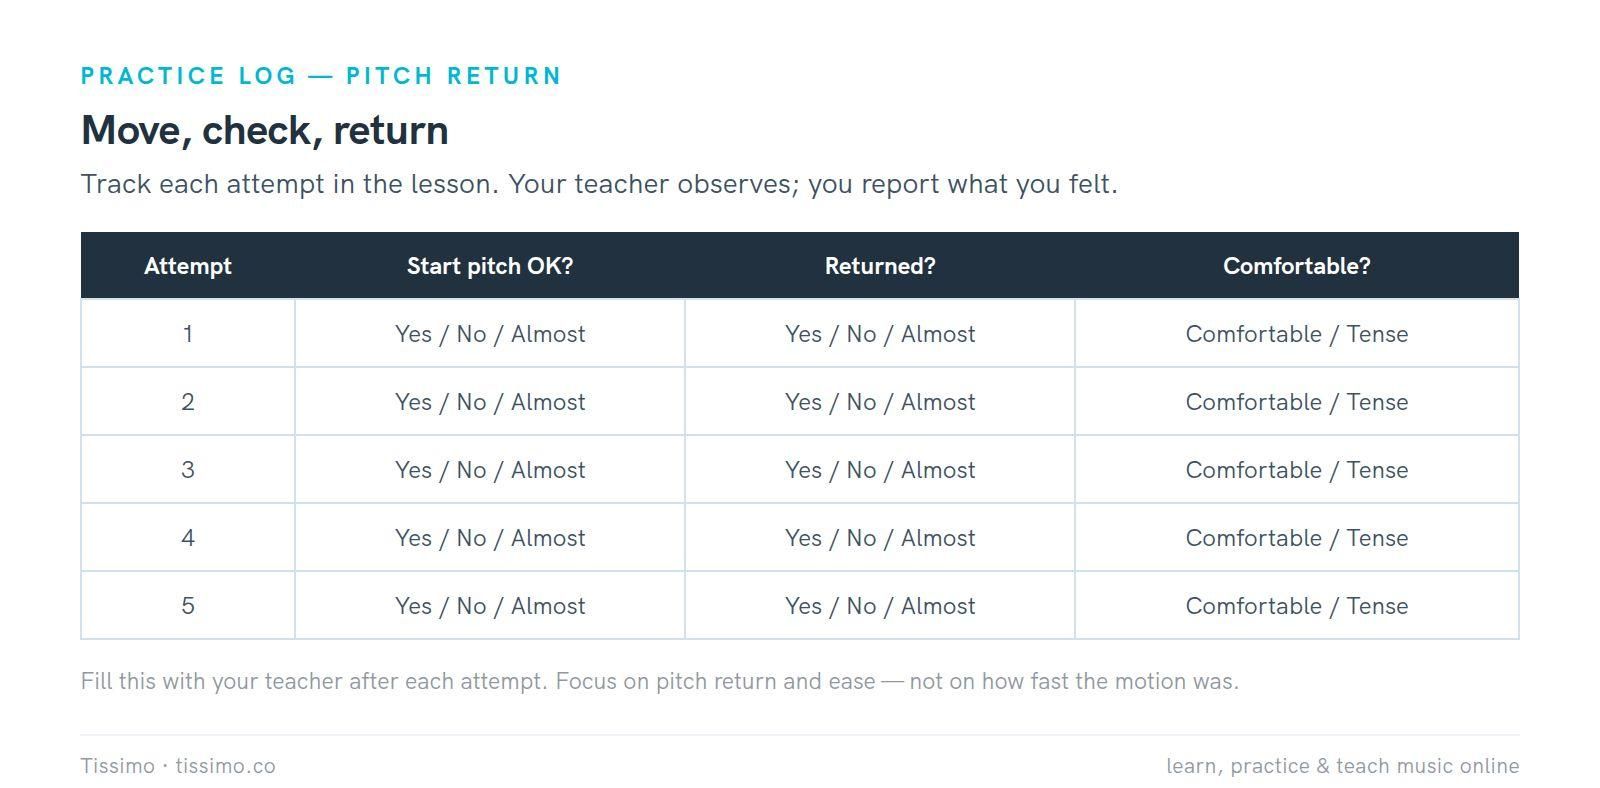
A simple log for early vibrato attempts. Track what your teacher observes, not how fast the motion was.
The readiness checklist your teacher uses before introducing vibrato includes several things you may already have covered in earlier lessons: secure intonation on C♯5, stable bow contact on the A string, a relaxed left hand during long held notes, and a listening habit that allows you to compare a played pitch against your inner ear. Vibrato is added to that foundation, not substituted for it. If any part of the foundation is missing, building vibrato on top of it will not fix the gap — it will make it harder to hear.

The five readiness signs your teacher checks before introducing vibrato. All five need to be in place.
One thing worth noting separately from pitch accuracy: whether you can tell by ear whether the return was accurate. That listening self-check — the ability to compare your played note against an inner-ear reference in real time — is the same skill that supports all intonation work on the violin. The hearing intervals worksheet trains this by asking you to identify pitch relationships by ear, which builds exactly the kind of fine-pitch discrimination that vibrato checking requires.
The trill-vs-vibrato comparison gives you a final hearing checkpoint to carry into every attempt:

Final distinction: a trill mark (bar 1) indicates two alternating notes — a different pitch is sounded. Vibrato (bar 2) stays on one note whose pitch oscillates and returns.
If during an attempt you hear two distinct notes, the motion traveled too far and crossed into trill territory. If you hear a pulsing loudness but no pitch change, the motion is coming from the bow rather than the left hand. If you hear a pitch that lands somewhere other than C♯5 after the motion stops, the finger shifted position. Your teacher can pinpoint which of these is happening from the outside. Your job is to report what you heard and felt.
After a number of attempts, you will start to feel when the return is accurate without needing to stop and check every time. That proprioceptive certainty develops gradually, and it is different from person to person. There is no fixed timeline for it. A Tissimo violin teacher can listen carefully to your return after each attempt in a live lesson, confirm the accuracy, and guide the adjustment when it is needed. You can find available teachers and book a lesson whenever you and your current teacher feel ready to explore the next stage.
Free worksheets for this lesson
- One Note, Moving Pitch — The Handout 474 teacher reference: C♯5 timeline, pitch-vs-amplitude traces and audio examples.
- Move, Then Find the Reference — Exercise 178: identify frequency vs. amplitude traces, four audio listening items, and a teacher-observed rubric.
Sources
Read this article online: https://tissimo.co/articles/violin-vibrato-steady-note-return



Comments